
Fiat 2000 Italian Heavy Tank
Vargas Models, a prolific maker of extraordinary resin, 3-D printed, limited-run armor models is back with another unusual subject; the Fiat 2000 Carro Armata or ‘heavy tank’. The Fiat 2000 was Italy’s first tank ever developed, with the first prototype displayed in mid-1917, and the final production prototype unveiled the following year.
The FIAT 2000 was a substantial vehicle, of comparable dimensions to the British Mark V tanks, and weighing 40 tons as compared to the Mark V's 28 tons, making it ‘technically’ the heaviest tank of World War I, although it never saw combat.
The layout of the FIAT 2000 differed to the other tanks then in use; the engine was separated from the crew - not placed behind the crew compartment as modern tanks, but below it. The mechanical layout was also interesting and innovative, comprising a FIAT Aviazione A12, water-cooled 240 hp (180 kW) engine with 6 cylinders driving the tracks through a transverse transmission. The fuel capacity was 600 - 1,000 liters, but this gave only 75 km range on paved roads.
The tracks were longer than the hull, but were lower in comparison to the wrap-around type found on the British 'rhomboidal' tanks and thus lower in weight.
The armor was of clean design, being made of riveted steel plates. It was 15 mm thick on the sides and 20 mm on the front.
Armament originally consisted of the turret mounted gun and ten machine guns (three on each side and four in front), but this left the rear of the tank undefended and tended to contaminate the interior with propellant fumes, so it was decided to install a ventilator in the roof and alter the machine gun positions to two on each side, three at the rear, and two in front.
Perhaps the most interesting feature of the tank's weaponry was the turret. Apart from the Renault FT, this was the first tank to have a rotating turret mounted above the hull. The turret was made of four pieces riveted together and had room enough for two crew members. Its weapon was a 65/17 howitzer. Thanks to the tall turret and the space available beneath it, the gun's elevation was -10/+75°.
A modest order for 50 tanks was never completed, the only tanks produced being two prototypes, both of which met their fate to time and circumstance. A project to build a 1:1 fully functional replica, however, was completed in April of 2020, and ‘should be making the rounds at tank demonstrations and armor shows in the near future’.
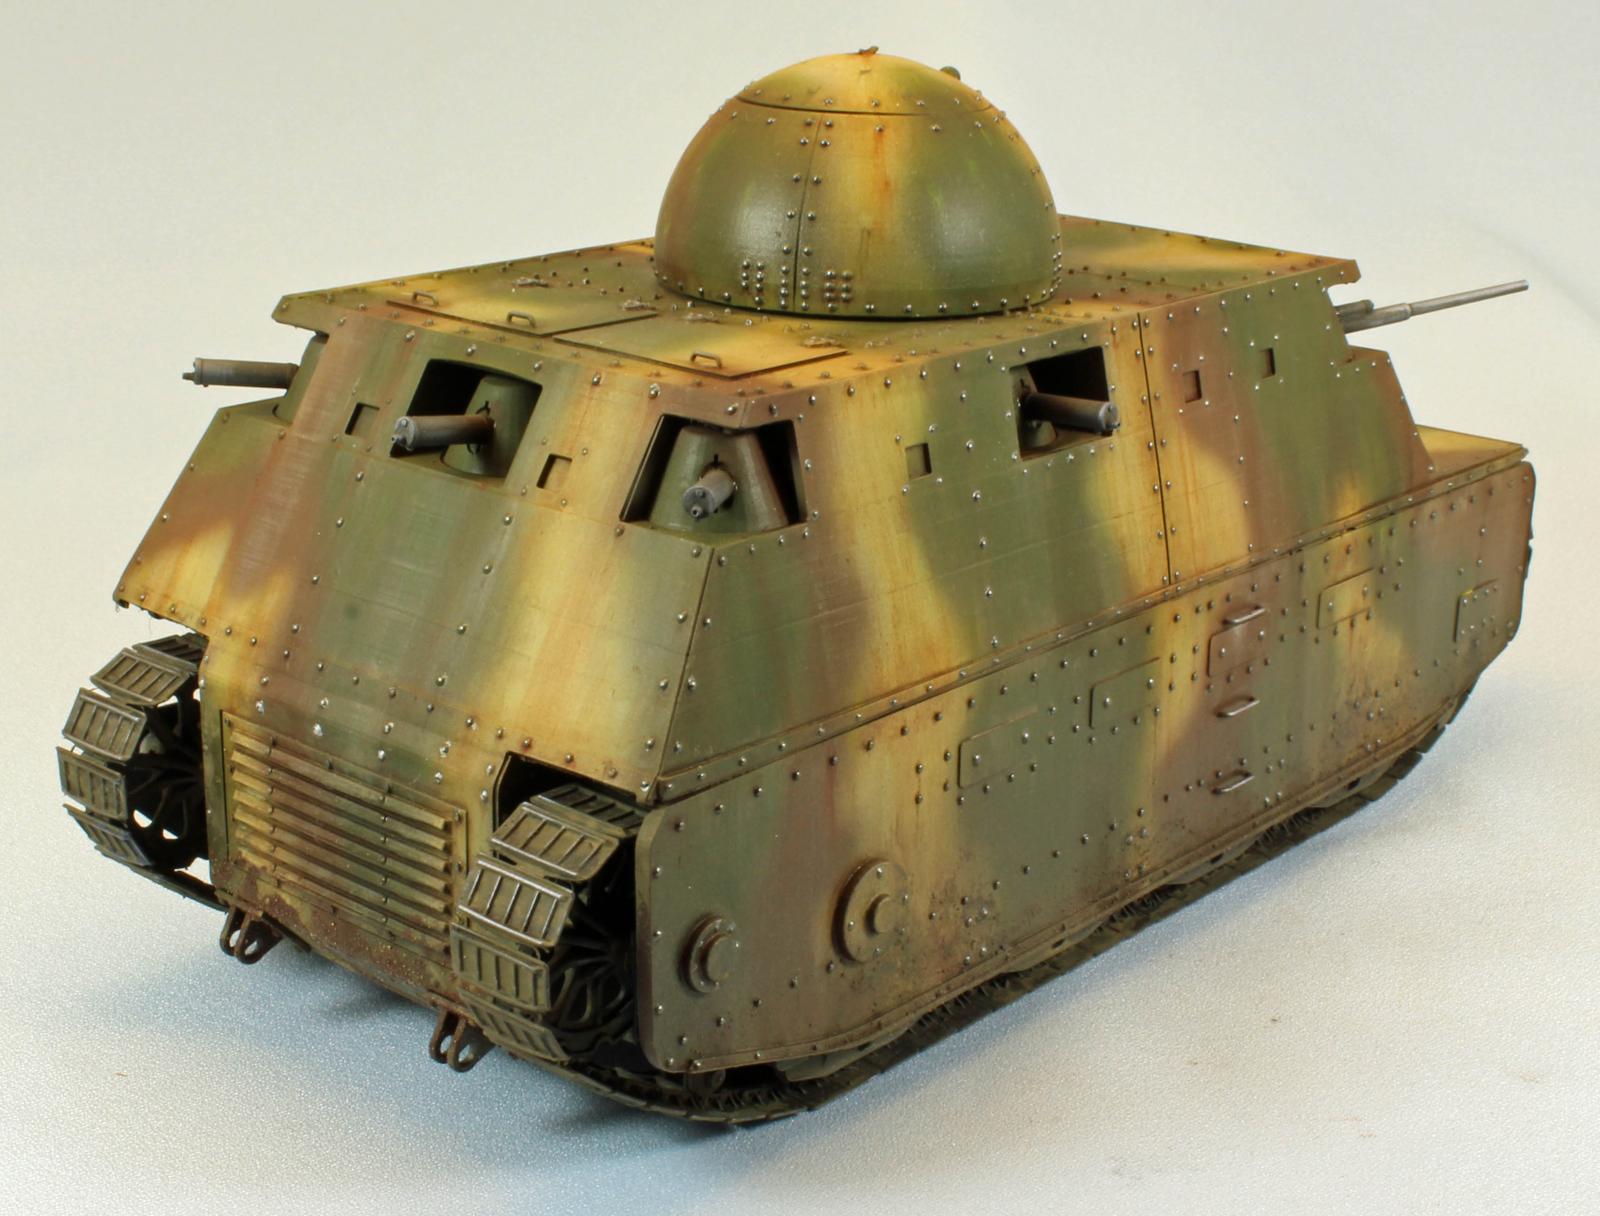
Physically larger than a Tiger I, as wide as a Panther, and taller than an M3 Grant, this enormous vehicle can be built in one of two versions offered by Vargas; the first sporting seven machine guns and a short-barreled howitzer in the turret. The second, representing a rework of the second 1918 prototype (finished in 1934), with two of the machine guns replaced with 37/40mm guns, both positioned forward. This second version s the subject of my review.
The Kit
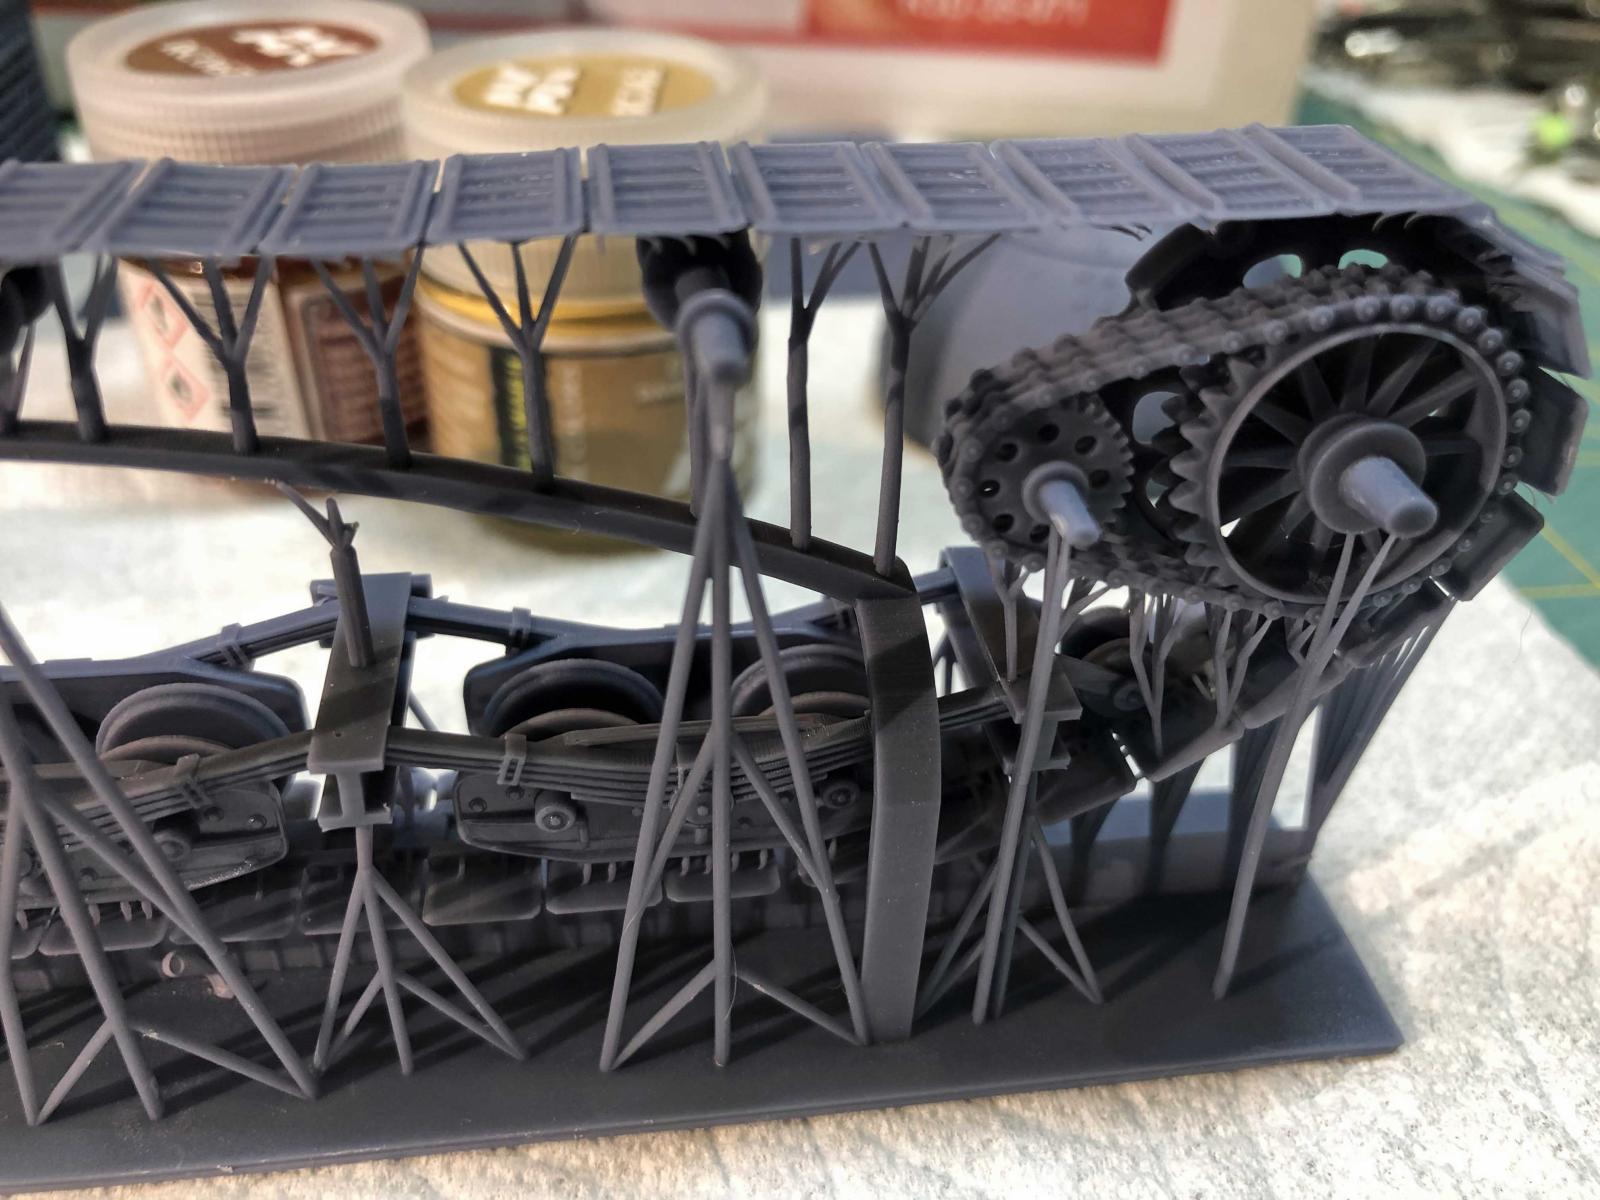
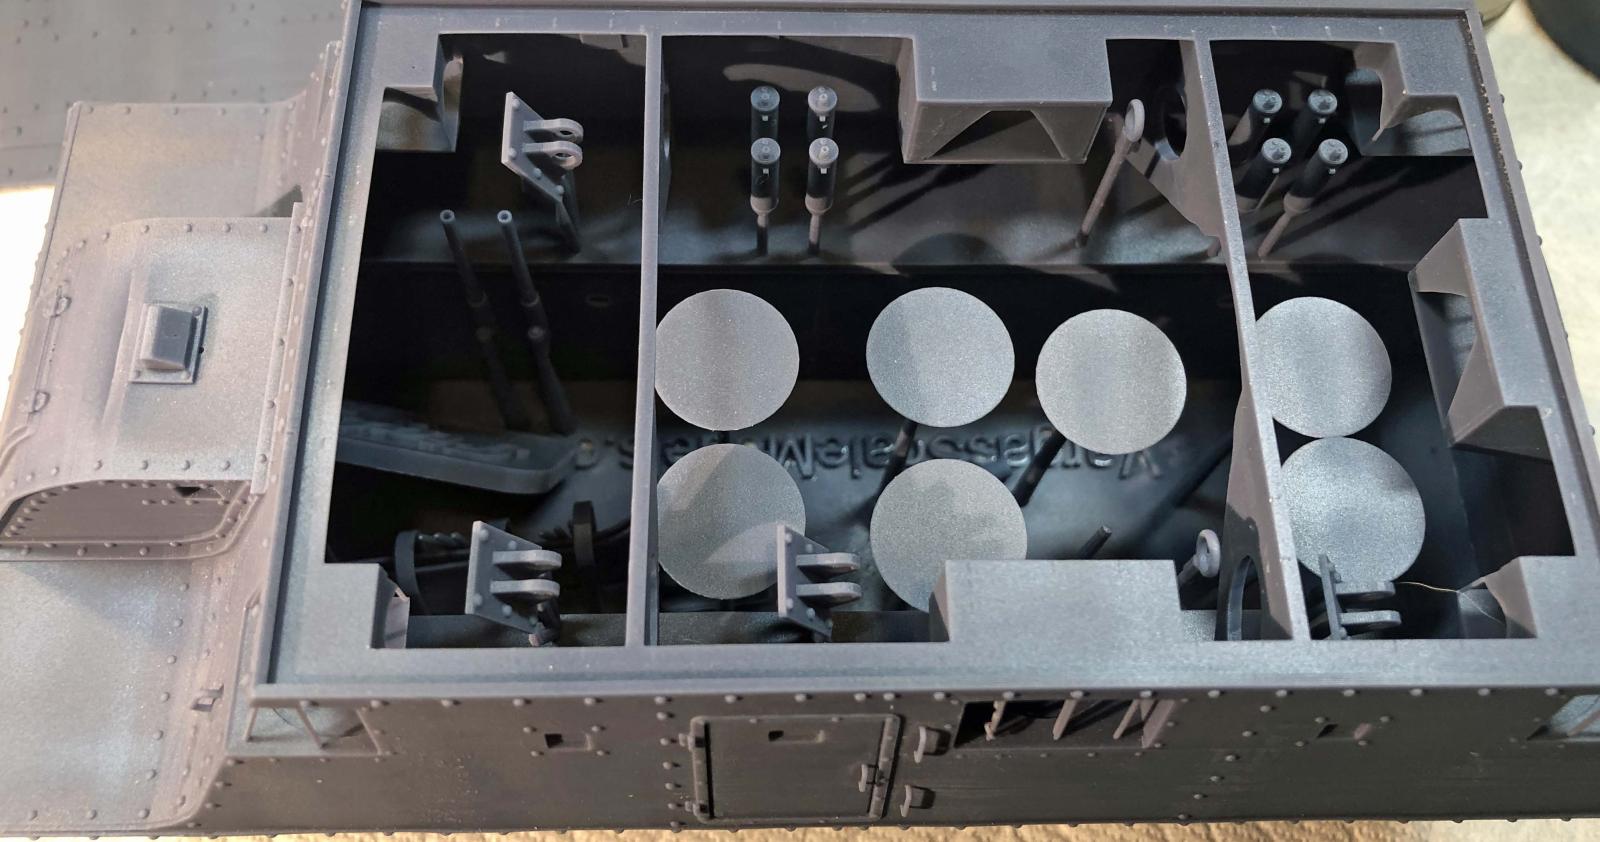
As with most 3-D printed kits, the sprues do not have any old-school poured-resin blocks to remove; instead containing dozens (hundreds?) of very thin connecting rods that are part of the printing process. This makes the parts very simple to remove from the sprues. The howitzer barrel, machine guns, name plate, and a few other parts are printed – inside – the single-piece main hull, and can be easily removed (a great use of empty space there!) There are very few actual parts, 17 in all, and these are exquisitely detailed – some of the best work I’ve seen in this medium. There is cleanup required, to be sure, but nothing like what I would normally expect for limited-run subjects.
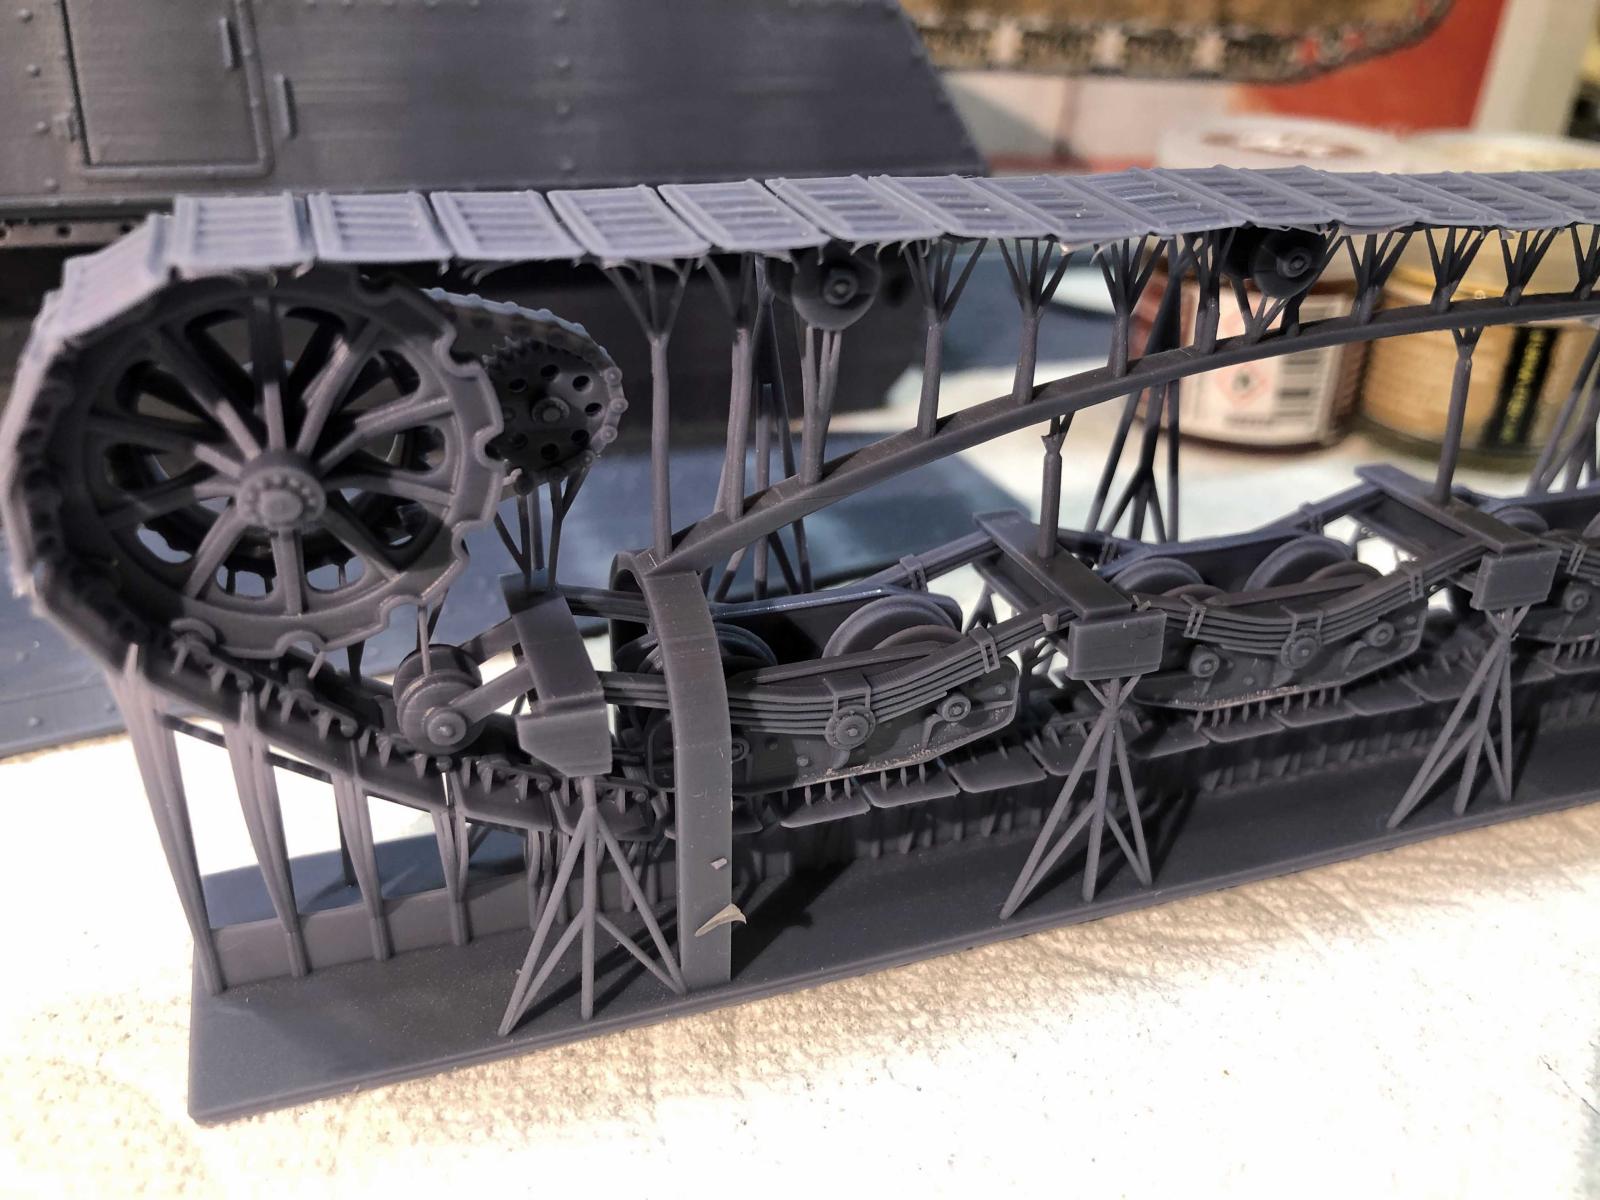
The dark-grey resin is firm, but sands easily enough, and there are some very slight surface striations on some of the round parts that require attention, making preparation more important than with typical styrene kits. Comparatively, however, this work from Vargas is pretty good as delivered. There are very few, if any, surface flaws and the molding is excellent with no noticeable defects. The detail overall is crisp, and while many of the parts are very delicate, Vargas pulls everything together without having to resort to using photo-etch or other finicky mediums, which is a big plus (for me at least). The two pieces that represent the full track runs, one for each side, are simply breathtaking – so much so that I decided to leave one side skirt off to display the detail represented in resin by Vargas.
The contents of the box include:
- Two track sections, packaged individually.
- One top plate for the main hull, packaged individually.
- One half-round turret, packaged individually.
- Two separate side skirts, packaged individually.
- The single main hull and superstructure, packaged individually.
- An 8-page, color instruction booklet, consisting of two full size sheets, folded in half, which includes a parts list. All text and label information is printed in English.
- There are no markings included in the kit.
The Instructions
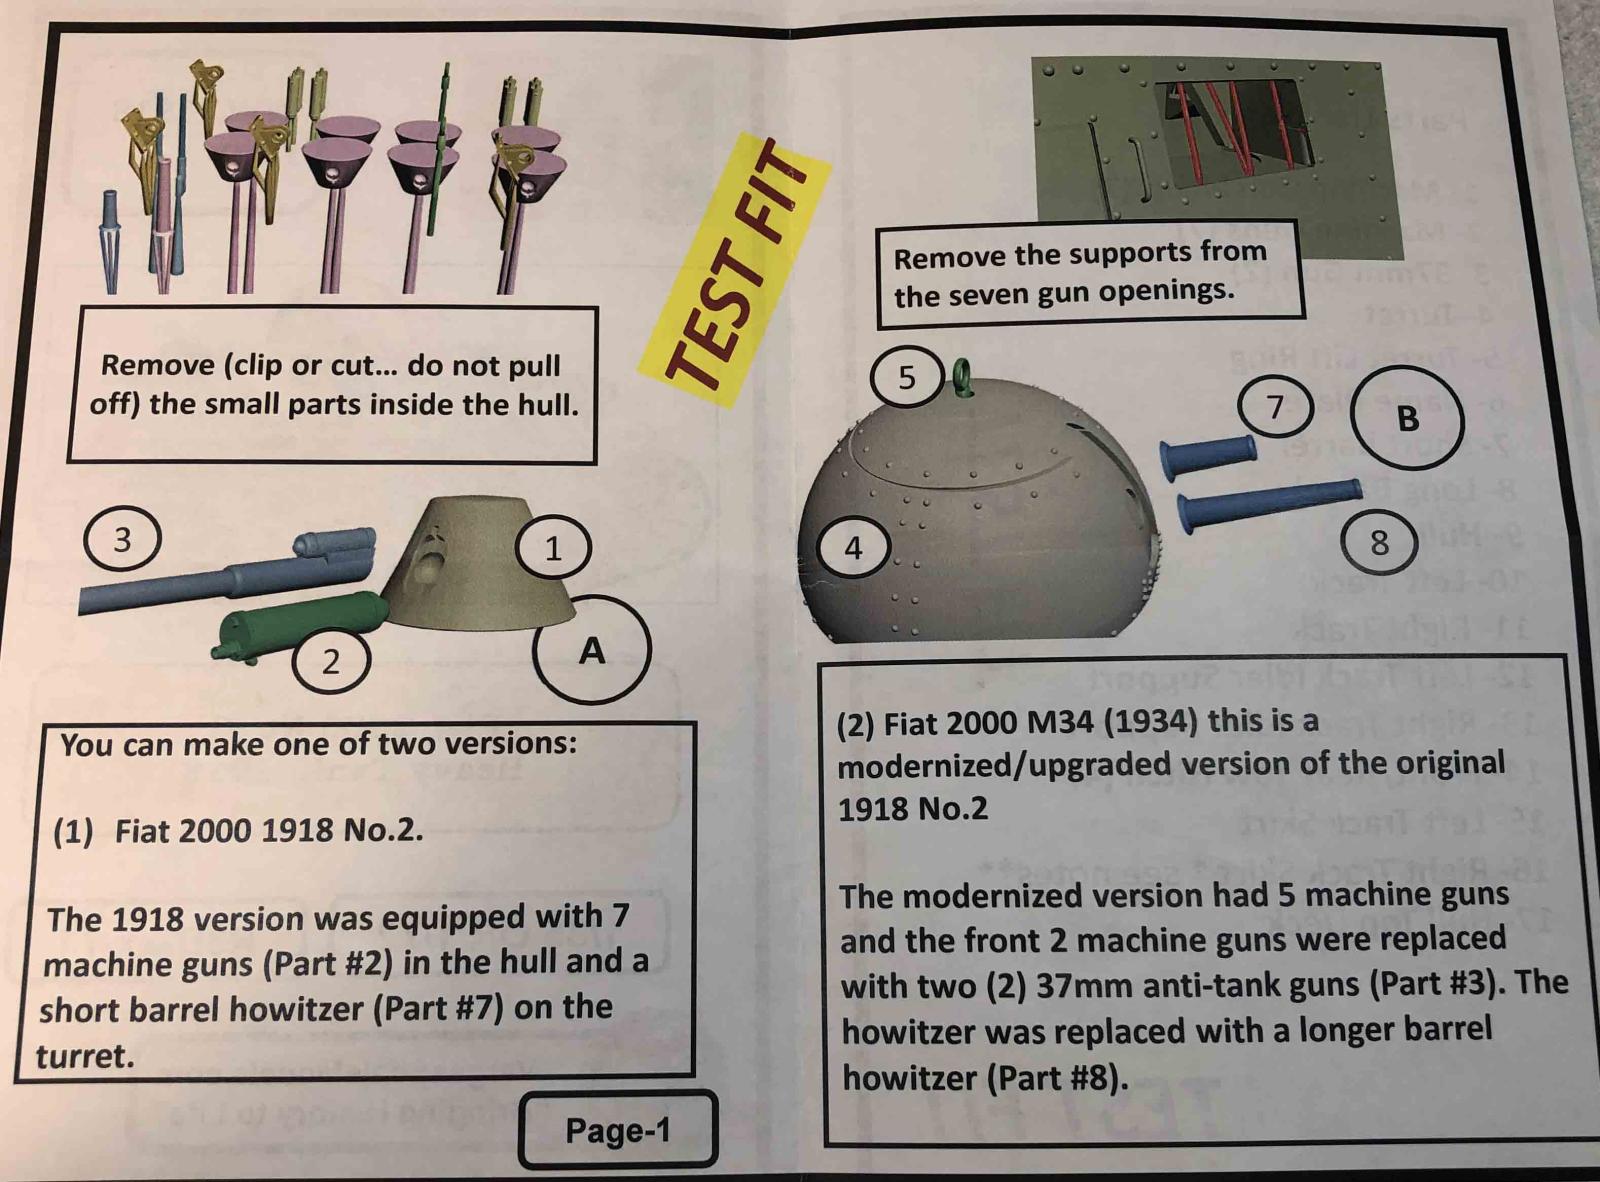
As with most limited run, resin kits, the instructions are brief and not always ‘enough’. Assembly requires test fitting and comparing what you have to drawings and images of the real thing, easily found on-line. In place of text, Vargas provides simple CAD images from the printing process itself for use as a rough go-by to start with. Fortunately, each piece is shown assembled and printed in a different color from the one adjoining it, which makes things a little easier to follow – but only a little. If you have built limited-run kits before, this one is typical – a lot of testing and adjusting surfaces to fit. Fortunately, the images are rendered from several angles so you are rarely forced to guess about how things go on ‘the other side’.
Clean Before You Start
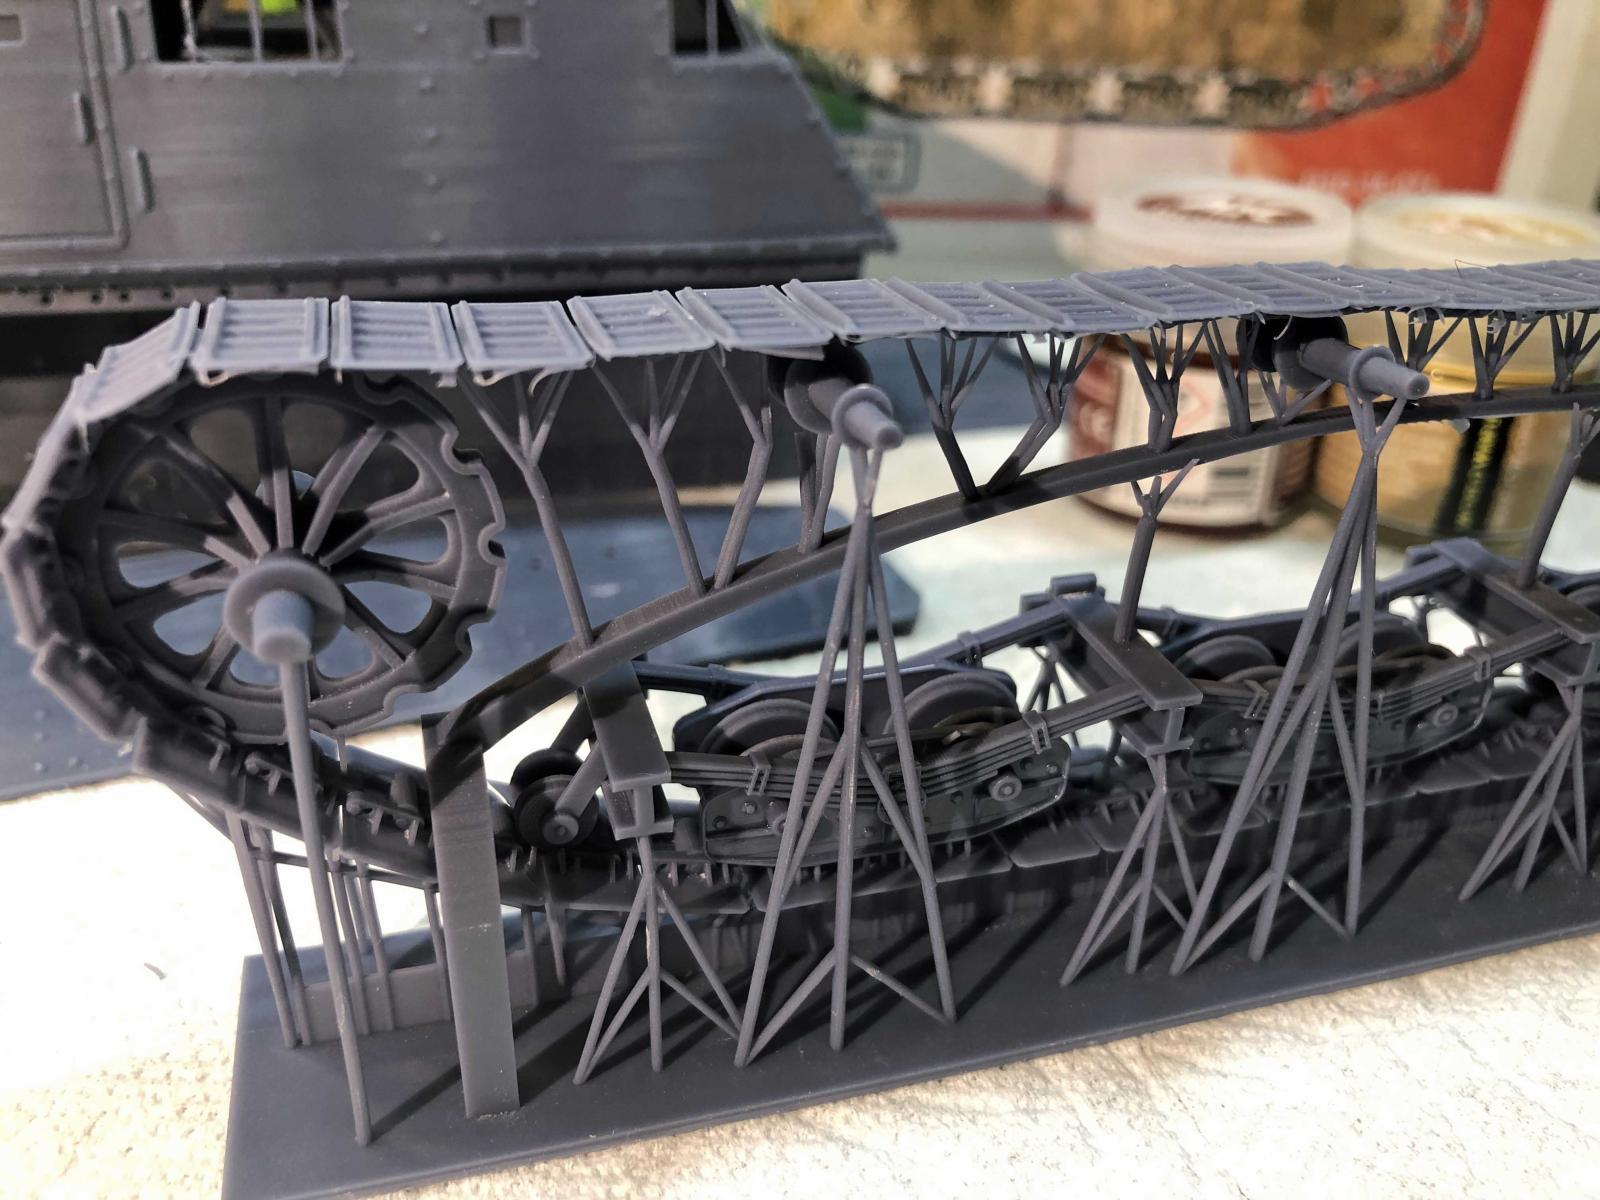
Even though there are relatively few parts in this kit, a 3-D printed model requires a good amount of preparation before assembly. After unwrapping all the parts, and carefully snipping (not pulling) the parts printed inside the main hull, I carefully shaved and sanded the surfaces of everything to remove any remaining vestiges of the thin resin posts that held the parts to the sprues. The track sections, however, were so fragile that I felt they would come apart during assembly and painting. I decided to leave intact some of the supporting structures until each track run was security attached to the main hull, after which I removed the remaining vestiges of the resin supports. This worked out very well.
Next, I went to work smoothing out some minor (but noticeable) grooves on the surfaces of the round parts. The resin is not soft, but it works away with a little effort, resulting in a smooth surface relatively quickly. Other areas that need attention are where flat surfaces mate together; on some parts the flat surface was actually slightly convex (rounded) from the production process, and need to be made perfectly flat to prevent gaps.
Once I thought I had everything pretty well cleaned up, I gave the parts a warm bath in soapy water, rinsing them in warm water. After drying I felt the surfaces with my fingers, and, if I found anything tacky, I repeated the wash, rinse and dry steps until all the tackiness was gone. With all the parts clean and free of defects, I was ready for assembly.
The Build
Assembly starts with a choice to make – whether you will build the 1918 version with seven machine guns, or the 1934 version with two of the forward-facing MGs swapped out with long-barreled 37mm guns. I wanted to show a little variety in armament so the later 1934 prototype appealed to me.
Discarding the three unneeded parts (including a shorter main armament barrel) that made up the differences between the two versions, and donning my particulate mask, I went to work with several round files, sanding and fitting, until I had a good seal around all the parts and the places where they go.
The seven conical MG turrets were a tight fit and pushed into place without glue. Vargas printed a very slight round circle to insure proper placement of the MG turrets - nice. I left the actual gun barrels off until the end of the build so that they, and the rest of the tank, could be finished separately.
The barrel of the main armament has a ‘seat’ printed in the main turret that causes the barrel to point upwards – not my preference – I like barrels to be pointed horizontally. Not wanting to remove the printed circular ‘seat’ and recreate it to lower the elevation of the barrel, however, I decided to use these parts as provided.
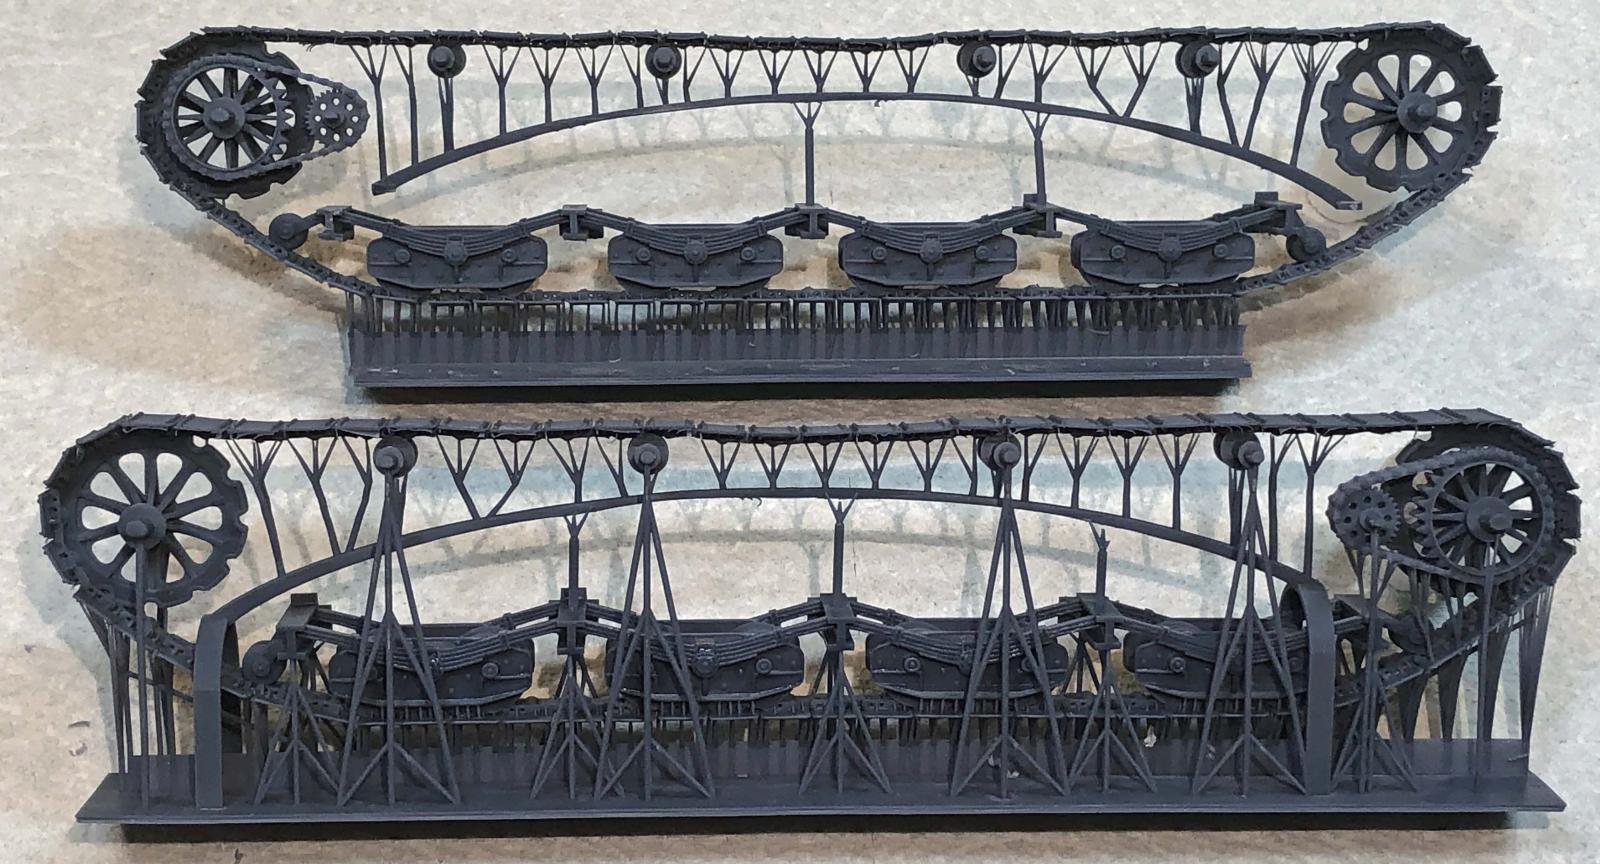
The two track sections, which are amazing pieces of work, have many, many resin supports to remove and clean up. I removed as many as I could without degrading the overall strength of the runs – I could remove the final supports once the track sections were in place on the sides of the hull. (See image of ‘before and after cleaning’). The side skirts will cover 90% of the track sections, so, per suggestion by Vargas, I installed the side skirt with the finely represented grab handles, leaving the other side skirt off so I could expose the exquisite track detail and bicycle-chain gearbox.
The top armor plate falls into place with a noticeable gap between it and the hull opening. I wasn’t sure if this gap was supposed to be there or not, so, choosing the easier path, I centered the top in place over the hole and called it a day.
And that was that – assembly complete, with the barrels set aside for attaching at the end. Vargas models are perfect for modelers like me, who enjoy the ‘finishing’ steps to those involving assembly!
Painting and Finish
There are a surprising number of images of the Fiat 2000 online, and more than a few color schemes to work with. I chose a three-color pattern to break up the menacing bulk of the vehicle, planning to apply a significant mount of weathering that might be present in combat.
Here is a breakdown of the colors and materials I used to finish the build:
- Painting: Main Hull and 1 side skirt
- Primer: Rattle-can Gunze Mahogany
- Post Shade (1) – Tamiya Primer (White) airbrushed carefully on upper surfaces.
- Post Shade (2) - Tamiya Dark Iron airbrushed carefully on lower surfaces.
- Main Camouflage - Tricolor, airbrushed freehand:
- Light Shade: 1:2 Mix of Tamiya XF-60 Dark Yellow and XF-2 Flat White
- Green Shade: Vallejo Model Air71.092 Medium Olive
- Brown Shade: 50/50 mix of AKI RC067 ROT and RC023 Olive Drab
- Painting: Track Sections and Guns
- Primer – Rattle can Flat Black
- Post Shade (1) AK Surface Primer Track Color
- Post Shade (2) Dark Iron
- Weathering (glossy surface)
- Mr. Hobby Mr. Weathering Color Enamels - Stain Brown – all surface detail, stumped with Mr. Hobby thinner.
- Vallejo Thick Mud colors, working light to dark, starting with 73.807 European Mud, and finishing with 73.808 Russian Mud.
- Dot Filter using various AKI Drybrushers
- Treated the track and lower chassis with AKI Earth Effects
- Weathering (flat surface)
- Overall filter using Old Holland Sepia Extra (tube) Oil paint.
- Dusting of Tamiya Dark Iron on lower areas and panel lines.
- Dusting of Vallejo Game Wash 73.200 Sepia on upper areas and panel lines.
- Overall bolt detail added using Tamiya X-10 Gun Metal
- Overall ‘bling’ added using Uschi Chrome Powder.
Overall application of dry pigments to areas that needed a little toning, using MIG Russian Earth to darken areas, and European Dust as a mid-level dirt-color dusting.
Conclusion
This is my second 3D printed model from Vargas and the build was a breeze. Luis Vargas did a solid job researching the subject, and the design and engineering that went into the kit is readily apparent. As I said with the last Vargas project – each one makes me want to build more.
As with any all-resin project, this kit has its challenges, especially when compared to injection-molded models. I think the build was straightforward enough, however, for any modeler to finish. Having a solid working knowledge of alternative adhesives (CA Glue, epoxy, and/or ‘fortified’ white glues) would certainly be a plus.
I would like to heartedly thank Luis Vargas at Vargas Scale Models for providing this kit for review, and to IPMS USA for giving me the opportunity to build it.


Reviewer Bio
Eric Christianson

Eric Christianson is a father to two boys (Reed and Dean), the President of the Seattle Chapter of IPMS, and a long-time Little League umpire. He is also a devoted husband and companion to a wonderful woman named Jackie who enthusiastically supports his passions. Recently retired as a programmer, his home office has been scratch-built into ‘a perfect model room’. Modeling since he was a boy, Eric mostly builds armor these days, but still dabbles in 1/32nd aircraft and other types of models from time to time. He also enjoys presenting seminars on weathering and technique at local shows. Many of Eric’s kit reviews can be found on the IPMS USA website.
Comments
Add new comment
This site is protected by reCAPTCHA and the Google Privacy Policy and Terms of Service apply.
Similar Reviews