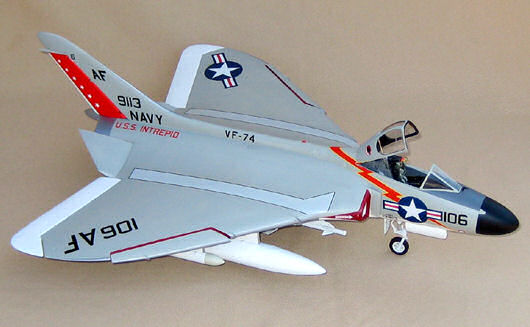
F4D-1 Skyray Part 2 – The Build
The first thing to realize when building a resin kit is you have to read and reread the instructions. Paul Fisher does an excellent job of not only writing the instructions but also adding tips, painting instructions, and any other needed information for the build.
First, the main wheel well bays needed to be cleaned and the openings trued up. The gear bays were then glued in place. The detail on the wheel wells is phenomenal. The engine face was also painted and glued in place. The exhaust was also painted and added at this point. Once done, the inside of one scoop was glued in place and the top and bottom were sealed. The best way I found to do this was to use thin super glue, letting it flow into the seam an inch or two at a time and immediately accelerating it. This took a little time but it made a difference in the need to fill later. All the seams need to be filled and then sanded and repeated until smooth. This takes a little time, as the leading edges and wing tips require multiple sessions. The beaver tail was added to the back and even with careful clamping, it took several iterations to get clean. The exhaust cone was left out until after final painting.
Next, the front cockpit and nose were finished. I added one ounce of weight to the front of the kit and glued it in place. The cockpit was very nice and painted up beautifully. There was no side wall detail, so I added some from strip and the spares box. The cockpit slid up and in and was a tight fit, but looks great. The deck behind it slid up and in and needed some finessing to get it to fit, but also looked great when installed.
Now for the fun. The nose and two intakes need to be added to the front. Trying multiple times, and even after consulting with some other modelers, we could not get the intakes to fit. In the end, I settled the two intakes tight to the nose and elected to reshape and fill the outside edges. To do this, I ended up coarse shaping with a Dremel tool, then working my way down to sanding sticks. Aves Apoxie Sculpt was then used for final shaping with multiple sessions of filling and sanding. In the end, it looked great. I then added the tail and smoothed that into place. The rudder was fitted and was over-sanded, so I built it back up.
Before painting, the two beaver tails had photo etch added to their insides. These also needed to be sanded and filled. The flaperons were fitted and sanded. The landing gear doors were cleaned and set aside. I added the miscellaneous pieces to the body, cleaned and sanded the tires and wheel hubs, and primed the entire kit with Alclad gray primer and sanded it smooth.
I added the landing gear next. There are multiple pieces, so take your time and align things. Once it was dry and set, I reinforced the joints with several coats of thin super glue. I did leave all the clear part off for painting.
There are lots of “things under wings”. The main tanks are very heavy as they are solid resin, and I pinned each with wire. All seven of the underwing pylons were also pinned. The round wing tanks and middle pod need a lot of work to get them round and true, but several coats of filler and sanding did the trick. I elected to pass on the Sidewinders but prepared their pylons.
At this point, all parts were sanded and all errors fixed. Don't underestimate this, as it was timely getting it prepped. After a final polished coat of Alclad gray primer, the parts were set aside to dry. I masked the canopy at this time. There are masks included for both the interior and exterior. I trimmed the well-made clear parts and dipped them in Alclad Aqua Gloss Clear, and after drying added all the masking.
I included a couple shots next to the excellent Tamiya 1/48th scale kit – this is one large chunk of resin. In the final part of the review, Ed Kinney will deal with painting and decaling the kit and adding the right amount of weathering.
I’d like to thank Fisher Model and Pattern for supplying this kit for review, and IPMS/USA for allowing me the opportunity to review it.


Comments
Add new comment
This site is protected by reCAPTCHA and the Google Privacy Policy and Terms of Service apply.
Similar Reviews