
F-4J Phantom II United States Marine Corp
Parts Breakdown
- 14 Parts 1 Crystal Clear Sprue
- 367 Parts 11 Light Grey Polystyrene Sprue
- 1 Decal 8 1/4” x 11 5/8” Decal Sheet
- 1 32 page Instruction booklet
- 1 Full size and color decal Layout page.
To further enhance my building experience I purchased three things from the Zoukei-Mura website.
- Zoukei-Mura Concept Note SWS No.IX Mc Donnell Douglas F-4J/S Phantom II. Building the Zoukei-Mura F-4J/S
- Zoukei-Mura Decal Sheet SWS48-04-D03 VMFA-235 “Death Angels”
- Zoukei-Mura F-4C/D/J/S Weighted wheel set
Model History
No fewer than six examples of the modern F-4 Phantom II have been released as 1/48 model kits in the last 50 years since the first flight of the F-110 on May 27th 1958. Later re-designated the F-4 Phantom II, this aircraft is one of the most well recognized of fighter jets in the modern world. With close to 5200 produced and flown by three US Services and eleven foreign armed services the Phantom has enjoyed a long and prosperous carrier in military aviation.
Revell, Monogram, ESCI, Hasegawa, Academy and now Zoukei-Mura have produced 1/48th scale kits of the F-4 in many variants. I personally have built every example of the F-4 model with the exception of the ESCI kit and find that all of them have their tweaks and benefits. You will find that the Zoukei-Mura Phantom is the finest model of the F-4 ever kitted but not without some limitations.
The Build
The first thing that I hope you notice when opening the box is that ZM has chosen to wrap every individual sprue frame in its own plastic bag. This is handy in that no part becomes detached and lost or damages other parts needlessly by scratching each another. This has been the standard for clear parts for years which are now doubly protected. Even the decals are like packaged with a barrier sheet on the important surface to eliminate shipping damage. Kudos Zoukei-Mura.
For instruction pamphlets this kit has a 32 page, 46 step building guild which includes a historical biography, color guild, parts list and directions as to who to contact if you have trouble with the kit i.e. missing/broken parts. Instructions are in both Japanese and English. One of the coolest things I like about this kit is that there is a color guild at the top of every assemble page to help you with finding the correct colors. No referring back to a separate color guild, just look up. Also, most all of the assemble steps have multiple views to help accurately align the parts.
Options abound in this kit. You can build your Phantom II with the canopy open or closed, refueling probe extended or re-tracked, speed brakes exposed or shut, tail hook up or down, slats and flaps extended or stored, stabilators normal or leaning forward angle, and front landing gear in launch extended location or normal mode. On page 30 of the instruction manual it shows how with the last of these options this aircraft can easily be built to resemble an F-4 in launch or recovery mode. Read the handbook carefully before starting your build to determine which derivative you wish to employ.
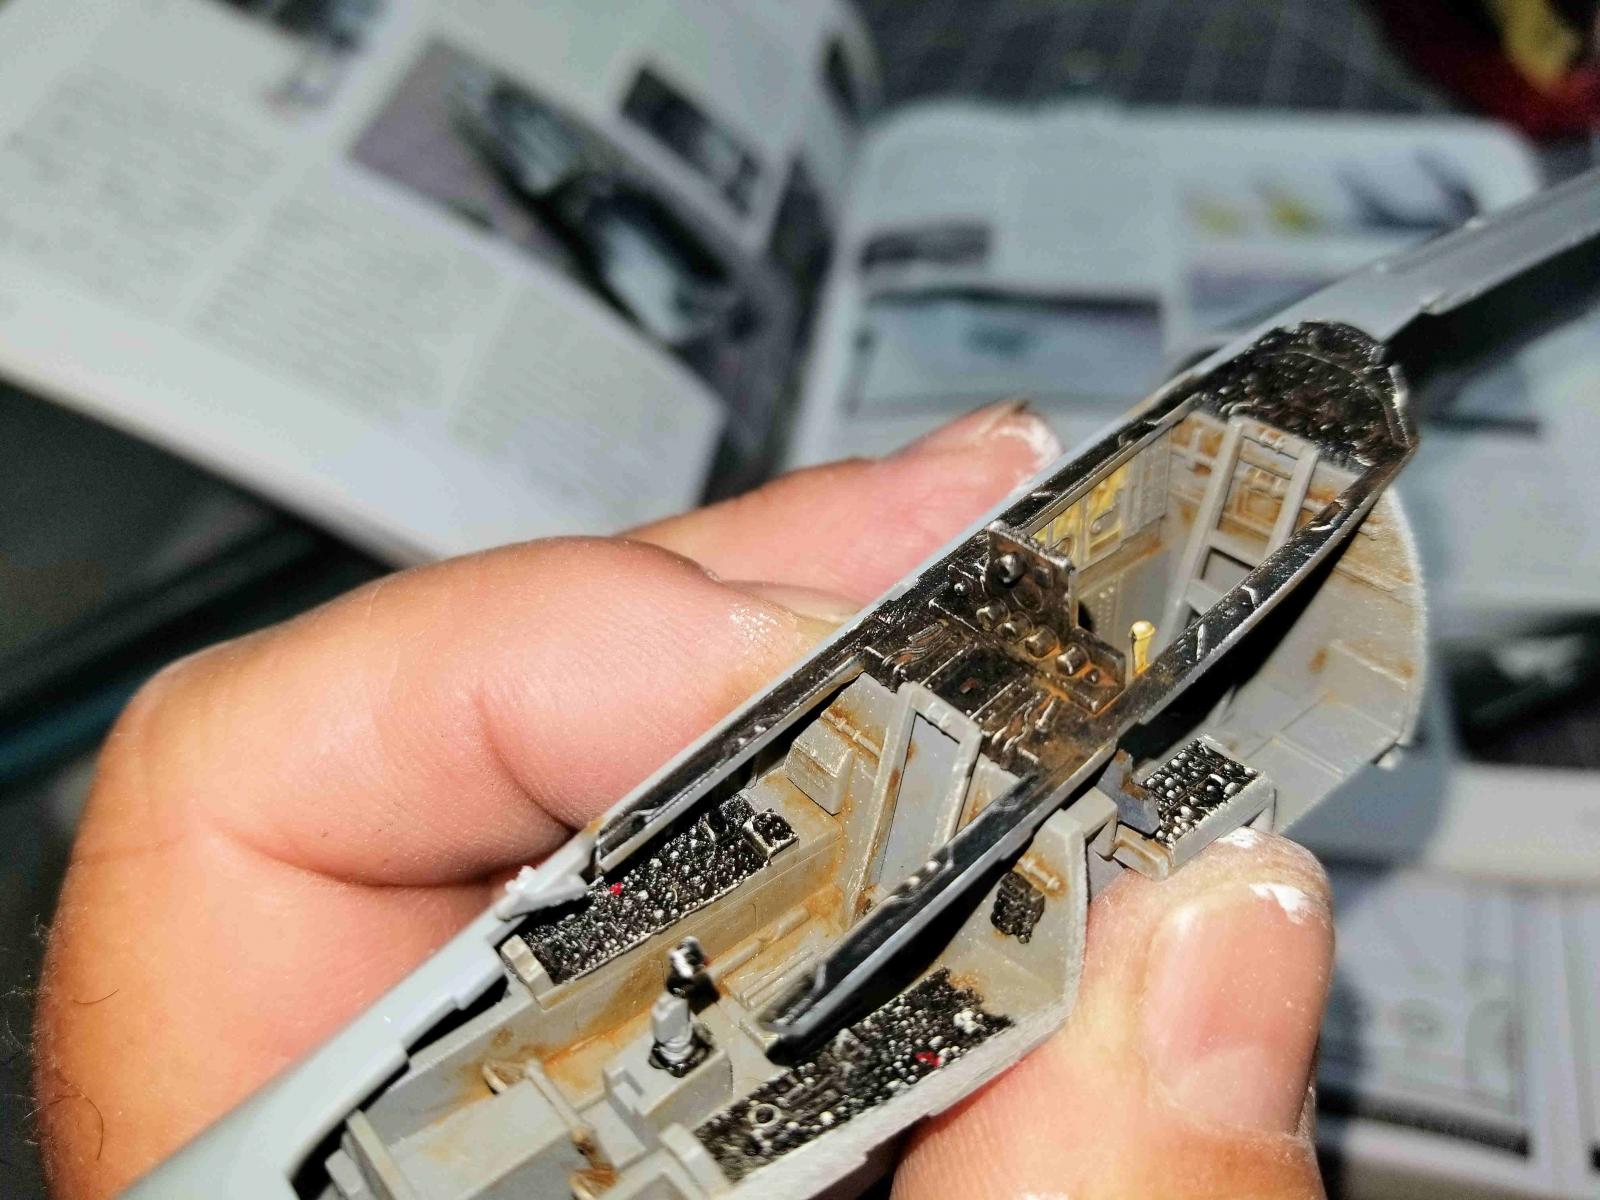
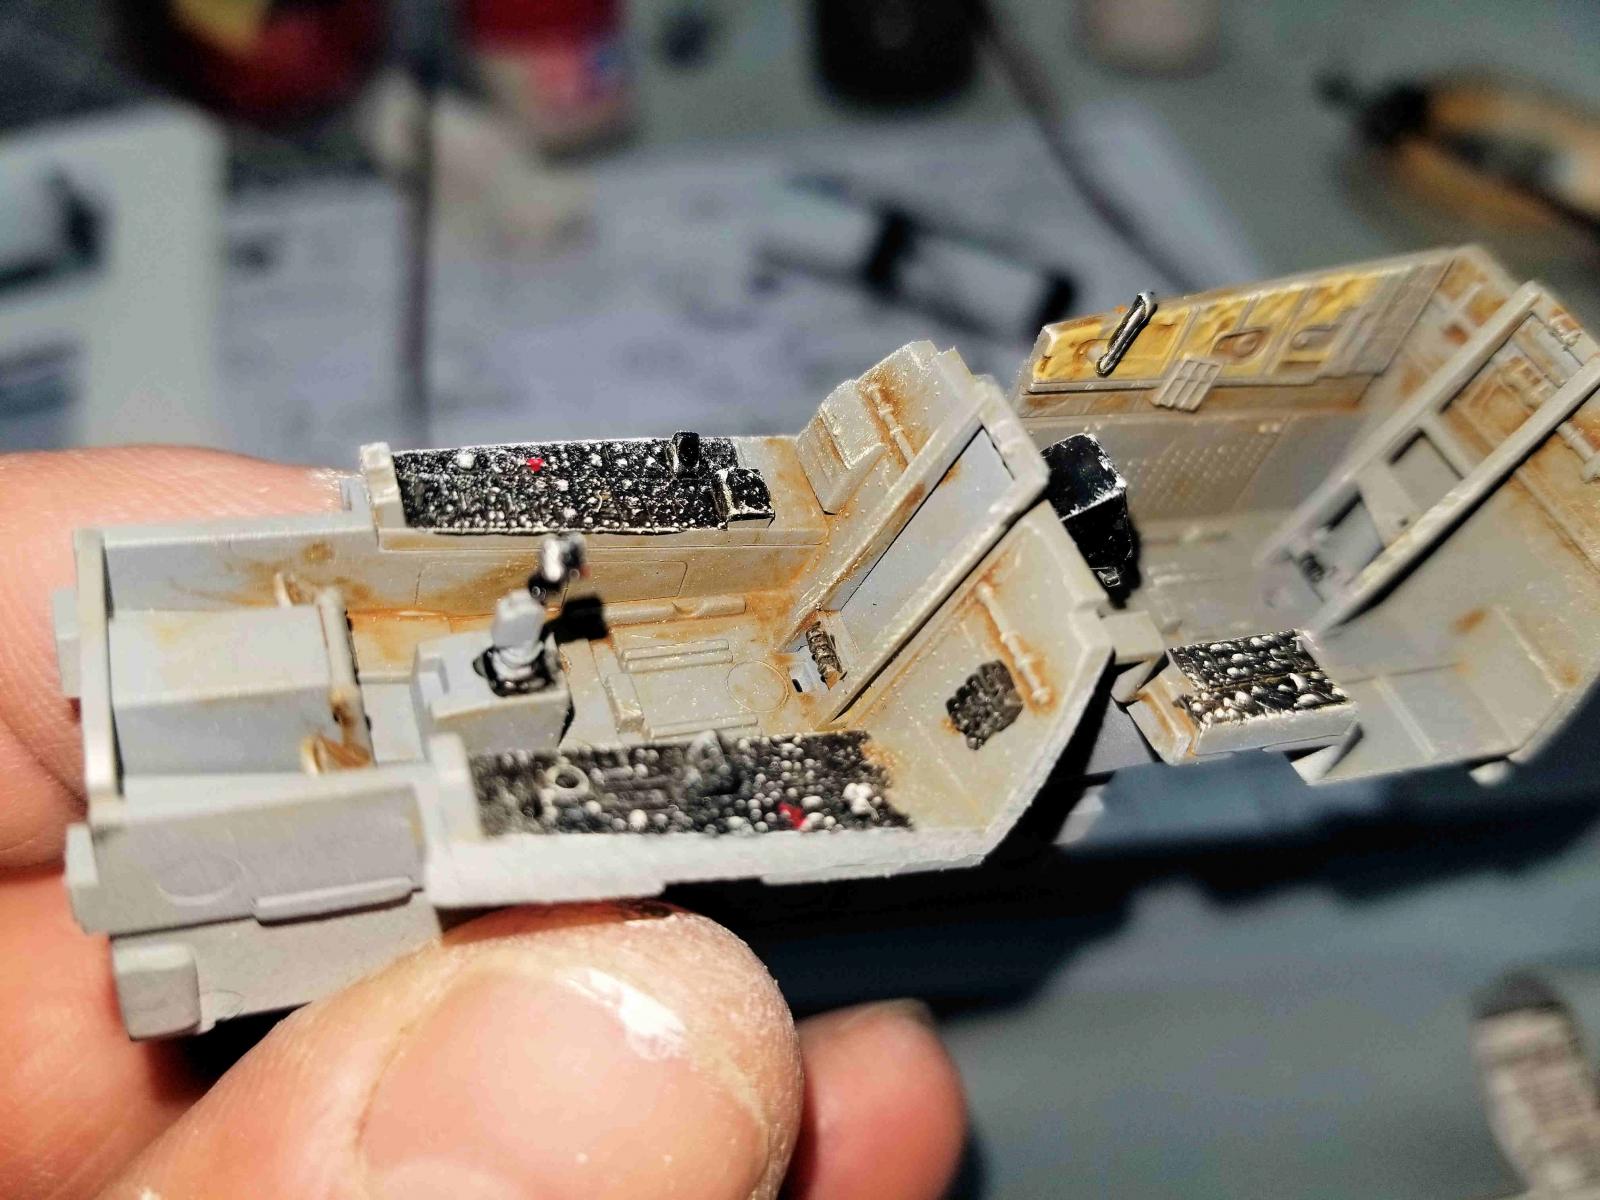
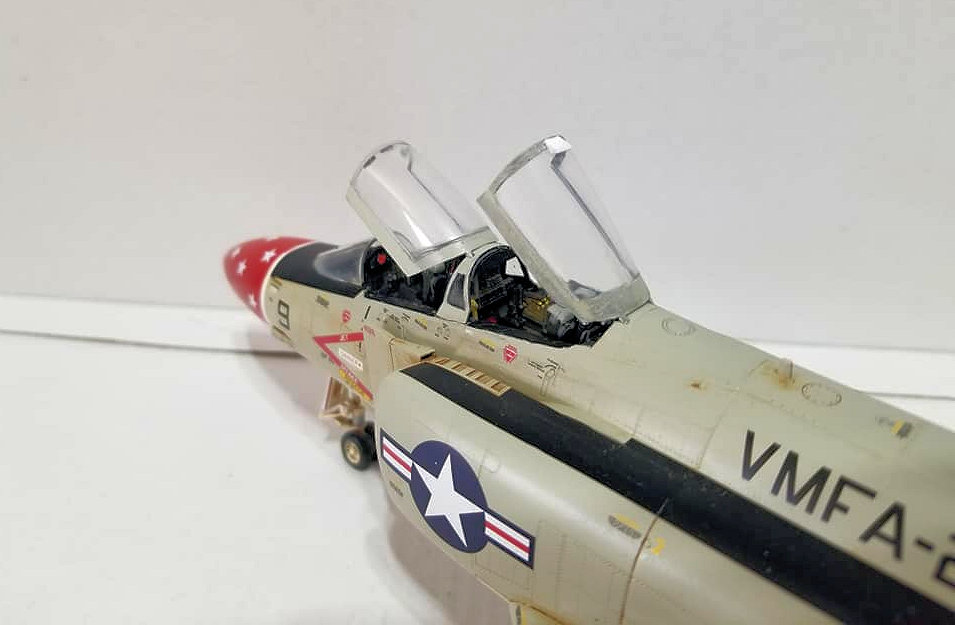
The build starts commonly like all Phantom II builds with the construction of the cockpit bay. Building of the compartment is some 7 steps long and consumes 41 parts in total. Panel and gauge detail can easily be called out by some sharp painting, application of gloss on the dial faces and light washes to emphasize depth. Unless you lack the ability to paint details, I would forgot the kits optional unrealistic panel/gauge decals.
One of the most disappointing things about the Zoukei-Mura F-4 Phantom II series is the lack of detail in the ejection seats. The balance of the aircraft’s representation cockpit wise is top in its class, but truthfully the Monogram 1/48th scale F-4J Phantom II at ¼ the price has superior ejection seat detail.
As a counter to the issue with the ejection seats, on step 8 the ZM Phantom steps up to the plate for a grand slam with part H-14. No longer in our air-frame builds do we have to deal with a grotesque seam going down the spine of the aircraft. This Phantom has a part which not only eliminates the ugly seam but will allow you to build different versions with the exchange of just one part. IE. Navy/Marine F-4’s refueling probe is on the starboard side inline with the rear cockpit and intake. Air Force birds have a refueling receptacle located along the back spine well behind the cockpit.
Further build up continues bringing us to another unique characteristic of the ZM kit. At step 11 we will find steps to get us two full internal engines from intake screws to exhaust afterburners. These mate to a two piece intake trunk giving us motors front to back. Take that Hasegawa! They have also included a simple engine display stand if you wish to detail one of these monstrous Pratt and WhineyJ79s engines and leave it out to be seen.
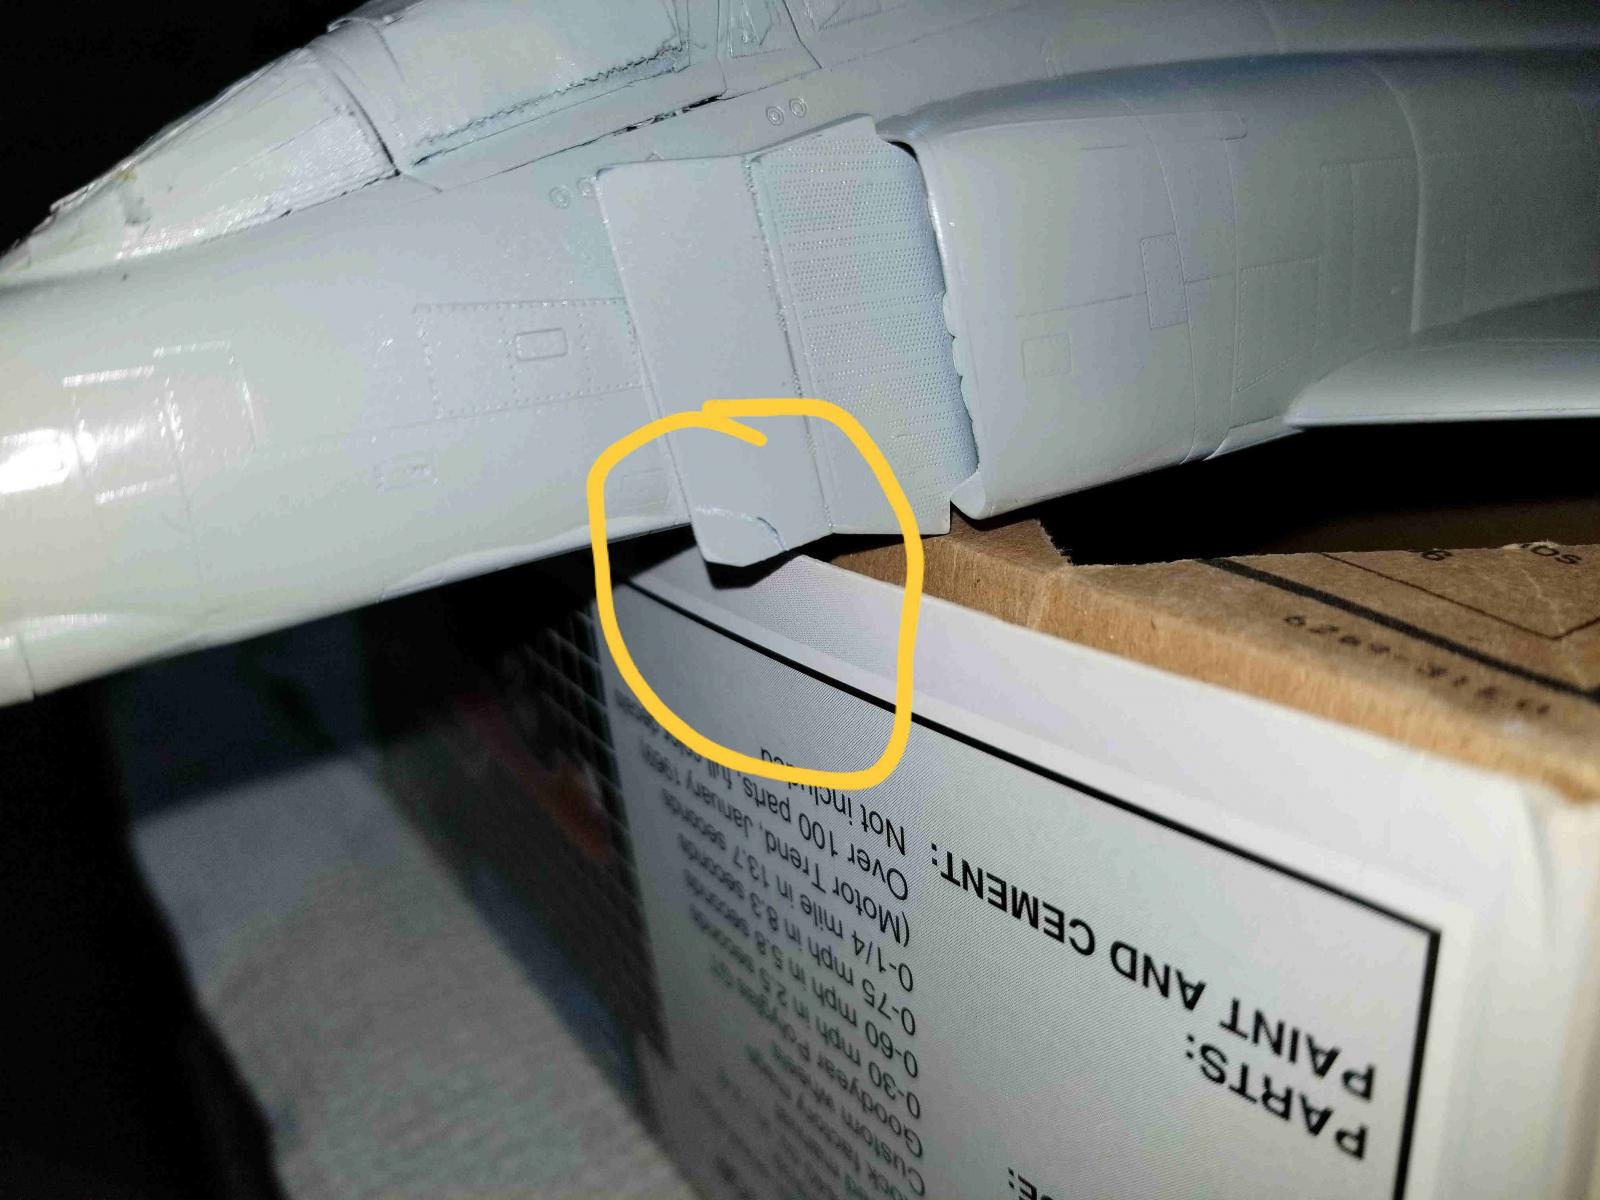
Steps 11 through 18 include the mounting of the engines to the bottom fuselage/wing section and the addition of the landing gear bays. Make sure you open up all the little holes for things like weapons rails and antenna. On step 17 you add in the front wheel well door actuator and lock. Be careful here to orient the part correctly and not break off the door actuator. I might have made a couple errors here.
Once the top and bottom fuselage is in place it’s time to add those infamous intakes. The splinter plate parts D-1, D-2, D-3 and D-4 all fit wonderful with the intake trunk. Issues arise with mounting the assembled intakes to the fuselage. Take great care to line up both the vertical exposed edge and lower horizontal edges with the corresponding edges on the fuselage. Don't worry yourself so much with the gap along the backside of the splinter plate and the fuselage, this is easily filled using AV Vallejo acrylic putty.
After mounting the intakes you will turn your attention to mounting the engine exhaust, flaps, slates, and wing tips. I left the exhaust nozzles off until after the painting and decaling was complete. Speaking of sub assemblies, most all of the items like landing gear, pylons, ejection seats, weapons and flaps were left off the model until I was done with painting, decaling and weathering. This will make for much easier assemble of the kit with added detail.
At sequence 25 you are given the option to place the leading edge slats in a takeoff/landing configuration. Zoukei-Mura was very thurough in giving instructions on how this is accomplished including where to cut/sand and which angles to place both the inside and wingtip slats at. Unfortunately there is no mechanism to display the outer wings in the folded/stored position.
The Finish
By now most of the major construction has been completed and I am ready to touch up the body, add the masked off canopies and begin the painting process. First I primed the body and all the left of sub assemblies with Tamiya rattle can white lacquer. Painting the aircraft was accomplished using a combination of Tamiya and Testors Model Master acrylics. Then the overall fuselage bottom, control surfaces, rudder, landing gear, landing gear doors, actuators, weapons, vertical stabilator, speed brakes and inside wheel wells where all painted Tamiya gloss white acrylic. After some careful masking with both Tamiya tape and Silly putty, the upper surface color of Model Master Acrylics Gull Grey FS. 36440 was put down.
Once allowed to dry, I misted on 3 light coats of Pledge Multi Surface Floor Finish for a gleaming gloss surface. Another day for allowing the clear to dry and I masked off the tail surfaces, exhaust cones and stabilators to begin the application of the Metalizers paints. Metal surfaces were simulated using Testors Model Master Metalizers, Tamiya Clear Acrylics and Alclad Lacquers Metallic. I used multiple colors including aluminum, steel, burnt metal, exhaust and Tamiya clear blue to get that used and burnt aspect.
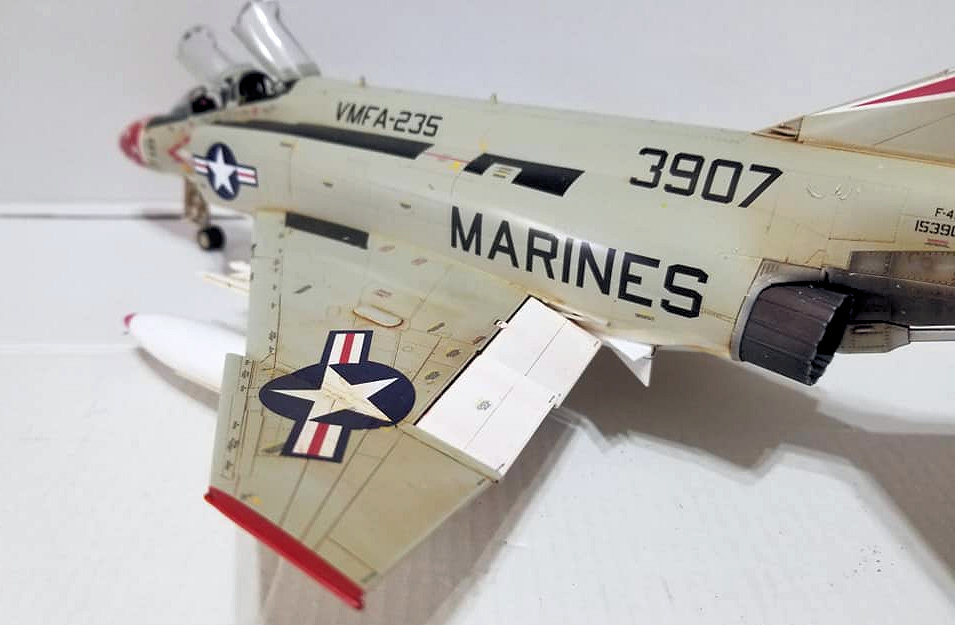
The beautifully produced decal sheet by Cartograf has options for two air-frames from VMFA-232 representing two different air-frames. #155822 and #153833 from Marine Corp Air Station Iwakuni, Japan in 1974/75. These air-frames at this time were painted Light Gull Gray FS # 36440 over Insignia White FS# 17875 with Insignia White control surfaces and nose cone. Tail and wing tips are painted Insignia Red FS# 11136. This sheet also includes excellently printed data and modex markings, enough for one bird.
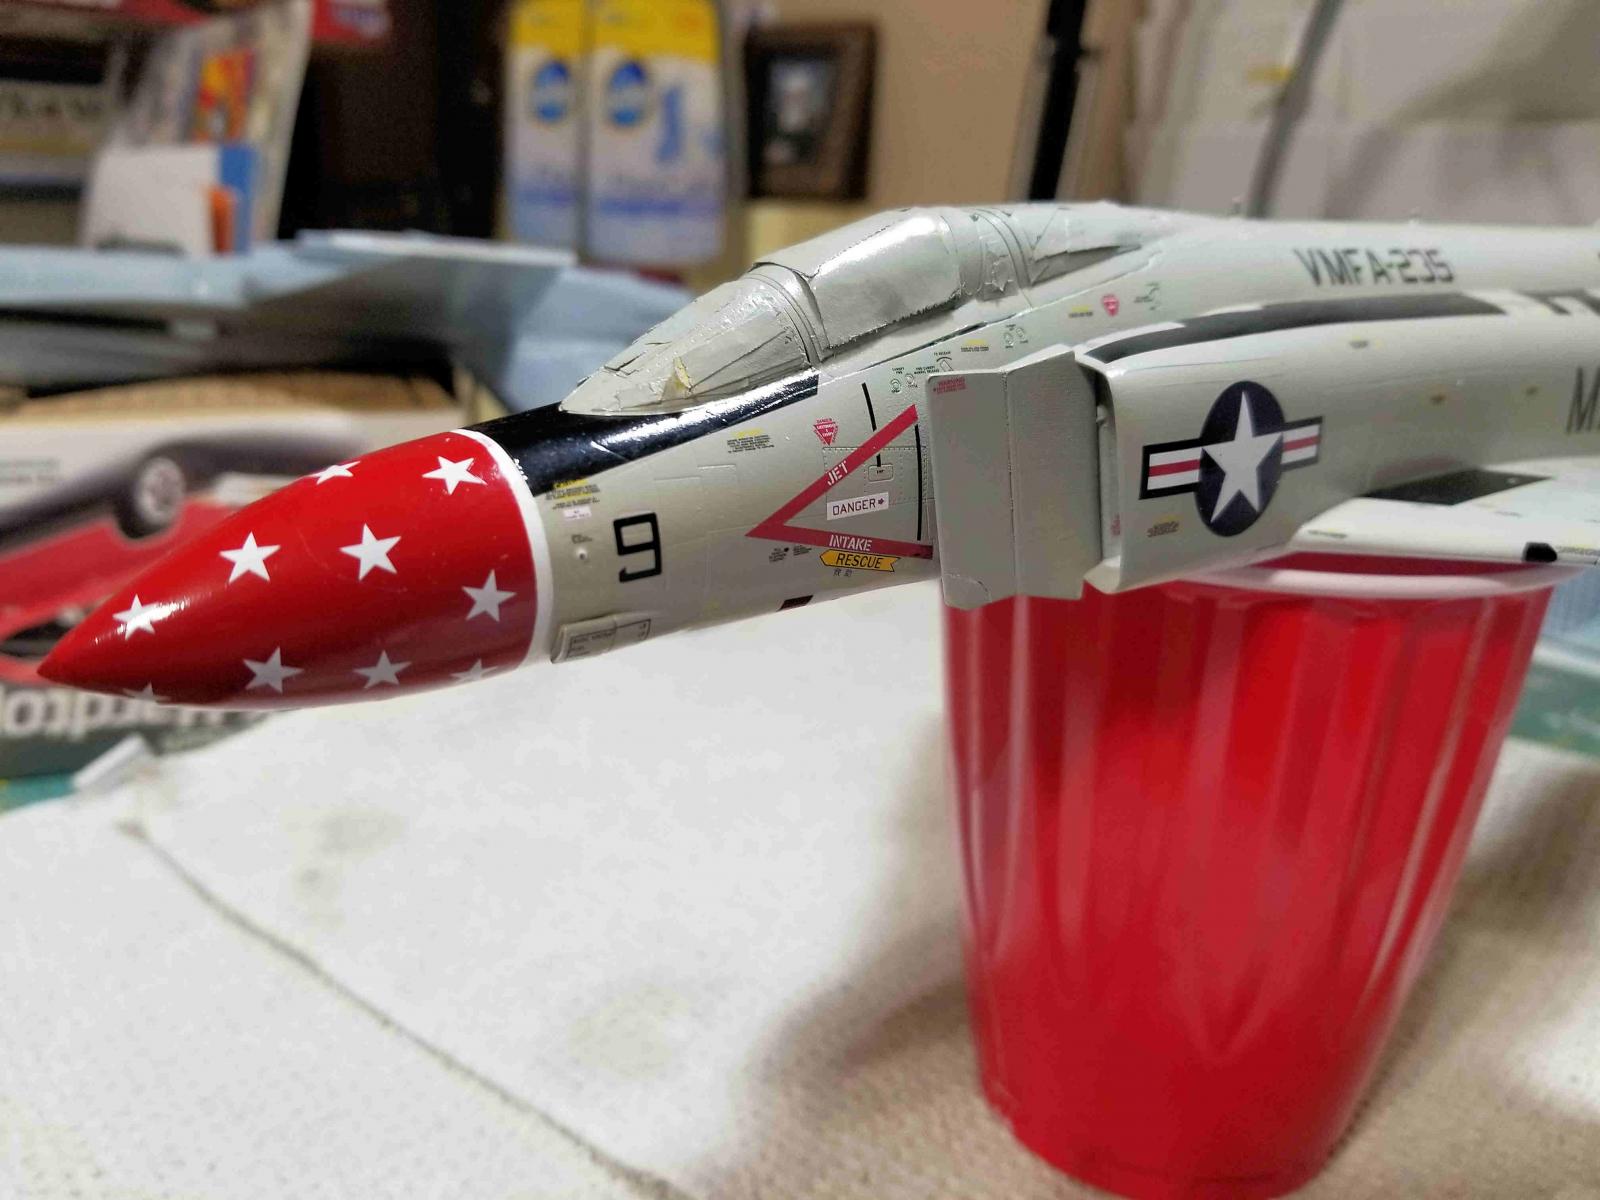
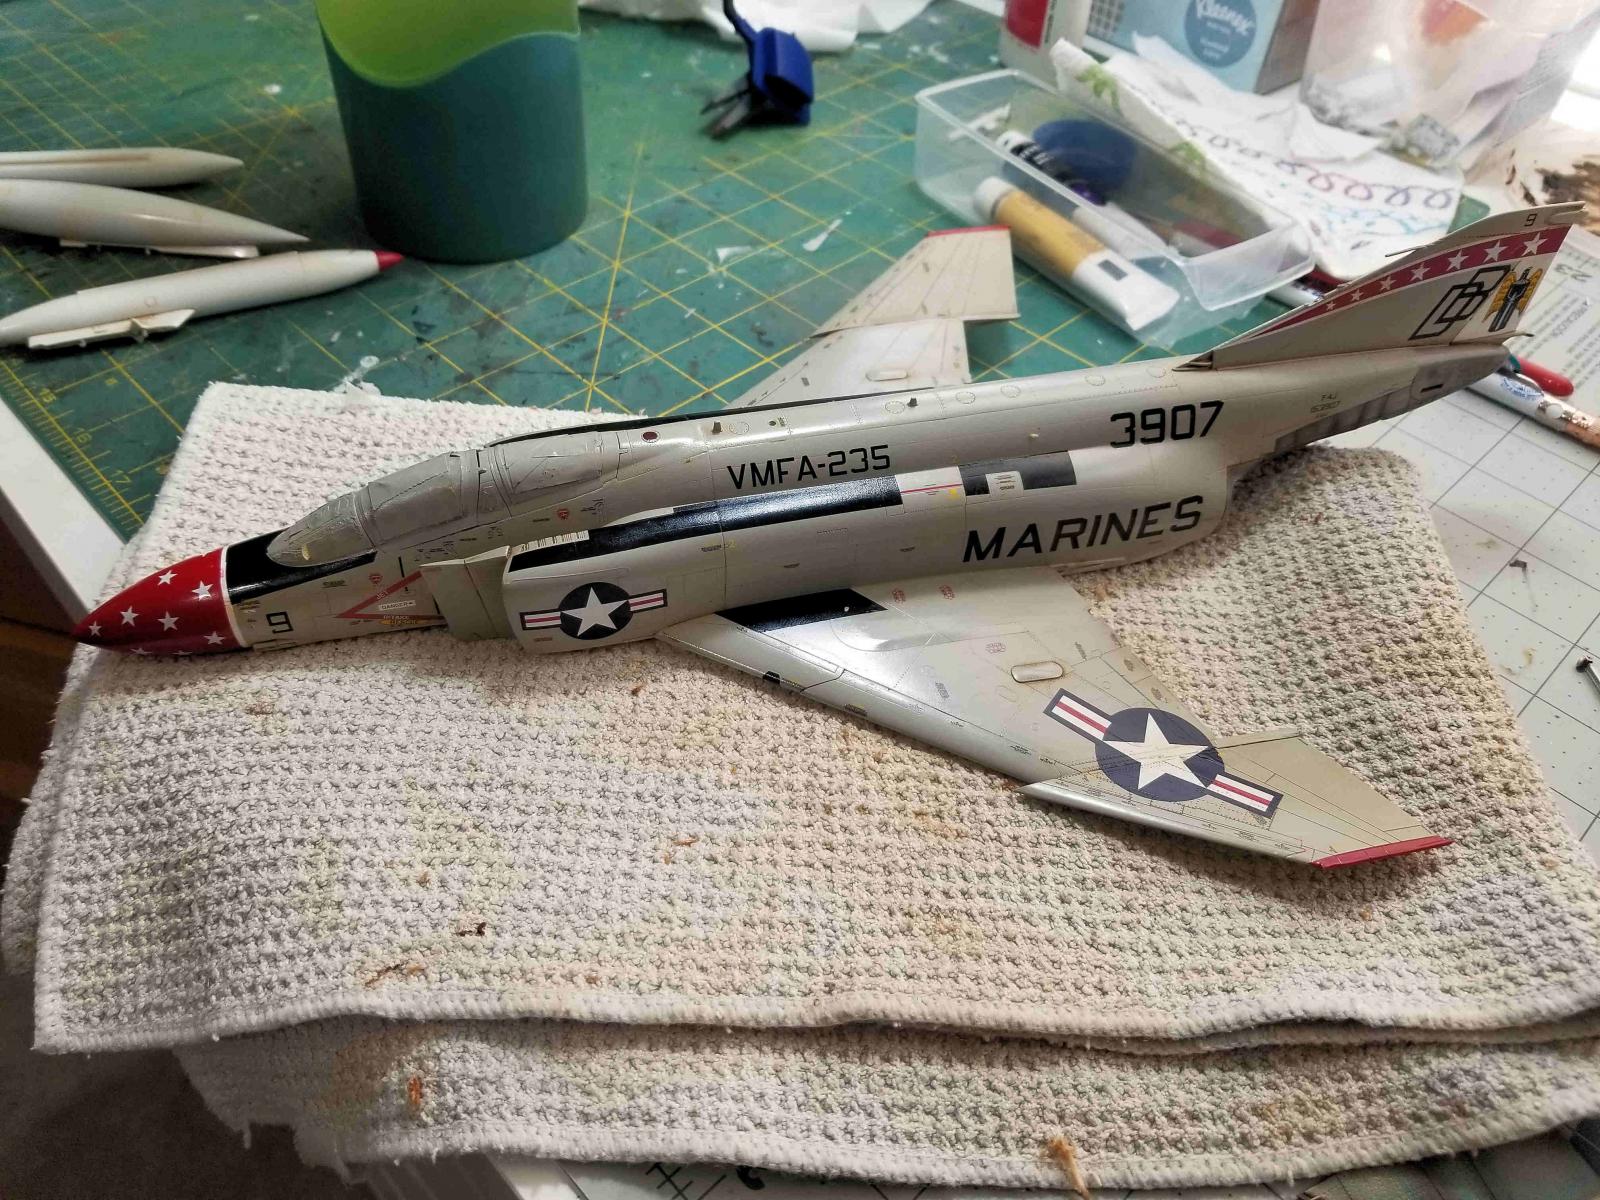
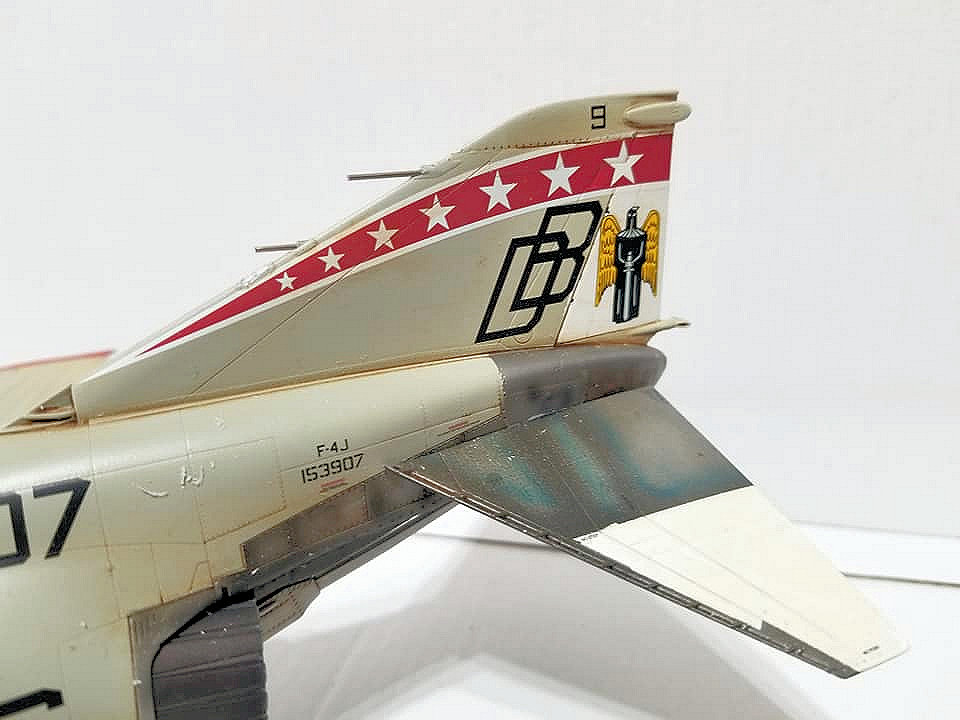
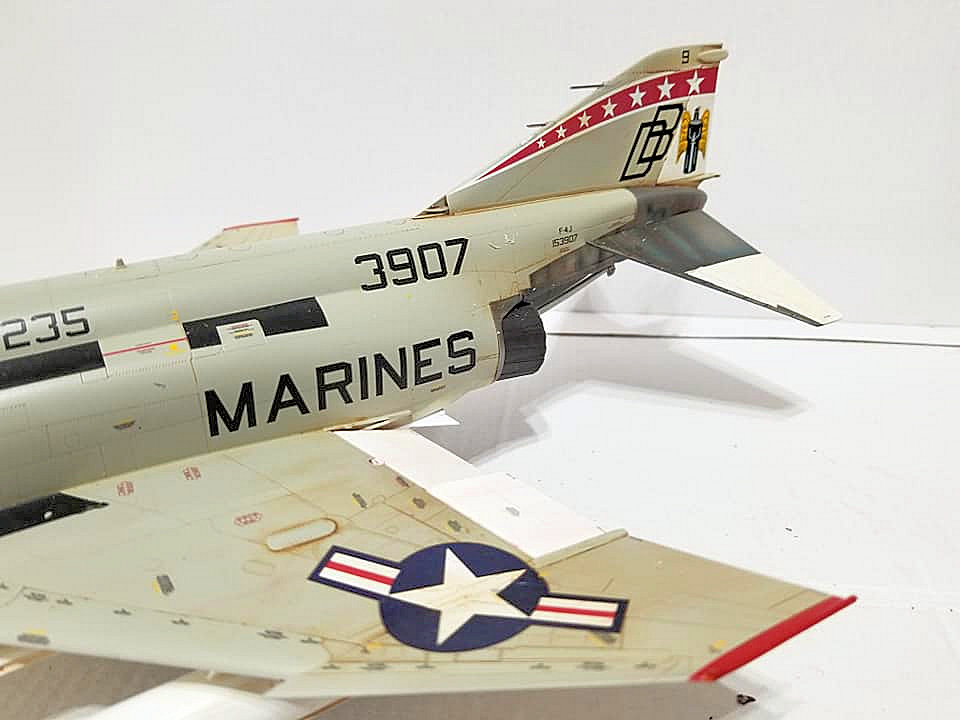
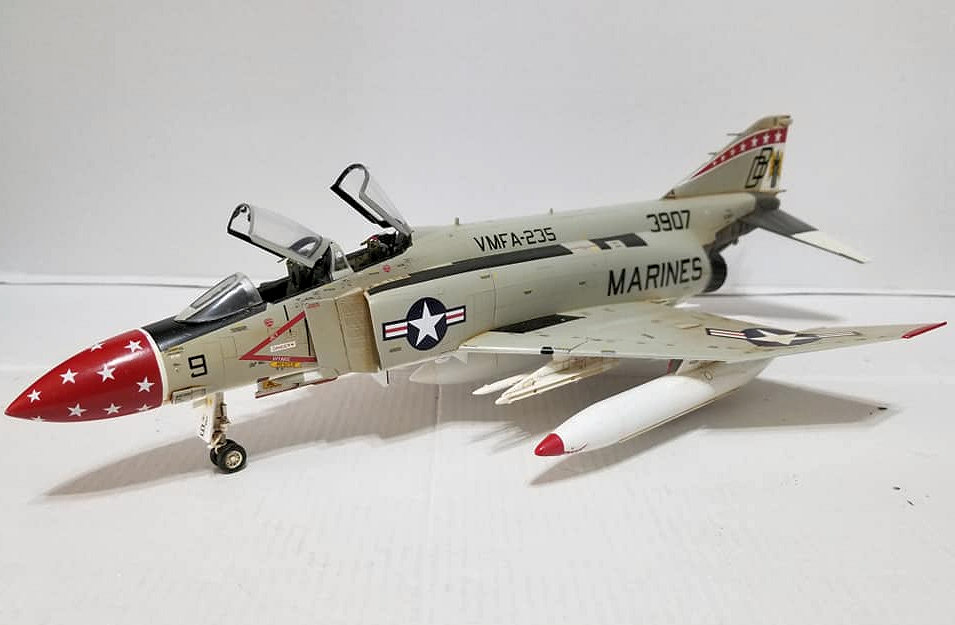
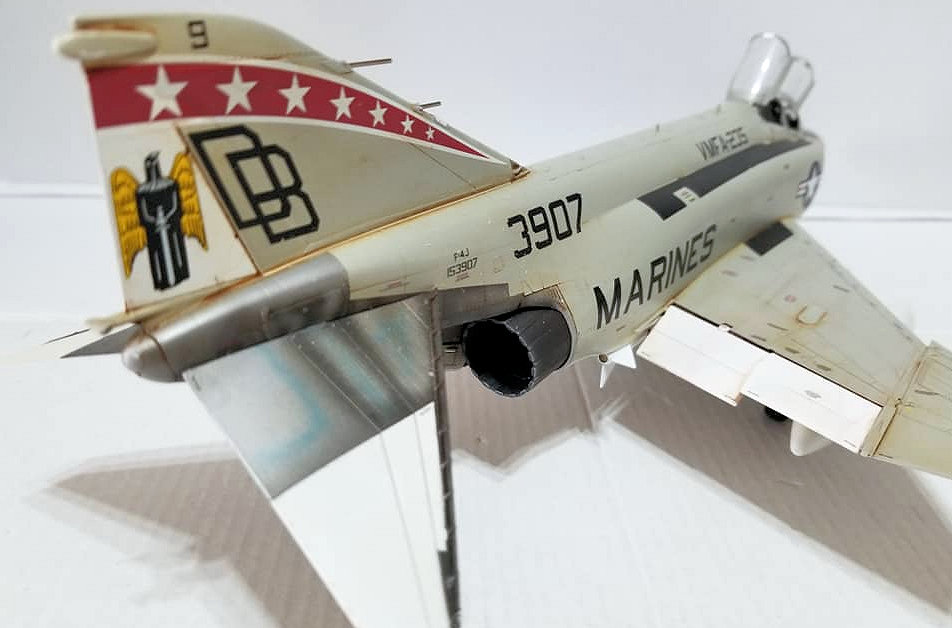
My choice to build this aircraft was to use the Zoukei-Mura after-market markings to do an air-frame from VMFA-235. The after-market sheet #SWS48-04-D03 from Zoukei-Mura has markings for four different air-frames from VMFA-235 “Death Angels”, three “J” models and one “S”. Air-frames #153907 1972 MCAS Kaneohe, 153878 1975 NAS North Island, 153827 MCAS Kaneohe Bay, and the “S” 155794 1980 MCAS Iwakuni, Japan.
The air-frame I was wishing to depict was F-4J #153907 in 1972 out of MCAS Kaneohe Bay, Hawaii. The aircraft is painted in Gloss Gull Grey FS#16440 on top and Insignia White FS #17875 undersides and control surfaces. The nose and wing tips are painted Insignia Red FS#11136. I used the modex and data sheets from the kit decal sheet. After another coat of Pledge Multi Surface Floor Finish the model was weathered with a combination of Reeves Oil washes and Tamiya Weathering Pigments.
Hint; when applying the data/stencil pay careful attention to the full colored decal instruction sheet and mark off the decals used as you move from one surface to the next. Doing so I was able to cover the markings relatively quickly without any errors or omissions. Even still well over 10 hours were dedicated to the decal installation.
Cartograf decals are extremely easy to apply. I use a dish of warm water to get the decals to release from their backing and float into place on a layer of Micro Set and water. Then they position well with a little prodding around with a clean moist paintbrush and press down with a clean most towelette. Seldom is decal setting solution needed but Micro Sol was strong enough to get the decals to snug down into panel lines and around curves.
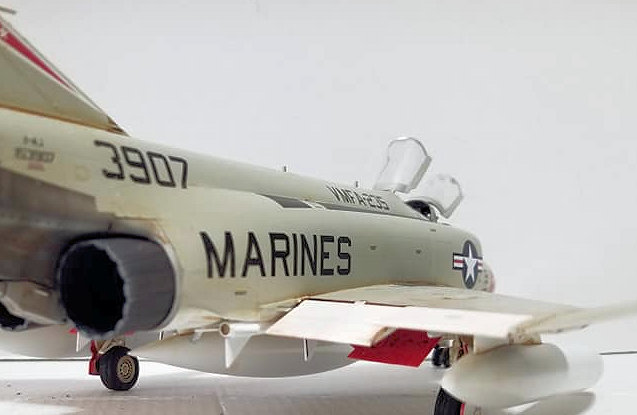
From step 27 to 46 you will find yourself adding many of the things that I previously had left off to detail paint and weather. Landing gear with actuators, landing gear doors, tail hook, stabilators, additional antennas, speed brakes, ejection seats, external fuel tanks, weapons pods and their assorted weapons, crew ladder. Somewhere along in this process prior to removing the masking and opening up the cockpit I gave my model a light dusting of 10% Testors Dull Coat mixed with 90% Testors Gloss Coat to seal the Phantoms decals to the paint.
Also during this time I chose to replace the kit’s wheels and wheel hubs parts E-3, E-17, I-15, I-16 with weighted resin wheels from Zoukei-Mura. These are an easy but fabulous looking addition to the build.
One of the last things I did, with the model now sealed, was to remove all the canopies from the model. Next remove the masking, polish the clear plastic, glue in the mirrors and other canopy pieces and then attach all four pieces back to the model using Formula 560 canopy glue. At this point the model is 99.9% finished with just a little touch-up here and there to do.
It took much longer than I had expected to complete this model kit. In total I spent 73 hours working on the Zoukei-Mura F-4J Phantom II from initial sub assemblies to the final weathering. Time frame from June 15th to September 15th. In that I took a couple weekends off to attend the IPMS Nationals in Phoenix Arizona. A little extra time was spent on the interior, landing gear, and wheel well assemble and hours more on the numerous decals and final weathering. I highly recommend this model and hope that the few idiosyncrasies do not affect your decision to build one.
Thank you to Zoukei-Mura, Volts International, IPMS/USA, John Noack, Phil Peterson, and the remainder of the IPMS Reviewer corp support staff for the ability to review this remarkable kit.


Comments
Add new comment
This site is protected by reCAPTCHA and the Google Privacy Policy and Terms of Service apply.
Similar Reviews