
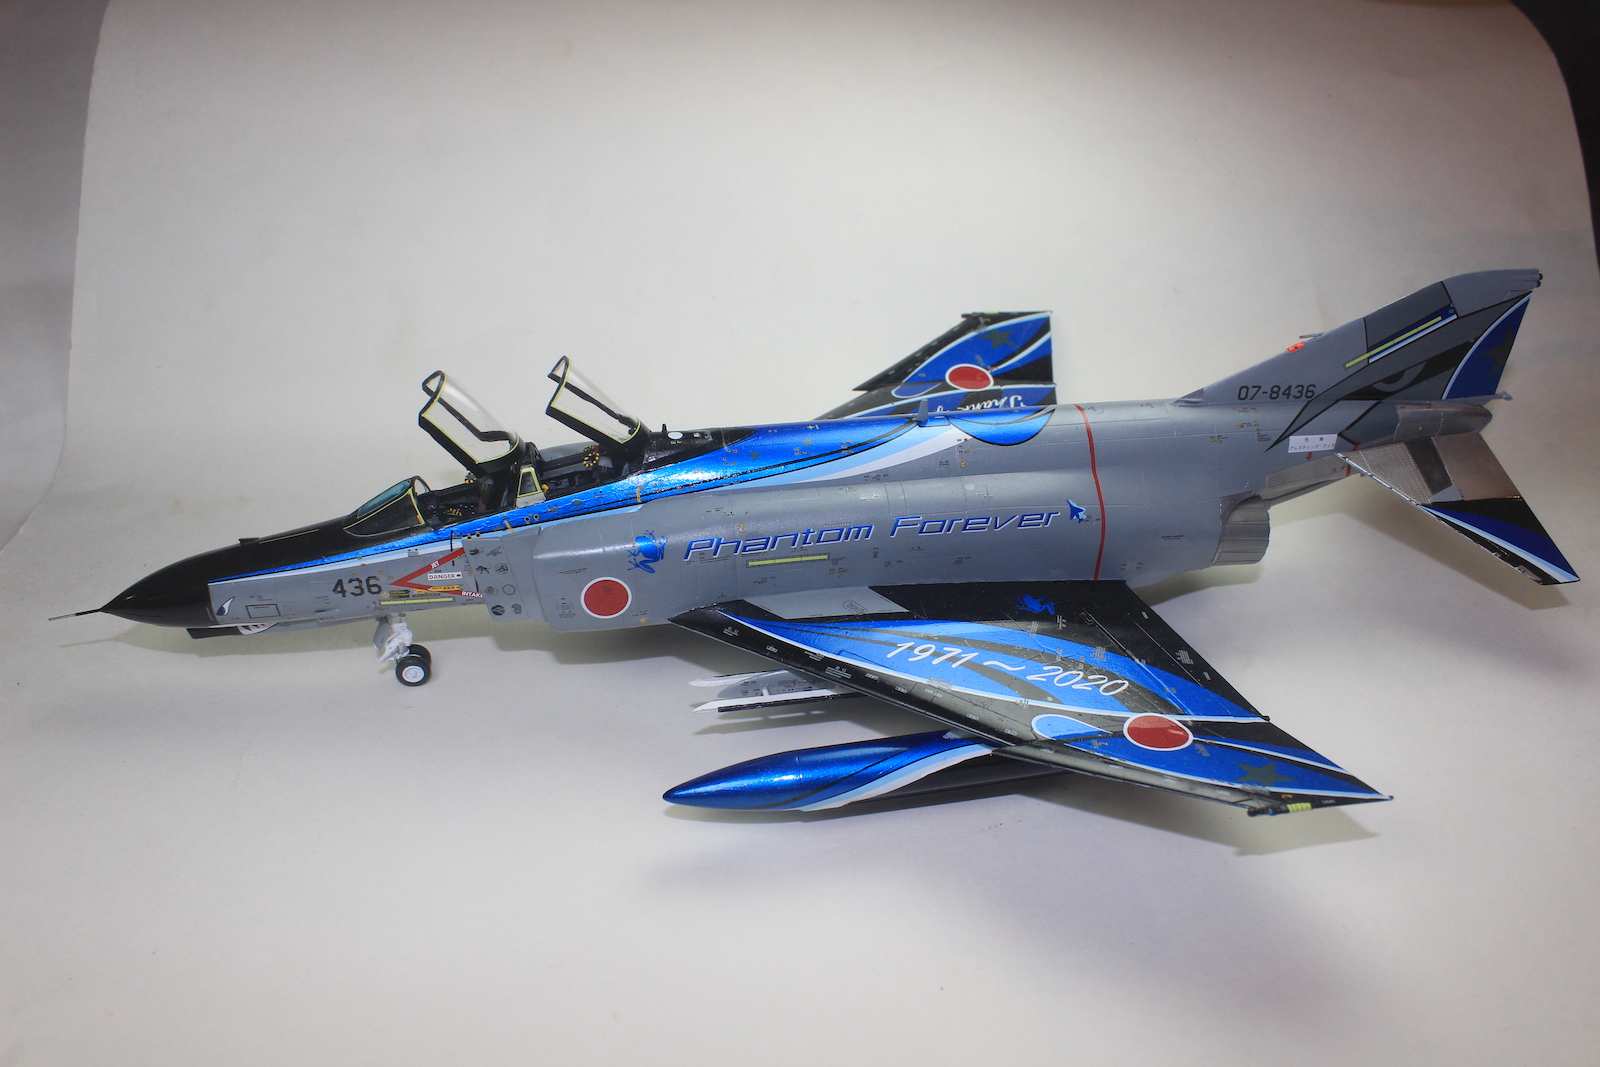
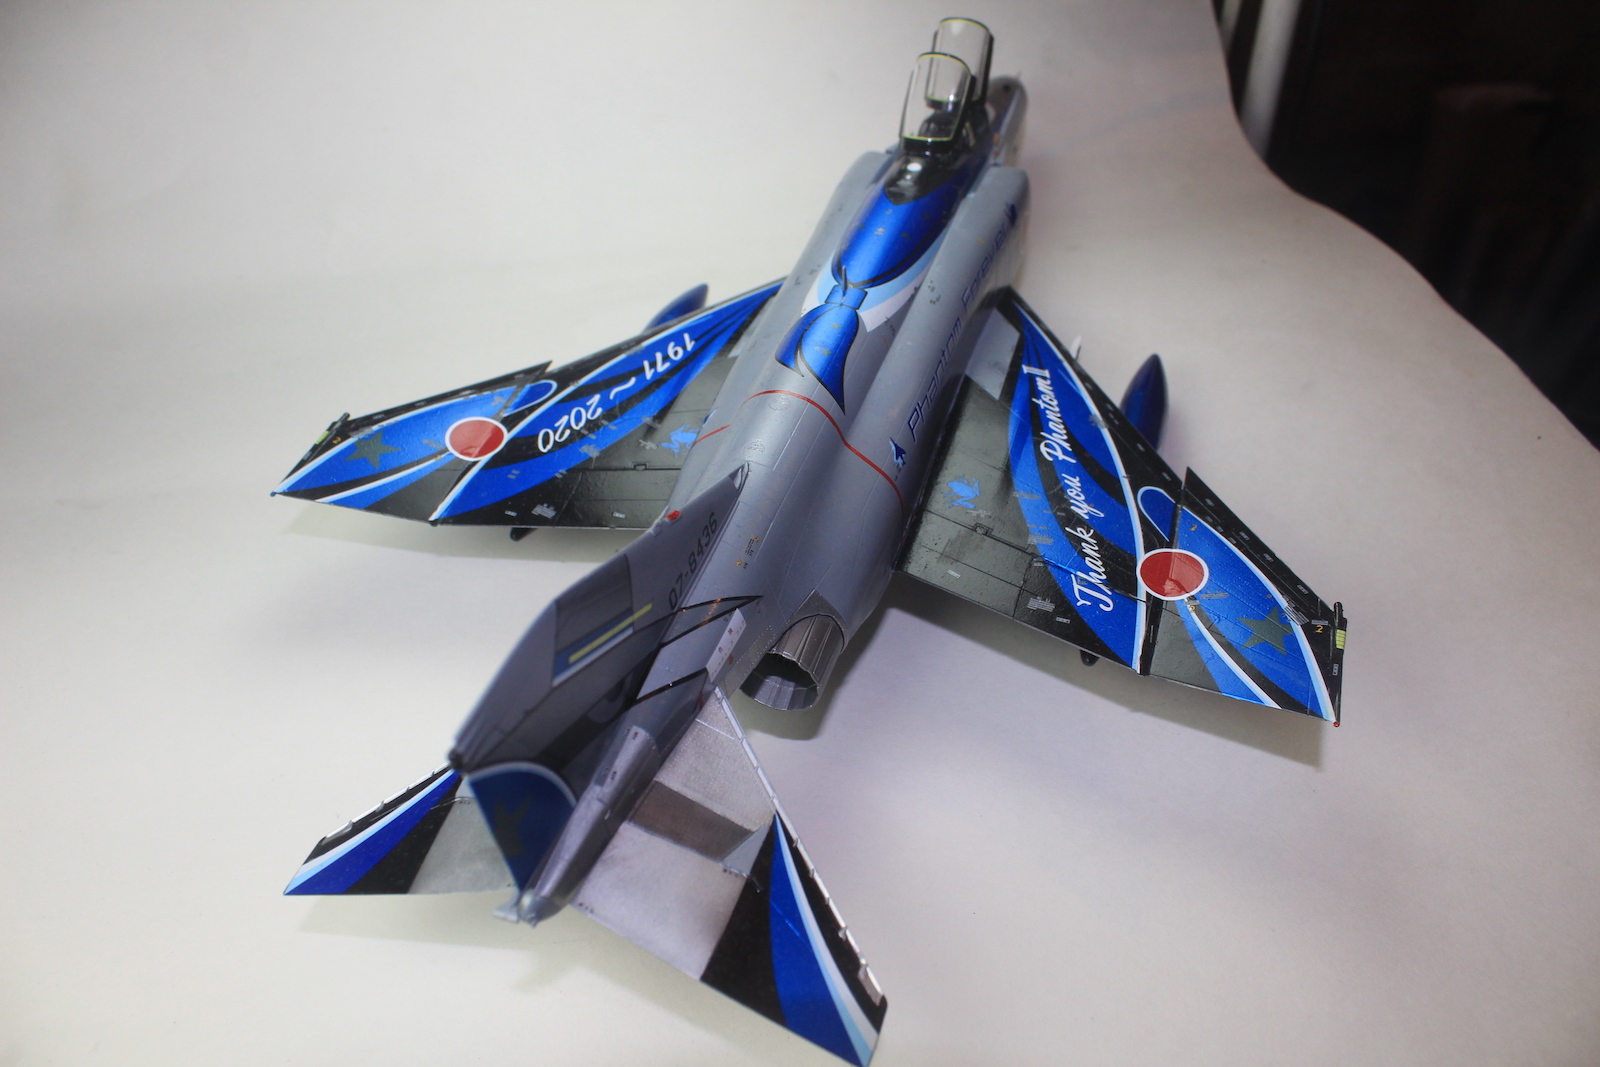
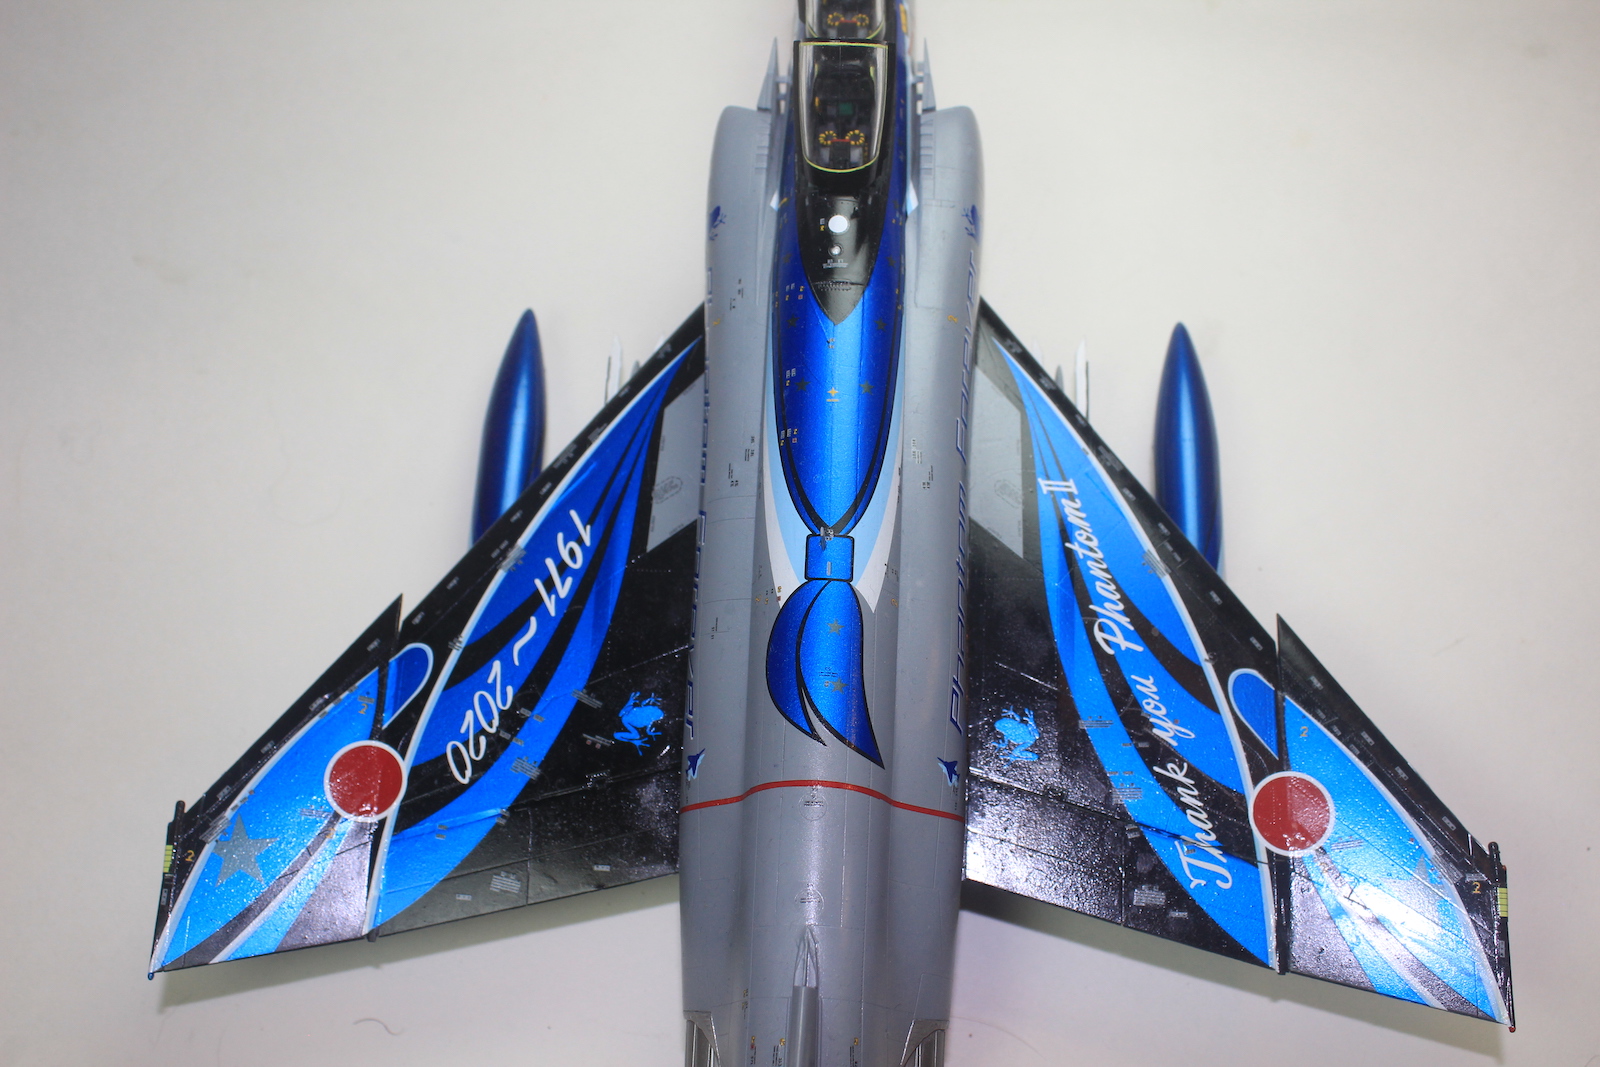
F-4EJ KAI Phantom II Phantom Forever 2020
The F-4 Phantom II is a two-seat, twin engine, all-weather, long-range supersonic jet fighter. The airframe was originally developed for the United States Navy by McDonald Aircraft. It first entered service in 1960 with the Navy and was later adapted for use as a land-based aircraft. In 1968 the Japan Air Self-Defense Force (JASDF), elected to replace the F-86F with a modified version of the F-4E. This new designation became the F-4EJ and became the main fighter of the JASDF until it was replaced with the F-15J. The last squadron to fly the F-4EJ Kai was the 7th Air Wing based in Ibaraki Prefecture. This new special edition kit from Zoukei-Mura depicts an aircraft in the commemorative markings for “Phantom Forever 2020”, this squadron’s final flight of this venerable aircraft.
This kit is a special edition available for pre-order at the link above. My sample is a pre-production version of the kit and some minor things may be subject to change prior to release. Primarily, I have not seen a final version of the box and the instructions with my version are the pre-production version.
Inside the box is the guts of the last F-4E version of this kit with a few new special parts to update this into the F-4EJ Kai. There are 14 sprues of light grey plastic, 1 clear sprue, and two huge decal sheets. Everything is perfectly molded as is typical on Zoukei-Mura kits. I had no issues with missing/broken parts or any issues with the moldings themselves. The parts have beautiful surface detail and flawless moldings. As stated above, I don’t have the final version of the decal guide or instructions, but the pre-production instructions are up to ZM’s usual standards. There are a couple minor issues with the that I will highlight later.
The build starts in the usual location with the interior of the cockpit. I felt that the detail here was very good with one noticeable exception. There are no molded in seat belts nor decals to recreate them. These are pretty prominent on this aircraft and while Zoukei-Mura does produce an interior PE set to add detail to the interior it is unclear if this set includes PE seat belts. The fit of all the parts in the cockpit section are great and I had no real issues while building the cockpit.
Zoukei-Mura does something interesting with the cockpit tub and front wheel well assembly that I haven’t seen on another 1/48 scale kit. Both structures are a part of the same subassembly, with most of the parts serving as a part of both structures. I feel that this lends a lot of strength to the main fuselage section as a sort of anchor for the build. The only other thing I will note here is that for the painting of the interior details. I relied pretty heavily on the build from Zoukei-Mura’s master builder for some of the detail painting. The link is here. I found the still shots very helpful to augment the painting directions from the instructions.
In steps 4 and 5, you are supposed to add the instrument decals. At the time that I was building the cockpit I had not received the decals for review, so I can’t fully comment on their use. I did add them in at the end of the build and the addition to the detail was great. I did however have some issues with them settling down over the molded details, but this could be due to the fact that I couldn’t use MicroSol and MicroSet as I normally would due to the surfaces being vertical. Other than this minor issue I had no issues with the rest of the cockpit assembly, everything went very smooth.
In steps 6 and 7, there are some tiny levers added for the manual canopy release. These are very nice added details, but I did leave them off until the end, as they would likely be easily broken during painting/masking. Moving on to step 7, this step completes the assembly of the center section of the fuselage around the cockpit tub. The fit here is a little fiddly and tight but if you get the tub centered the fit is excellent. There was almost no need to deal with any seams on the top part of the fuselage. This is partly due to Zoukei-Mura designing the spine of the aircraft as a separate part. This meant there was limited need to fill and sand the spine of the fuselage. Part R1 is the part that covers the spine, this part fits a little loosely into it’s slot, but I used Mr. Surfacer 1000 to fill any gaps with no need for sanding. Also, I left Part P2 and M16 off until final assembly to avoid breaking them.
The next three steps use parts that are specific to the F-4EJ Kai. The Parts are P15, P1 and P4 and I had no real issues with these parts. They are all well molded and the detail is good. I did have to fill around Part P1 with Mr. Surfacer 1000 to hide some minor gaps. Also, I did leave all the clear parts off until final assembly and the subassembly for M33/M34, as this would be Flat Black.
Next up are the engines and intakes. As is typical of Zoukei-Mura, this kit contains two full engines and a display rack for one of them. This allows you to either use them in the kit or display one outside the airframe. The engines are decent but will require some clean up before painting. On the inside of the aft portion of the engines, there are two large ejection pin marks that are deep inside the engine. They are deep enough that you may decide to ignore them, but I found that they were very noticeable under the metallic paint. A little light sanding was all that was needed to remove the pin marks. I also changed up the paints that were used for the engines. All metallic paints I used were from the Model Master Metalizer paint range. Here is a list of the paints I used with the number from the instructions that they replaced: 5 = Steel 1420, 6 = Tamiya X-18 Gunmetal, 7 = Testors Chrome Silver Enamel.
Skipping ahead to step 13 for the intake trunks. This kit has two-part intake trunks molded out of thin plastic. Overall, they are decent but there are some minor ejection pin marks on the inside of the parts that will need to be removed. Also, the parts are butt jointed as is typical of two-part intakes. They will need some sanding and filling to hide the seam but nothing too serious. They were actually surprisingly easy to work with. The interior of the intakes was painted Tamiya Flat White and once dry they fit well into the keyed holes in Parts I15/G3. In step 12, you will need to drill holes for any underwing stores that you will be using. The instructions here are very clear on which holes are required for each option.
Mounting the engines is next and again the fit is good into the keyed holes. The fit of both engines at the same time is a little fiddly but this is partly due to the tight fit into Part I15. Once these are installed it is time to add the interior walls of the wheel wells and the top parts of the wings. The instructions contain a big bold note to be careful here and to not swap the internal parts for the wheel wells. The design and the fit here is once again extraordinary. I had no issues with the wheel well parts and the upper wing surfaces fit extremely well. The leading and rear edges of the wings required almost no filler to hide the seams. The last thing I want to highlight before moving on is in step 17. This step has you install Part I17 for the front gear door support. I would recommend leaving this part out until adding the landing gear later as there is a support arm for the gear door that is extremely easy to break while handling.
Once the intakes and engines are in it is time to attach the wings to fuselage. This is handled in step 18 and the instructions have a number of different views to help with alinement. The fit here is great, with the only issue being the lower part of the front fuselage. The area around the gear bay needed a little sanding to smooth everything out. The wing roots were pretty straightforward and required only a little Mr. Surfacer to disappear. The center fuselage goes down well past the upper wing surface which makes matching the surfaces much easier and the joint stronger.
Next up is exterior parts of the air intakes in step 19. The assembly here is pretty straightforward with no major issues. I did leave the pitot tubes, Part M22, off until final assembly as they are fiddly and easily broken. Take care to not miss the decals shown in the bottom right of the page, these need to be added after painting, but the note is easy to miss and forget about. Lastly, the fit of the intake subassemblies to the fuselage is a bit fiddly. They do fit pretty well overall, but it is easy to get something slightly misaligned or end up with a gap at the rear of both parts. I would recommend dry fitting a lot and using a slow fitting glue with some clamps here. There is a lot of surface detail in this area and any sanding will be noticeable.
I skipped steps 20 and 21 until after the first round of painting as I chose to do the metallic painting last after the main paint scheme was complete. In step 22, the instructions cover the installation of the flaps and ailerons. There are two options here for raised or lowered flaps. They use the same parts but both options require you to remove select tabs that are highlighted in the instructions. I chose to use the flaps and ailerons in the raised position and I found the mounting points fairly strong. I did note that the trailing edges of these parts did require a tiny amount of sanding/filling to hide a minor seam. Also, if you do choose to display the flaps and ailerons lowered, you will likely need to cut the wing decals to fit.
Step 23 covers the build out and attachment of the outer wings. There are two options here for the leading edge flaps and the instructions have extensive notes here to help you decide which option to use. The leading edge flaps are very finely molded but be careful when removing the sprue attachment points, it is easy to damage these parts. For attaching the outer wings to the main wings the instructions have a very helpful diagram to show exactly at what angle to set the dihedral. The parts are molded in such a way that setting this dihedral is easy, but it is nice to have the diagram for reference. I did find that I had to fill some minor gaps around the leading edge flaps and around the joint between the inner and outer wings. A little Mr. Surfacer filled in the gaps without requiring any sanding.
I skipped over step 24 until final assembly and moved on to step 25. This step contains options on how to display the stabilators. There are three options for different angles: 0 degrees, -15 degrees and +7.5 degrees. I chose the level 0 degree option but I did leave the stabilators off until after final painting. Very similar to the outer wing sections, the stabilators are molded in such a way that the setting the anhedral angle is very easy. The instructions also contain a graphic of how to set the angle. Once the stabilators were ready, I set the fuselage aside until the rest of the parts were ready for painting.
Steps 26 through 33 cover the various parts and assemblies associated with the landing gear and gear doors. The engineering of these parts is great, and I had no real issues with any of the parts. The landing gear attach to the fuselage with a unique tab system where they slot into holes in the wheel wells. The fit is extremely tight and the angle of the wheels is easy to set. This also leads to a very strong join with the rest of the airframe. The engineering of the gear bay doors is similar, they all slot into specific openings in the fuselage that make alignment easy and the joins strong. All of these parts were set aside for painting with the interior of the wheel wells painted Tamiya Flat White.
In step 32, I left part M23 off until after final painting. Step 33 covers the addition of the air brakes and engine hatches. Both can be posed open or closed and the instructions are clear on how to carry this out with multiple views of both sets of parts. I chose to model both open and had no issues with the installation of the parts. Parts M37 and M38 fit a little tight into their openings, but the design is interesting. They have a molded-on tab that fits into a slot in the fuselage, this sets them at the proper angle easily.
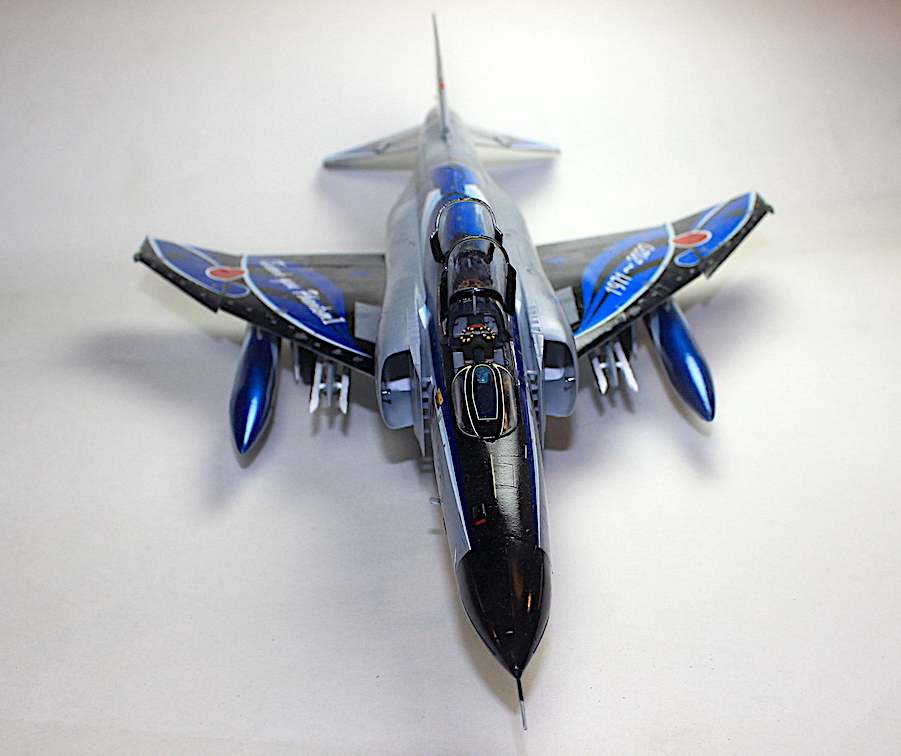
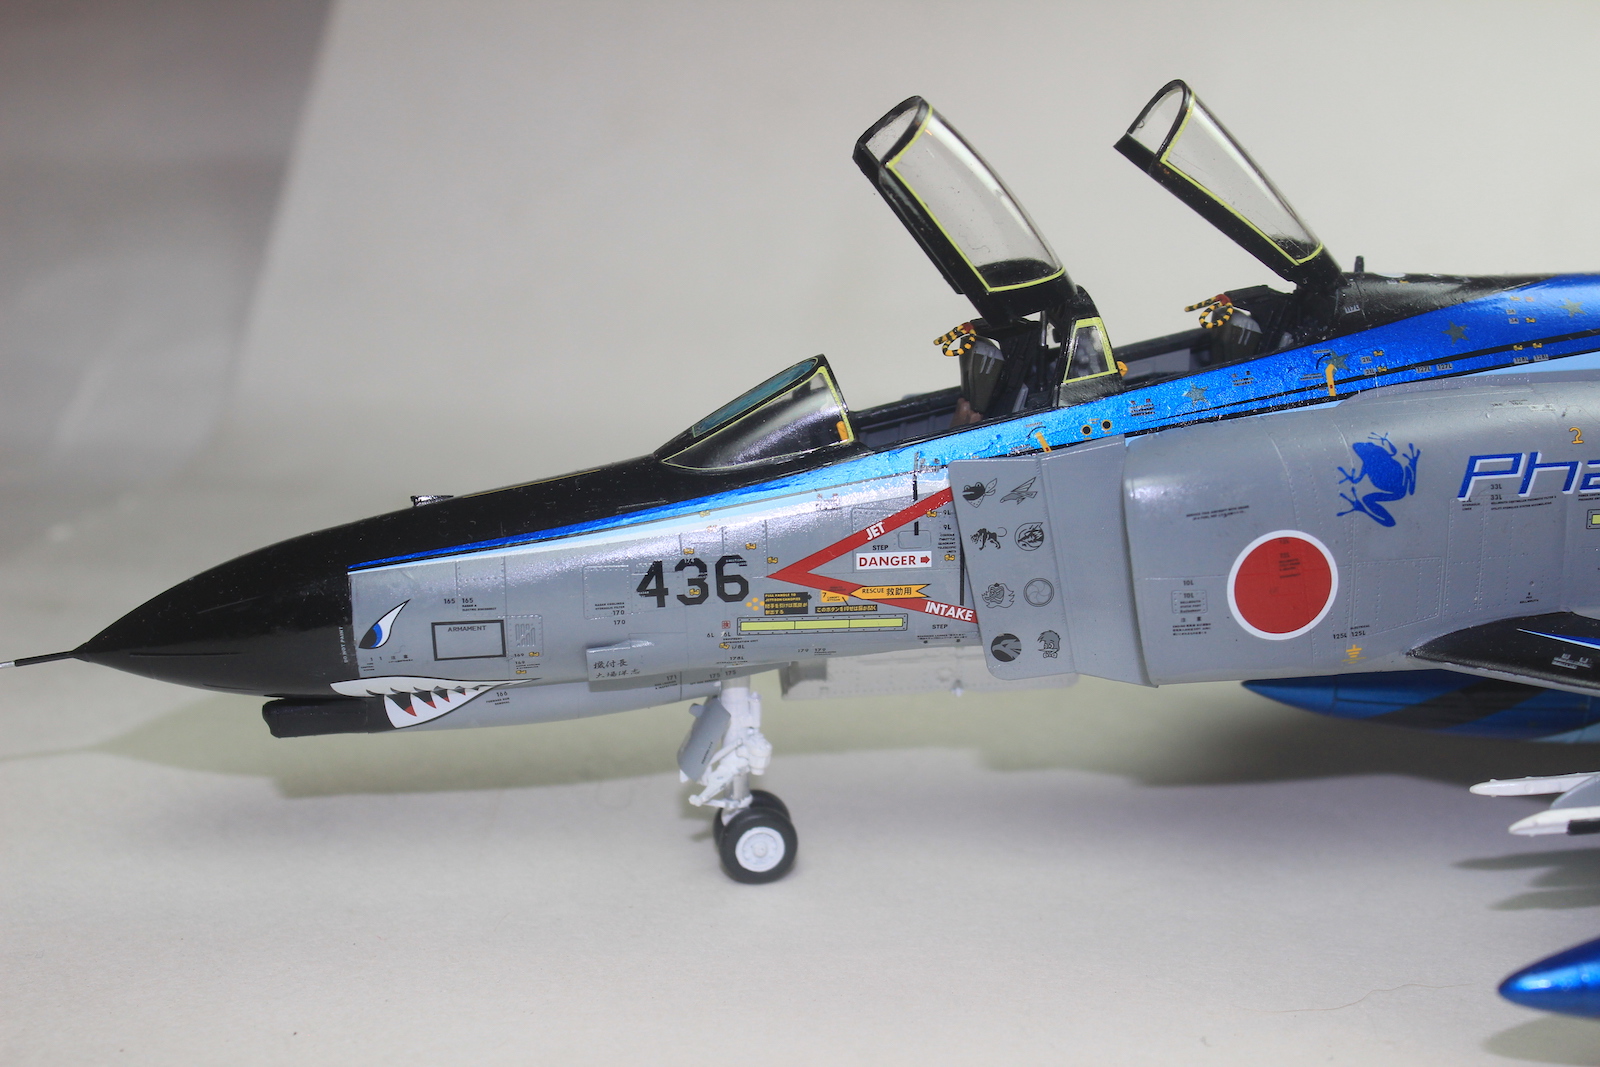
Steps 34 through 36 deal with the finishing touches to the cockpit. There are two options of the canopy glass, open or closed. The clear parts for the canopy are really well molded and crystal clear. The molding is very fine, to the point that I had a little trouble finding the edges of the glass while masking. I chose to build the canopies raised and decided to use the closed version as an easy paint mask for the cockpit. I did leave these parts from these steps off until final assembly.
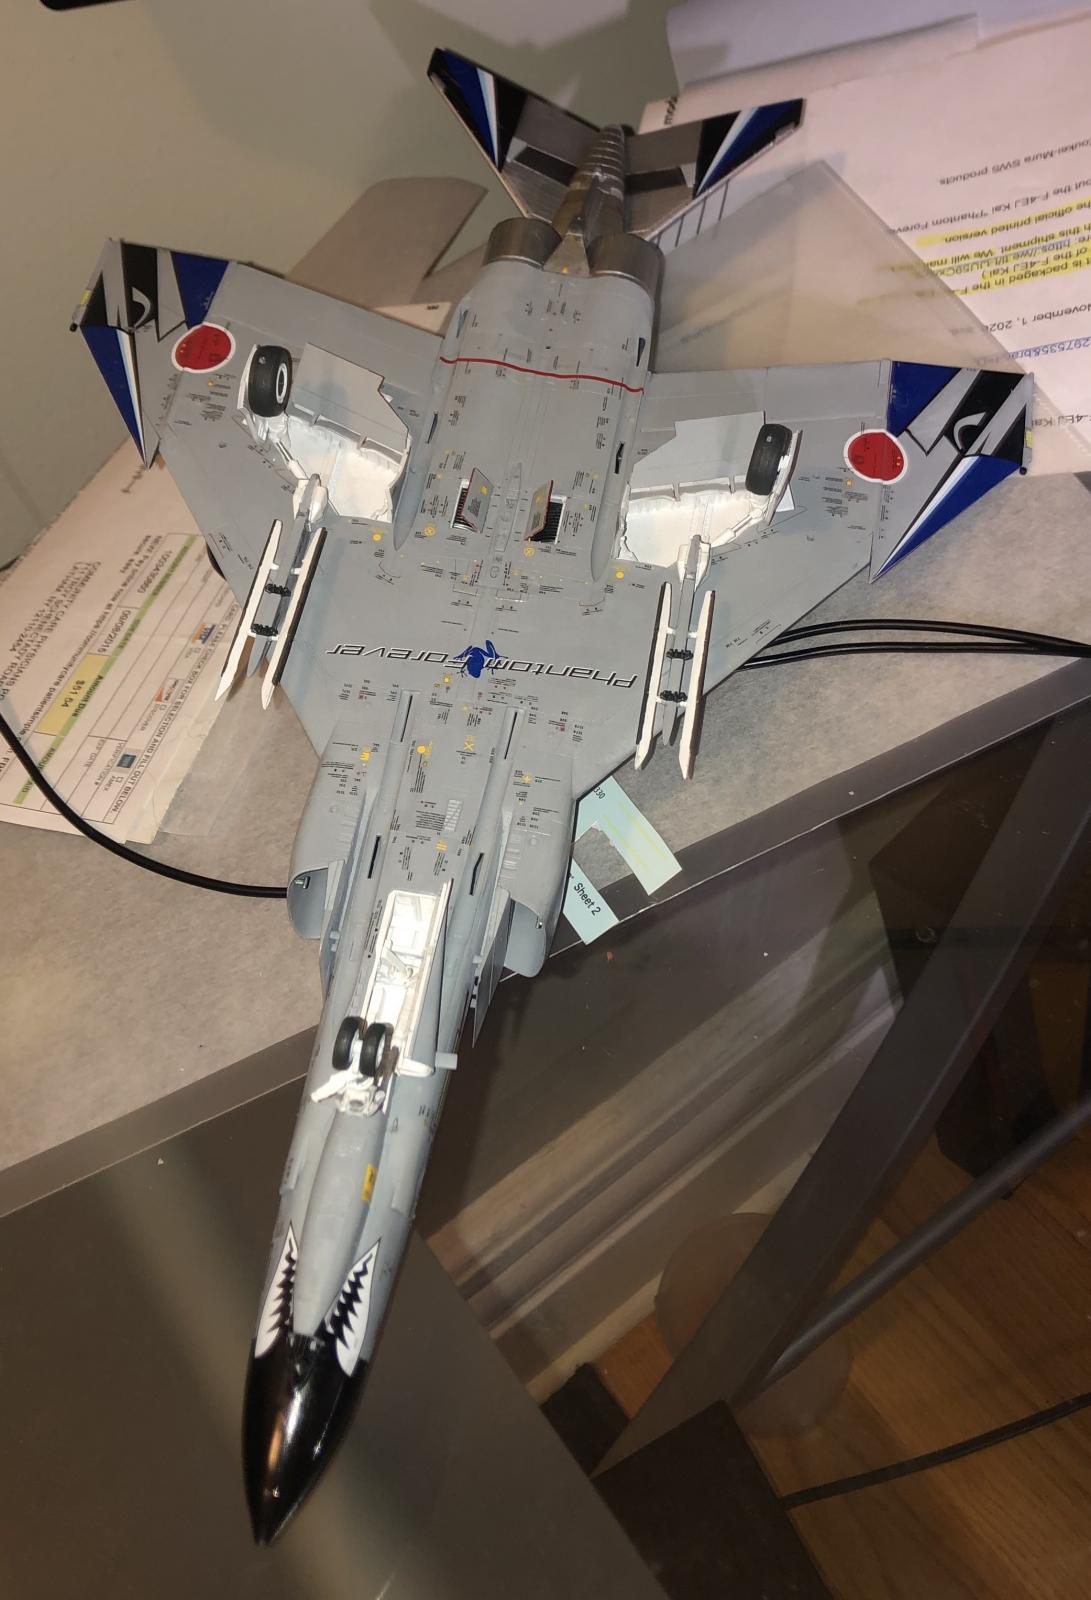
Next up are the underwing stores. The stores used in this kit are three drop tanks, one center line and two under wing drop tanks. There are also two wing pylons but no weapons are hung from the pylons. As stated above all of these underwing stores are completely optional. I chose to use them all for this review. The tanks are well molded and I had no fit issues. The pylons are also well molded but I had a couple of minor issues. First there are no painting guides for the detail painting of the pylons. I found the pictures from the master builder extremely helpful in determining what to paint them. The video is linked above. Also I would recommend leaving the launchers and R23/R22/R18/R19 parts off until after the pylons are painted and decaled. There are some decals that are impossible to place on the pylons with these parts installed.
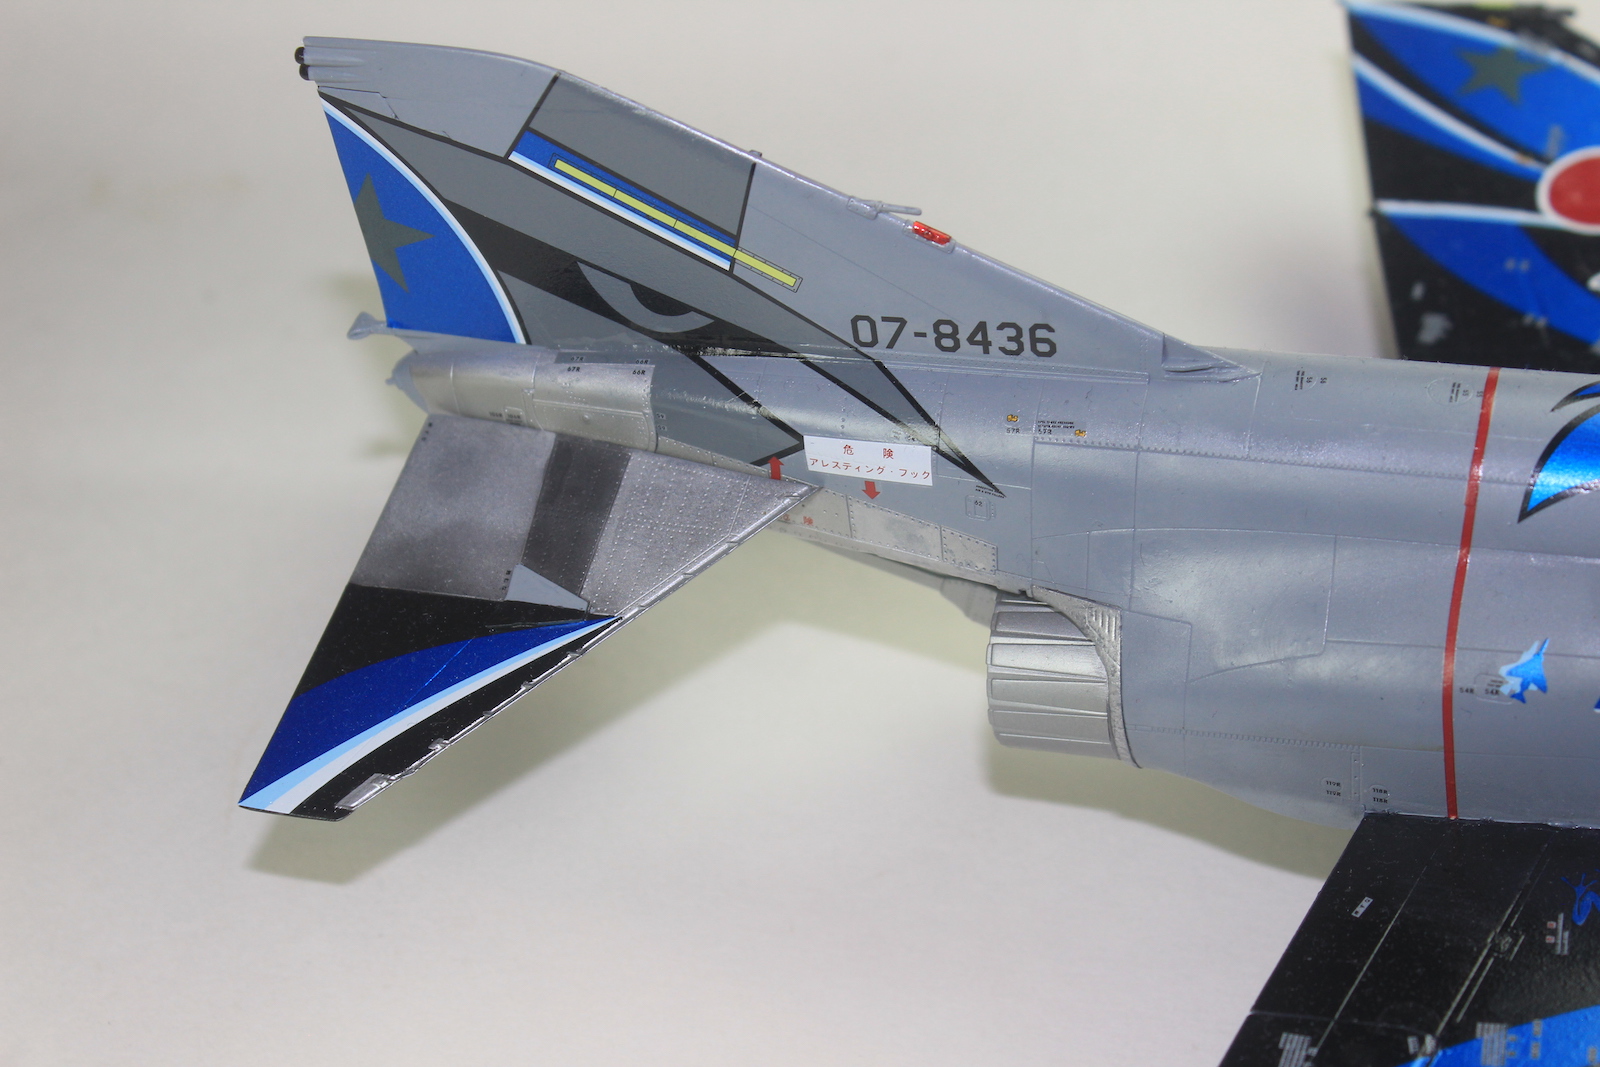
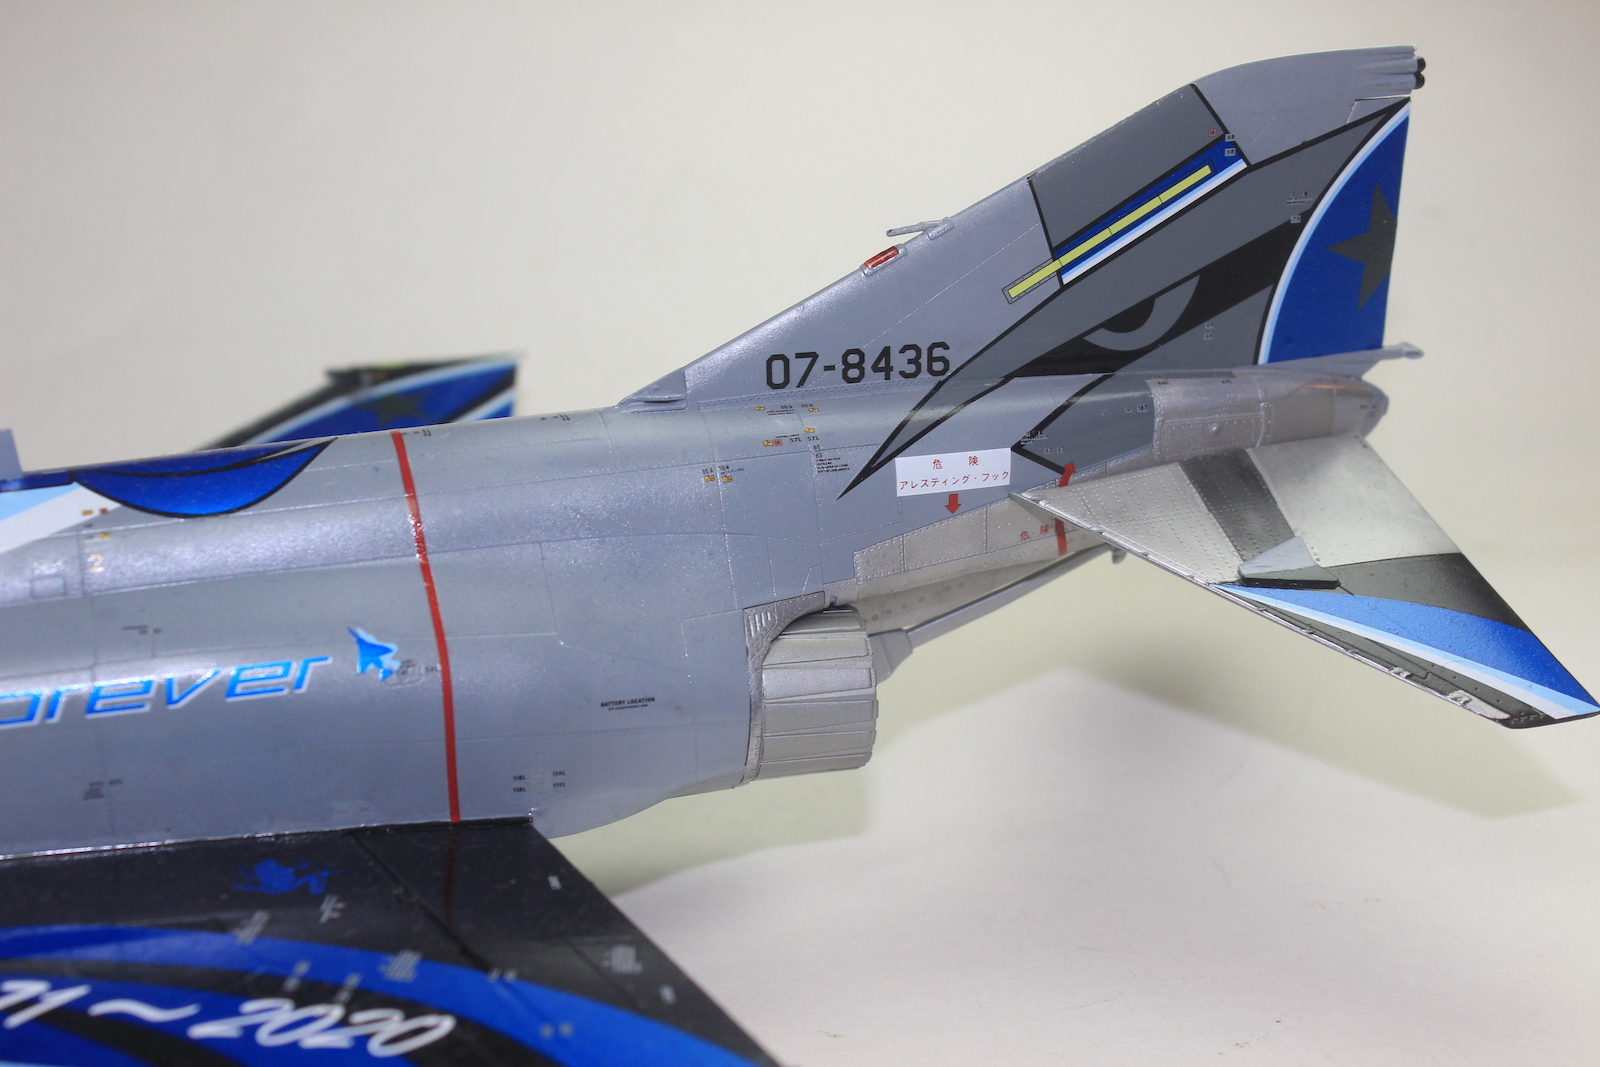
With the completion of the underwing stores it was time to move on to the painting of the overall scheme. I chose to use the Model Master enamel versions of the FS numbers listed in the instructions rather than the listed Vallejo colors. All of the Model Master paints are titled by FS number so they are easy to reference. The scheme is extremely simple but I do wish that there was a separate painting guide for showing exactly where to mask. The only exterior painting information provided is on the decal guides, which can be a little tough to get detail from, as there are so many decal callouts. I was able to get a decent idea of where to mask by tracing the outline of all the major decals on to printer paper and using those to trace the outlines on to the model. Even using this method, I actually made a small error with the nose cone - drawing the line for where the black started one panel line too far to the aft. This shifted all of the major decals back a bit and I feel that with clearer painting guides I would have had a better idea of where to mask.
After the paint had cured and a gloss coat of Pledge Floor Gloss had cured it was time to mask for the metallic tail. As stated above I swapped out all of the metallic paints in the instructions for Model Master Metalizer paints. The burner cans and arresting hook were painted Stainless Steel, the main tail plates were painted as a base coat of Aluminum Plate, and every other panel was highlighted free hand with Magnesium. Everything got a thin overspray of Jet Exhaust, also sprayed free hand. The stabilators got a base coat of Aluminum Plate with the center section painted Titanium. Parts A6 and A7 were painted Silver Chrome Plate.
Once this had a chance to cure it was time to coat everything with a few light coats of Pledge Floor Gloss (PFG). After this was dry it was time to decal. Be prepared to spend plenty of time here, there are decals labeled up into the 400s. I spent about 9 hours total spread over 4 days to complete the decals including all of the tiny stencils. The decals are stunningly printed and the register is perfect. The metallic blue on the decals is an exact match for the Metallic Blue paint required for the drop tanks. The decals also performed flawlessly over the gloss coat. I did tend to apply them over a small puddle of Pledge and roll a Q-tip over the decal until the air and Pledge were squeezed out. I had no issues with slivering using this method, even with the larger wing decals.
After the decals had set it was time to overcoat several times with PFG to seal the decals. Once this was dry it was time to install all of the tiny parts that I left off during the build. I had no issues with the fit of these parts. The fit is excellent for the most part but fiddly for a few really tiny pieces. Once the landing gear had dried and the canopies were installed the build was complete.
Much has been said about the previous releases of this kit and I tend to agree with the other reviews. This is by far and away the best F-4 in 1/48 scale. The engineering and production value of this kit is awesome. The decals printed by Cartograf are stunning and the finished aircraft really stands out. My only real gripe is the lack of the painting guides. I do believe that a special edition kit like this needs a separate painting guide to provide better detail, especially with the huge number of tiny decal callouts on the provided guides. At the time of review this kit is available for pre-order with some special bonuses but I doubt that the pre-orders will last. Highly recommend to anyone with an interest in modern jet aircraft or someone that wants a large aircraft that will stand out on your shelf.
Many thanks to Zoukei-Mura for the review sample and thank you to IPMS USA for the chance to review it.


Comments
Add new comment
This site is protected by reCAPTCHA and the Google Privacy Policy and Terms of Service apply.
Similar Reviews