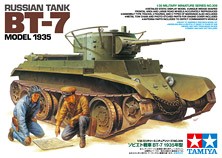
BT-7, Model 1935, Russian Tank
They say that there are only two things in life that are certain, death and taxes. I’d like to add a third: the precision fit of a Tamiya kit. Not that this model is perfect, but it sure was a pleasure to build. After building several other brands, I forgot just how nice a Tamiya kit goes together.
When the box is opened, one is greeted by 264 parts, 213 in green styrene, 17 in gray (for the figures), 8 in clear, 10 large and 8 small poly caps, 7 photo etched metal parts, and one length of steel chain. The parts are beautifully molded with no sink marks, excepting for the usual molding seams and punch-out marks. These are mostly unseen once assembled.
In steps 1-3, the lower inner hull is built. Details are crisp with no fit issues whatsoever. I was a little concerned at first, since the usual tub is not there. But I was amazed by how well it all went together. It was spot-on and I needed no filler anywhere!
In steps 4 and 5, the suspension is assembled. No trouble, but the poly caps must be in place correctly.
Steps 6-10 finish the lower hull and suspension. Again, no problems but it sure could use more detail on the inside. All that is included is a seat. With the front hatches open, it really cries for more.
In step 11 the tracks are done in link and length, with a sag already molded in – a very nice touch. The main problem is the large number of knock-out marks. Many will be hidden once assembled, but if the model is built to enter a contest, extra work is required here.
Step 12 starts the upper hull. I left the exhaust pipes off till later to help in painting.
In steps 13 and 14, all of the etched parts are added. Tamiya really did this part right. A little jig is included to help bend the exhaust covers. Just line up the tabs, work the part around, and then press the other half over the top for a perfect bend. Later, part of the jig is used as the support for the cover, as on the real thing. Pay attention in step 14 as to how the radiator screens are added. It is a little tricky, but simple once you try it. The instruction sheet could have been a little clearer here.
Steps 15-19 finish the upper hull and all the details, OVM, and fenders. A few punch-out marks must be dealt with on the fenders, but they are not a big deal.
In step 20, the chain is added to the front of the hull. I left this off till the end to help with painting.
The turret is assembled in steps 21-24. Again, no problems, and there are a few more interior details here. I used a little filler on the turret halves. However, that was the only place I needed any, with the exception of the above-mentioned punch-out marks. I decided to build mine with the surround tube antenna. It just looks good on this model.
In step 25, the turret is added, and the model is ready to take to the paint shop.
Two figures are also included with the model, both down on their knees looking over a map which is cut out from the instruction sheet. A little sheet is also included that gives more history on this vehicle. Another sheet shows markings for five different tanks. Additionally, there is a glossy sheet of photos of the real vehicle taken at Kubinka and the Central Museum of the Armed Forces.
As for painting, I used Model Master Russian Armor Green and Tamiya Flat White for the aerial ID. I used Model Master Helo-Drab for the rubber on the road wheels and Track Brown for the tracks, finishing them off with a #2 pencil. I added some filters, washes (to help pop some of the detail), some MIG pigments, and pastel chalks. To finish it, I heavily thinned some Tamiya Buff and misted it over the tank, concentrating on the lower hull.
Overall, I give this model a high mark. The assembly is flawless and the fit perfect. I would like to have seen a little more detail for the interior, as the model really needs it if the hatches are left open. Also, the tracks could use fewer punch-out marks; perhaps using tabs would eliminate this.
I would like to thank Tamiya and IPMS/USA for the sample. It was a very enjoyable build.


Comments
Add new comment
This site is protected by reCAPTCHA and the Google Privacy Policy and Terms of Service apply.
Similar Reviews