
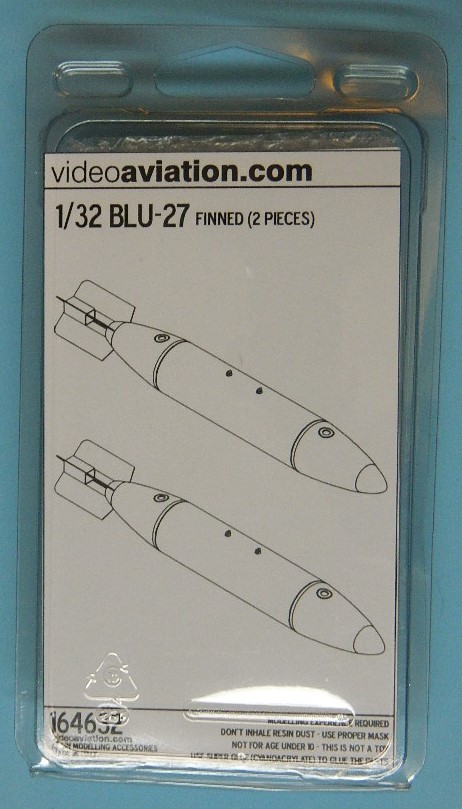
BLU-27 Fire Bombs Finned
Videoaviation is a small company out of Italy manufacturing big things; in this case, they provide large scale modelers the items missing from many of our 1/32 models to bring them to life, particularly in a diorama setting if you have room!
Having built their Dash-60 Power cart earlier this year, I was aware of the quality of Videoaviation products… and this continues with this simple, effective set of two firebombs.
The BLU-27 firebomb set will produce two, Vietnam-era Napalm with stabilizing fins. The BLU-27 was utilized as an effective anti-personnel weapon during a war where the world was less concerned about environmental issues. Common employers of this weapon were the A-26, A-1, F-100, F-4, and F-105 (not so much when their mission changed later in the war). I don’t know if these were certified for use on other aircraft.
Napalm, for the uninitiated, is a jellified-mixture of fuel, usually gasoline, naphtha, and a Gelling-chemical, (I have heard it is detergent,), allowing the fuel to ensure the agent sticks to the target and doesn’t flow off the target area. Usually two igniters are installed, one on the front and one on the rear of the tank, to ignite the agent as it hits the target area. Originally there were no fins on napalm, which allowed the tank to tumble, spreading it more efficiently when the canister hit the target area. The problem was frequently the tanks hit the aircraft on release, causing damage to the jet and sometimes igniting the weapon in close proximity to the aircraft.
Fins were added and the weapon was not only more accurate but was a better weapon on a specific target area such as a bunker or cave. The human targets either suffocated as the weapon consumed the oxygen in the proximity of the weapon during ignition and subsequent conflagration, or the more common situation, the jellified agent stuck to the individual. Almost impossible to defeat if you had it happen. I won’t go into the moral consequences causing its limitations on use.
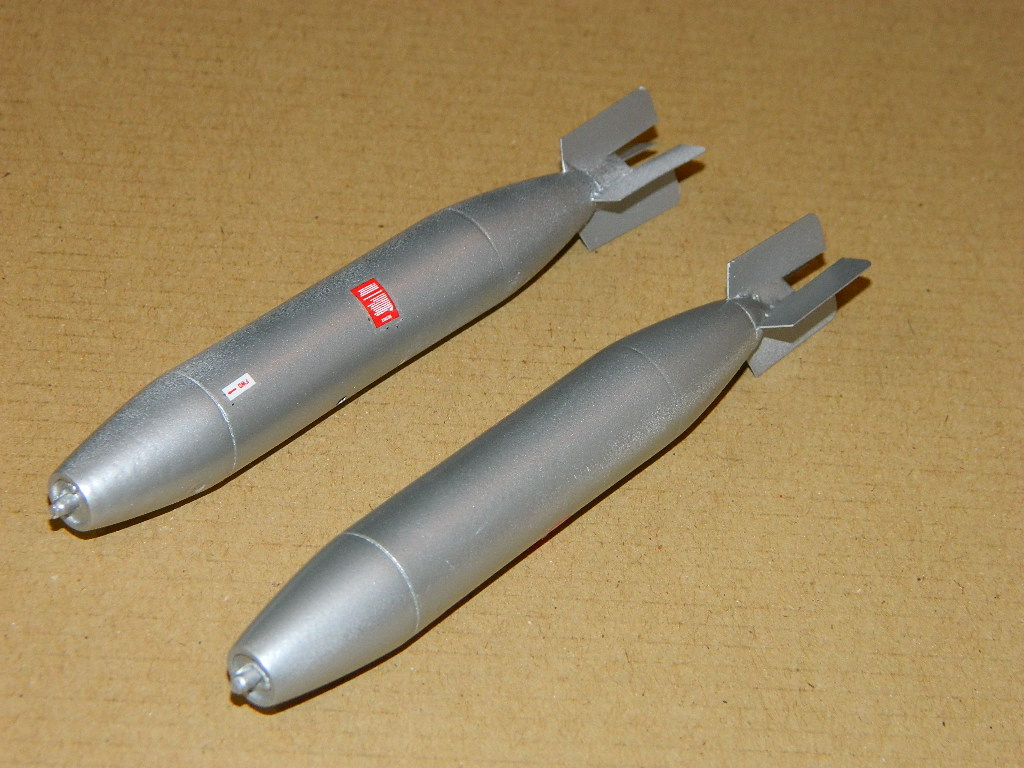
This set comes in a clear plastic box containing 10 resin items, (two tanks separated in front/back sections, a set of nose caps, and a set of fin attachment caps for the tail) along with a brass Photoetch set for the fins and a small decal sheet. This allows Videoaviation to manufacture fin-less tanks as well… This is an accurate and much-needed accessory for your Hun or F-4 in particular. The brass fins are welcome, because resin fins are more fragile and tend to warp over time as internal molding stresses manifest themselves. I have noted this on other manufacturer’s napalm tanks, which even after being hot-water straightened were wonky.
Construction: you need to remove the tank front and back sections from their pour blocks, and work on a clean, accurate mating seam. Using the tank filler caps molded on the two tank halves (which indicate the centerline) as an alignment tool, eyeball and superglue together, and then add the tail fin section to the rear. This important part has fin attachment grooves, which allow you to slip the PE fins into place. Again, the fuel filler caps are the indicator for the dead-center of the tank top and mounting location. Big foot stomper there.
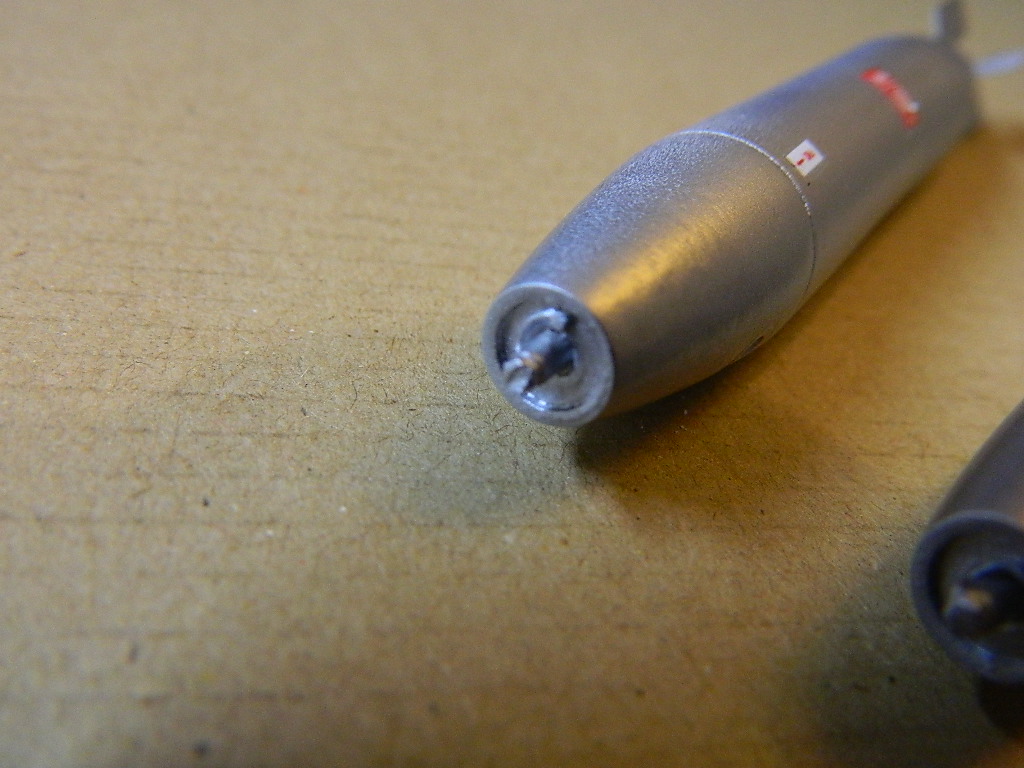
If you intend to use the nose caps, they need to be gently sanded off their pour stub using the sandpaper on tabletop method; this will ensure they are not sanded too much. Remove the fuse detail from the tank nose, sand flush, and install the caps with superglue. I opted to leave the caps off, as I liked the fuse detail.
Tail fin installation: Make sure you align the fin mount in an “X” orientation verses a “+” orientation, as the fins will interfere with the installation on the pylon or rack if you don’t.
Remove the fins from the PE set, and clean up any burrs on the edge; then remove the centerline fin box and carefully fold TOWARD THE ENGRAVED LINES after burr cleanup, making an open-ended box. See the pictures for clarification.
Slip the fins into the slots; the rounded part is the leading edge, and the sharp angle is the tail. Carefully glue the fins into place; the fit is tight, which aids in the installation. I had to use a bit of filler for the seams, so the dust needed to be cleaned out of the slots, which one of the fin sharp edges worked well in clearing. Once the glue has set, carefully align the box into the area between the fins on the centerline and glue. I would probably use epoxy in a future build; the superglue accelerator made a rough surface on the attachment, and it needs to be either filed smooth (an awful job) or filled and sanded (not a better option). Of course, careful, methodical installation verses a “get it done on a timeline” installation may have precluded the requirement to use accelerator.
Your mileage may vary tax title and license not included, prohibited in New Jersey. See dealer for details. (Sorry, I had to do this….)
Painting involved drilling a hole in the mounting lug area (which later serves as a place to put a mounting wire) and using extra length cocktail sticks from wally world to jam into the corrugations of the cardboard box I was using as a paint stand; Tamiya primer for the overall prep, then overall Tamiya Bare metal spray bomb to finish.
Allow the paint to cure, then apply decals… these worked well, snuggled on to the surface, and look like the real thing. I did not check the writing, but it appears legible.
BRAVO MAURIZIO! The finished product will look great on my Trumpeter Hun… I liked the etch metal fin section, the detail on the nose fuse (which would frequently have the cap applied) and the overall clean presentation. It looks great. Extreme thanks to Videoaviation for sending the set to IPMS USA, and to Sir Dick in his last few weeks of being the keeper of the hoard, (take a breath)… who sent the set to me on the approval of Mighty Dave, AKA “fearless leader” of the reviewer corps. More to come on the Videoaviation front…


Comments
Add new comment
This site is protected by reCAPTCHA and the Google Privacy Policy and Terms of Service apply.
Similar Reviews