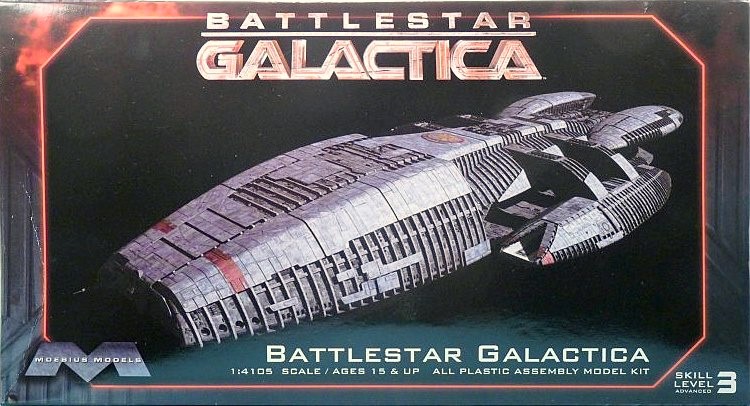
Battlestar Galactica
Description and History
From the Moebius Models web site:
“Galactica was one of the first twelve Battlestars to be constructed by the Colonials, each representing one of the twelve colonies; Galactica represented Caprica. As such, she is some 50 years old. Galactica (BS 75) is a veteran Battlestar and the last of her kind still in service with the Colonial Fleet at the time of the destruction of the Twelve Colonies. Built during the early days of the Cylon War, she becomes one of only two known Battlestars (the other being Pegasus) to survive the renewed Cylon attack on the Twelve Colonies. By the time of this attack, she was part of the 75th Battlestar Group (BSG-75).'
In the Box
Several light beige sprues with parts numbered 3 to 45. There are multiples of some parts, 2 major hull parts, 1 clear sprue, 1 metal rod for the base, a sturdy base and 1 decal sheet, and a partridge in a pear tree.
First Impressions
The materials of this kit are very high quality and since the real/fantasy item is about 7/10 of a mile long, the heavy thickness of the styrene along with deep recessed panels realistically simulates the massive exterior of the Galactica. An initial dry fitting shows that most of the pieces have a very tight fit but there are a couple of exceptions to be noted below. There is no flash and only a few injector pin marks that will not show.
Construction and Discoveries
In less than 4 hours I was able to build the major hull components and subassemblies.There is a one piece base with a metal rod that makes for a sturdy display allowing the finished model to be elevated to view the underside.
The forward hull sections were an easy assembly and other than a few small gaps, fit snugly with the main hull sections.
The engine pods will be attached after they are painted in order to make the painting easier.
The Galactica can only be built in battle mode. This means that both Flight/Landing Pods are extended from the main hull. The hull recesses will require the most filling since there are large gaps where they meet the upper and lower hull. It took several applications of putty and sanding to eliminate these gaps.
The Flight Pods below are shown before and after assembly. Before closing them up I needed to fill gaps, smooth, prime, paint, gloss coat and apply the landing bay floor decals. A lot of work since only a very small portion of the work will be seen from either end of the Flight/Landing Pod entrances. Please note that decals were applied inside the pods before closing them up.
Painting
I used Vallejo Model Air for priming and base coats. There were 2 coats of grey primer, 2 coats of silver over the entire model and a final overall coat of steel. The extra armored panels were initially pained with Vallejo Model Color dark grey but, that was too much of a contrast so I over-painted with light grey. Other areas such as the 24 main guns, red ID stripes and a clear blue inside the engine exhausts completed the detail painting. After 2 mist coats of Future the decals were applied. All the decals were very fragile. Another spot coat of Future over the decals and we are ready for weathering.
Weathering and Finished Photos
I wanted to have the deeply recessed panels and other features really “pop” so I applied an acrylic wash of black over the entire model and after wiping away the excess (can you say “a box of Q-tips”), A final dull coat and I’m done.
Summary
I highly recommend this kit. Great details, over 90% flawless fit and great subject for Sci-Fi modelers. This was my first Moebius model and I have a Colonial Viper waiting in the “wings” [pun intended]
I would like to thank Moebius Models for supplying the kit and IPMS/USA for the opportunity of doing this review.


Comments
Add new comment
This site is protected by reCAPTCHA and the Google Privacy Policy and Terms of Service apply.
Similar Reviews