
B-52G Stratofortress "Gulf War" 25th Anniversary
Up front: Sincere thanks to Italeri and their U.S. distributor, Hobbico USA, for this Boeing -Licensed model of the venerable B-52. And thanks to IPMS for sending it to review.
The old (1992) AMT/Ertl (Now released by Italeri) B-52 G and H series were hailed at the time as a "Someone finally listened" moment. Three versions of the kit were released, all of which shared the modular center/core of the B-52 line. The B-52G was released in a hound-dog carrier, early-version without EVS (Electro-optical Viewing) and FLIR (Forward looking Infra-red) chin–mounted sensor turrets and fairings. This kit was released with an excellent set of Hound Dog missiles for underwing mounting. The engines were correct for the "G", with the side-mounted electrical generator cooling ducts, and the forward bullet-nosed engine section which was a major feature to differentiate this mark from the "A" through "F" blunt-nosed engines with the Alternator cooling section in the center of the engine intake.
A second "G" was released as an ALCM carrier, whereby the large fillets on the forward wing to fuselage junction were mounted along with the aft fuselage lower fins and comm gear. These fins and strakes served no other purpose than to determine ALCM-carriers for Russian flyover satellites to record which jets were on the ramp.
Kit details are very heavy-handed, with deep, wide scribing, and all the external stiffeners, etc. are pronounced. Some are appropriate; but could use refinement. For example, the entire horizontal stabilizer on the B-52 rotates on a large triangular plate, much like an F-4, except the B-52 uses this function as a pitch trim system; there is a tiny (but effective ) elevator all along the back of the control surface. The kit has a large recess for this moveable part, which is incorrect and should be filled in. There are similar issues throughout the kit, which will be addressed later…
AMT subsequently released an "H" version as well, with the external pylons for the ALCM mission, and six weapons per side. The H did not have the fuselage to wing strakes, but was considered to be readily identifiable by the large TF33-103P engines. It also had strakes mounted on the aft lower section of the fuselage halfway between the main wing trailing edge and the horizontal stabilizer leading edge. \
All kits had forward and aft fuselage sections molded separately in four parts; external detail was good in that it contained the lower longitudinal external stiffener straps running from just In front of the forward bomb bay to the rear stabilizer; vertical stiffeners were also included under the main wing and around the aft stabilizers.
The nose was correctly shaped in all cases (although there have been at least two different nose radome G and H shapes over the years; one is shorter and more blunt, and the newer version has a bit more upward sweep and length, which is what is provided in the kits.) Nose side cheek blisters are provided, (a bit square and can be rounded off) and upper antennas and tail radar blisters are provided for each.
OK, those are the details. How did the AMT /Italeri kits fare?
Most noticeable: The flaps are not down. On the B-52, they are always down on the ground, unless there is a reason to bring them up involving maintenance. That is due to stresses on the hydraulic system, and inspection requirements.
If you are willing to do some work, these kits are ok. Not unbuildable, but in order to make a proper final product there are several things requiring serious alteration.
First, the tail section. At the extreme tail, it is about a scale foot too slim in horizontal cross section. Very noticeable if you have worked on the bird. The Tail guns, (.50 caliber quad) are also about the size of 30MM cannons, and the turret just doesn't look correct; the Monogram "D" has the correct turret. On both G and H jets this requires one to use the aft fuselage from a Monogram "D" to get the correct width on the turret area; and the use of the four-gun turret for the "G" or the "H" M-61 20MM Six-barrel Gatling gun stinger. How did this all come about? Look at pictures of the actual B-52 tail then look at the kit; someone totally fictionalized this section, as the horizontal stab plate has a large recess going toward the tail; this makes the tail gun section about a scale foot or so too thin in width. I'll address this in the side by side build on another article.
Second: the "wing box" issue… as installed, the wing is in a "flight load" condition. This is great if you are building the kit and hanging the model from the ceiling. It's been a few years since the kit first came out, and many have addressed this issue in various ways; install the box upside-down, (which means you have F-104-style anhedral… not a proper fix) and fill the gaps, or install and modify the kit wing box and spars. Check the pictures for my quick fix; use the sprue runners from the fuselage to make short stub spars, cut down the spar box with a razor saw, and then use the stubs to drop the wing down and hold. Use gel superglue and work fast while the fuselage is sitting on the bench; in this case I didn't make a jig, but in future will probably do so. Fill the huge gaps with styrene and superglue, rough sand, putty, primer, rescribe, and check your work. I did a bit of a dodgy job, but this one is going to hang in the office…
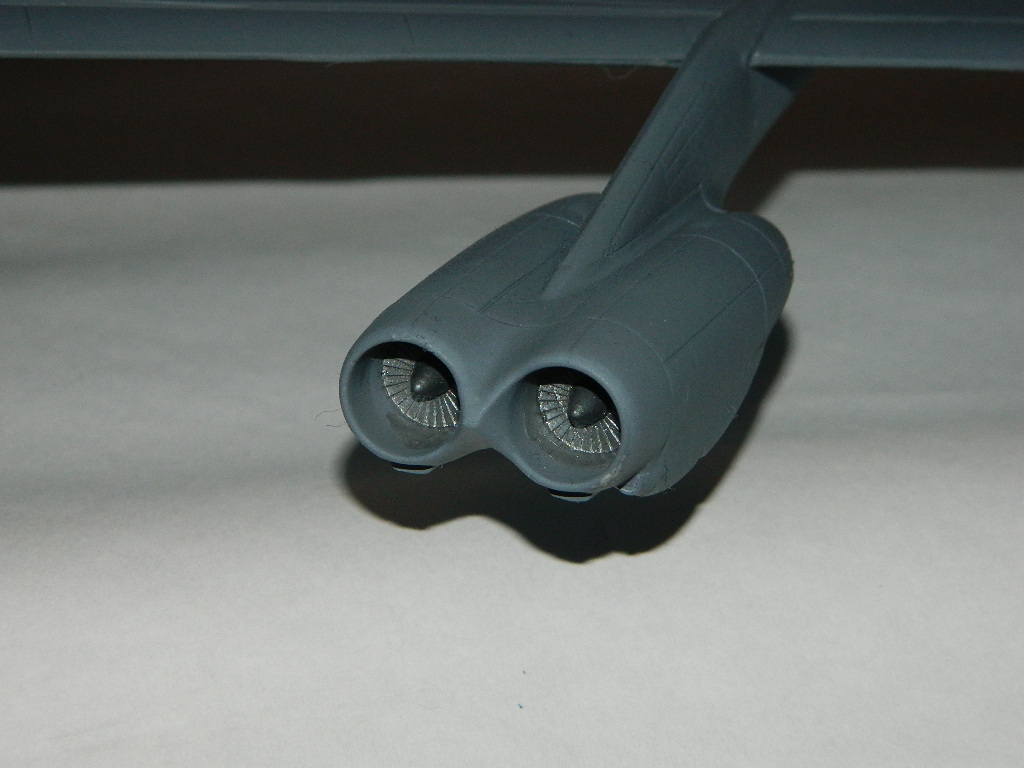
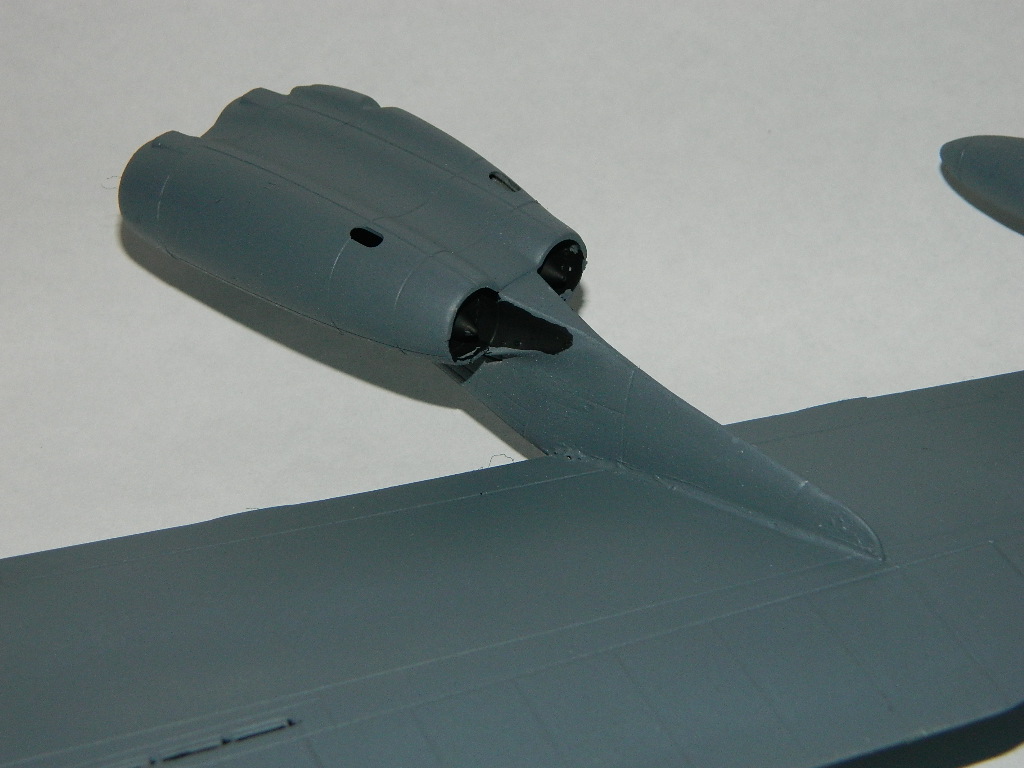
Cowlings: The J-57 steamjets (water injected) have correct intake diameter. The intake bullets are a bit anemic and not rounded enough, and the intakes are too square in profile. The engine exhausts are ok, but don't include the sonic sound vibration diffuser "mice". The "H" kits cowlings will be addressed in the later article as well…
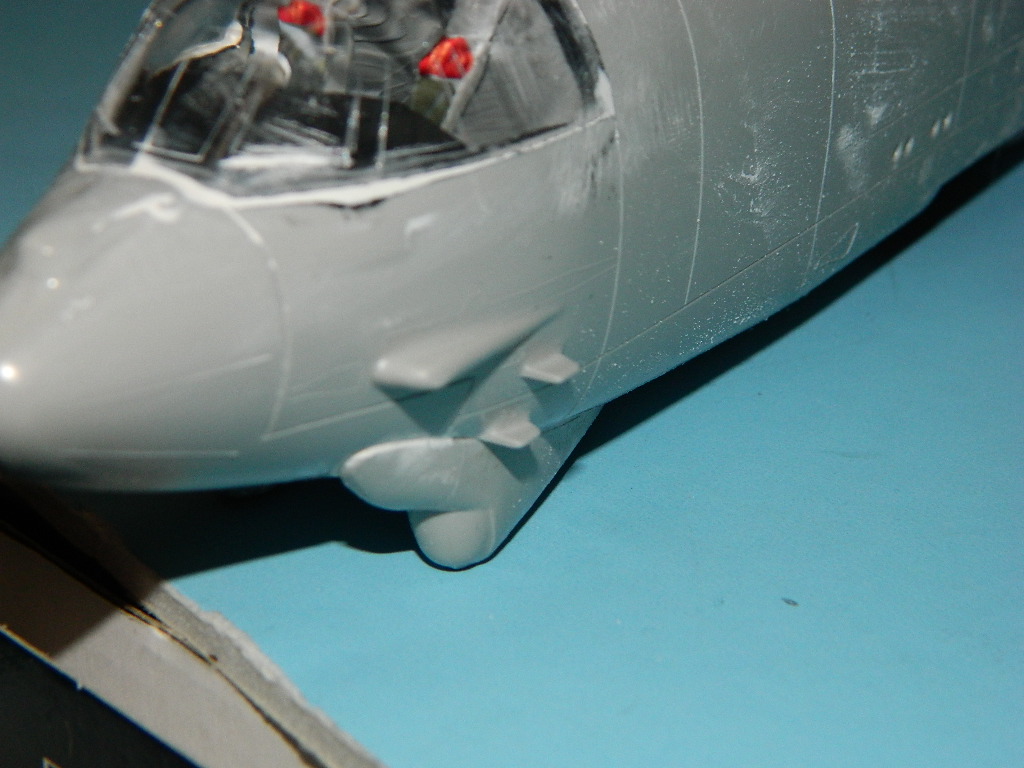
External details: the butt-strap stiffeners running the length of the aft fuselage for skin crack attenuation on the lower sides need to be sanded down a bit. I didn't on this build. On both sides of the nose are four lateral blades extending out, two on each side; this caused much confusion until I figured out these antennas were placed where the pitot/air data probes were mounted. Whoever got the task of developing the external detail on the model appeared to use whole-aircraft "stand-way-back" pictures and didn't notice what was actually there; they just assumed they were blades for whatever reason and went from there. I recommend you clip these off, drill a tiny hole on the back section where the blade area was to serve as a mounting location for the proper probes, and then sand the area flush, leaving the hole for the location of scratch-built air data probes. There are no blade antennas here…
Cockpit windows: Although this section is well done, all the windows have a convex shape to them inside the framing. Options include: Laborious drilling and removal of the panes, and installation of flat clear plastic; marking the frames from the inside and sanding the exterior flush, then polishing to clarity; or another technique for cross-kitting using the Monogram "D". That's part of where I am heading… but for the review, I installed the clear parts, ran a sharp blade around the edges to mark the panes, and sanded them all flush with the framing then polished, leaving the scribe lines to mask from. Not my best effort, but…
The cockpit is pretty well done, and far more detailed than the Monogram kit. 1968 release kits were part of that generation; a seat back and peg in the fanny of the pilot to hold in place, with a yoke to control with and decals for the instrument panel and throttle column. This is ok for a flying display on the "D", but we can do better…
The out-of-business Meteor Productions resin sets attempted to address many of these issues in the mid-1990's; most of the details were excellent, including the cockpit, ejection seats, antenna blisters and tail modifications, a new vertical fin, and external tanks. The upper-fuselage ejection hatch/spoilers were grade-a perfection, requiring careful clean up for a very well-done effect. A "Cheese grater" tail vent was provided for the modern "H"after someone correctly surmised the utility of the gun was zero (missile performance has drastically improved), and a correct width tail gun section for the "H" with gun was also addressed.
Two other major external differences were also catered to: The seven-section roll-control spoilers with their offset fingers were provided, and new engine nacelles. The "G" set was very well done, and appeared to copy the AMT J-57 pods. The "H" pods were also copies of the AMT parts, and here's how we know: they are about 30% too small than actual "H" engines in both cases. The TF-33 intake fan is Larger in diameter, and using a scale ruler, the engine intake fans for the "Golden Phoenix" "H" intakes are correct. The GP nacelles have shape issues, but are the closest to be developed to date. They also have excellent bypass duct exhausts on the sides of the intakes. The 1980's DB conversion "H" intakes and nacelles have good shape, but are a bit undersized and the bypass exhaust details are not well-defined.
One last benefit of the meteor set were the engine struts and sailboat fairings; both are dissimilar on the actual G and H aircraft, with total different shape to the "D" monogram struts. (See the comparison picture). The kit and Meteor got these right.
On the #2 engine pod (closest to the fuselage on the left side), a prominent air duct exhaust should be between the engines, right at the point the engine exhausts terminate.
The landing gear philosophy for the Italeri kit was to have separate wing outrigger struts and wheels/tires; Monogram's "D" kit versions have the outrigger wheel and tire integral as one item. For strength I prefer the Monogram version, and the wheel and tire are more accurate in profile. Italeri has a rounded doughnut. Tip well detail is also slightly better on the Monogram kit. The AMT well has no detail at all, just three strut mounting sockets.
Main wheel wells: toss up here. The Italeri kit wells are better detailed, and accurately depict the upper well ceiling, which is the body fuel cell floor (which runs the length of the fuselage from behind the gunner's position to just over the aft bulkhead of the aft main gear well). The Environmental system "Potato", which looks like a huge oxygen bottle covered in aluminum foil, is depicted as a square canister. The Monogram wells are appropriate for a "D". Also, the Monogram kit has bomb bay doors which can be opened… but no bomb bay interior! (The original Monogram bomb bay had a battery box with a plate of half-bombs which was screwed into the bay; this is where the four AA batteries went in the original kit to power the "Jet Sound" unit) The hokey sound system was suspended by four rubber bands… and a slide-switch was installed in the lower right fuselage side, just under the wing root leading edge. When completed correctly you had a "squealing" B-52D. And we won't discuss the fun of changing the batteries… which usually ended in broken wires and/or a broken model.
On to the build; Italeri has re-released this particular B-52G kit at least twice. The decal sheet is very well done with stenciling, wing walkways, and four marking sets for different birds. One SIOP (Single Integrated Operations Plan) SAC camo over white, one with Dark Gunship Gray and green/tan, and two overall Gunship gray birds. The problem with the decals is two of the jets (473, the Barksdale markings, and 90256, the SIOP jet) should not have the Forward wing root Strake fairings and lower aft-fuselage blades as installed on the START treaty ALCM carriers; Only the first two markings are strake-fairing modified aircraft. (Caveat: I cannot find pictures of the SIOP bird later in life, so it may have been modified… )
To make a non-strake bird will require you to purchase one of the early "G" models in early silver over white finish (this kit has very nice Hound Dog missiles in it) or an "H" model from AMT. They are out there on EBay for collector prices…)
First order of business is to tightly cement the aft fuselage sections to the nose sections on each side. You'll have to decide early on about the wing box, because it inserts from the inside. Of course, the plastic is VERY soft and is easily carved, so if you forget you can recover… BTW, buy a tube of filler, you are gonna need it.
When installing the cockpit and gear wells, make sure you have them aligned. The interior of the kit is pretty easy to figure out, due to locator pins. Cement the fuselage halves together, then notice the instrument panel coaming is way too short; on the actual aircraft you cannot see the back of the instrument panels. I used some card stock, made a new coaming cover, and then puttied away. This was just one more head scratcher for me; AMT/Ertl engineering missed SO many things on this project, particularly since they did so well on their KC-135 kits.
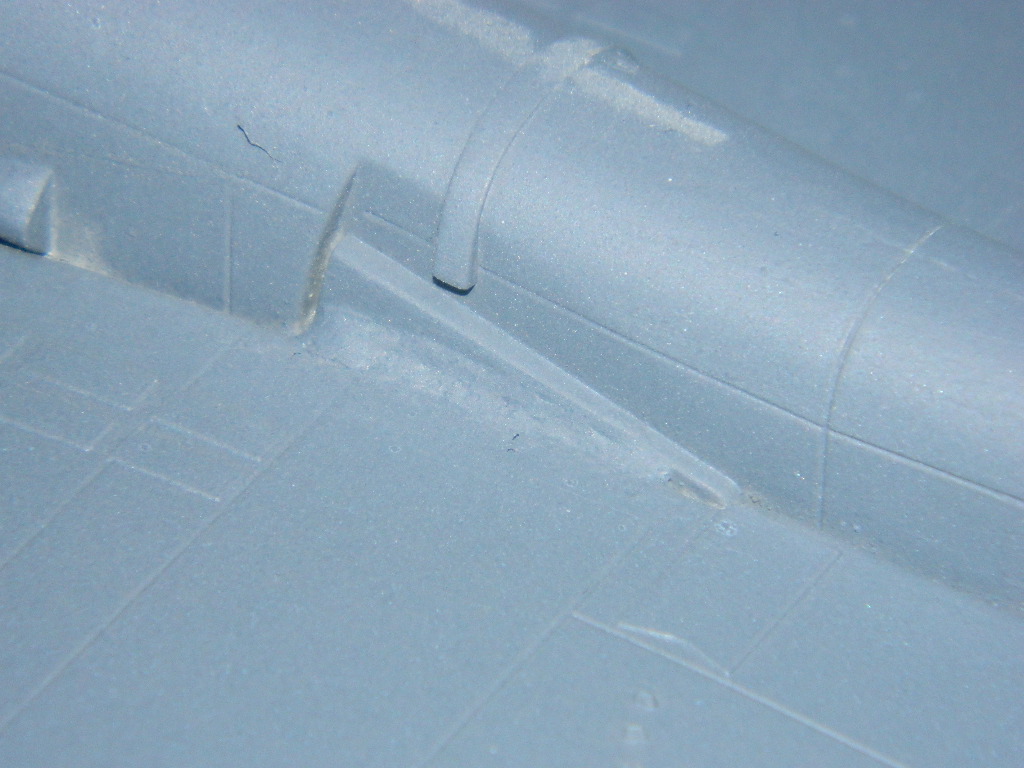
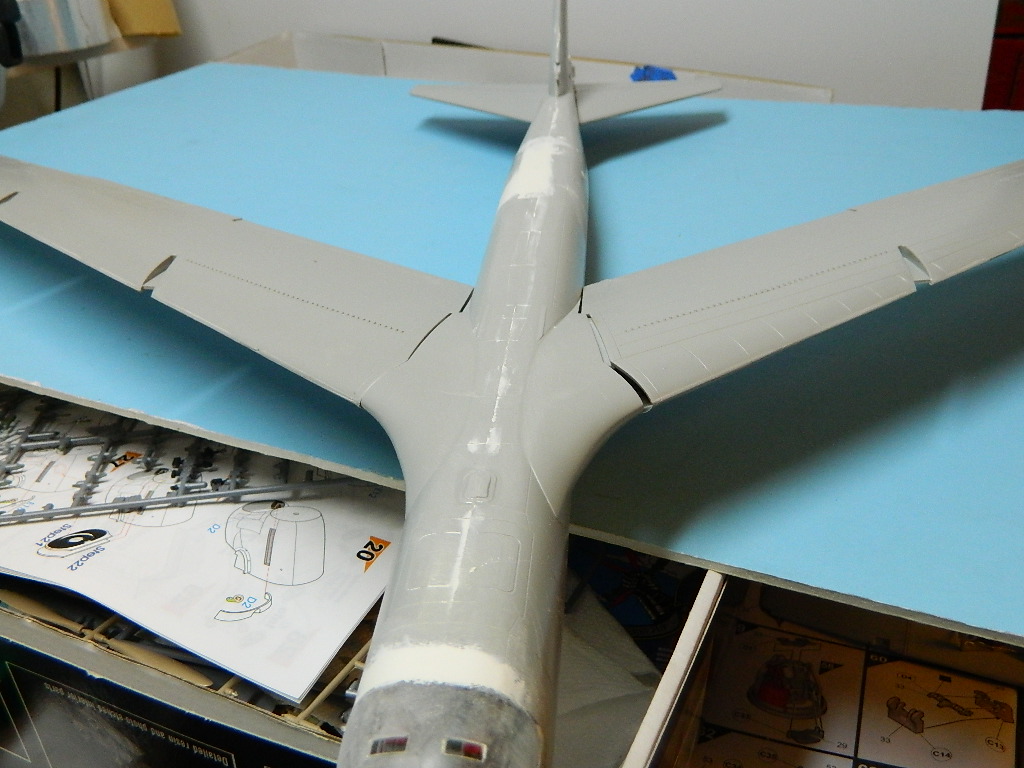
I addressed the wings earlier; now's the time to install. The fin intake for avionics cooling needs to be drilled out and a curved duct installed; I just painted it black for time purposes. Also forgot to replace the "Q" spring artificial feel intake probe at the base of the fin, which was a victim of aggressive sanding. (This probe provides pressure for an artificial control feel to the pilots; otherwise they don't know if they would not know if they moved a control surface or not).
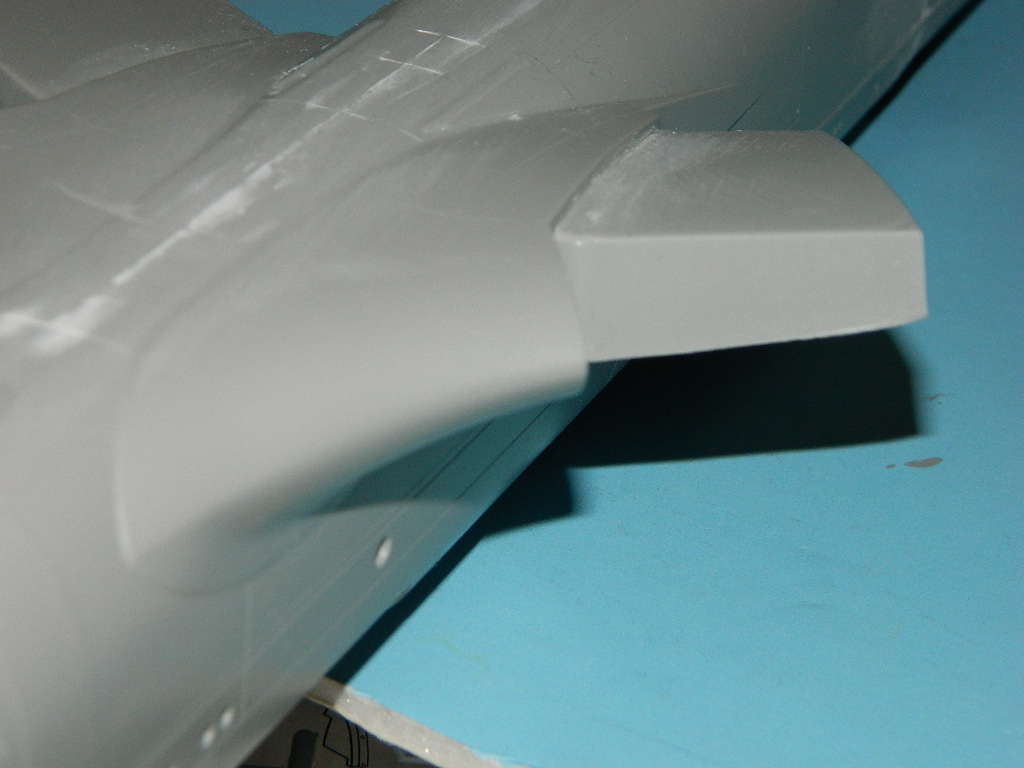
The horizontal stabilizers have small light housings at the extreme tips of the elevators… a small detail that was included on the kit. Same for the two Avionics cooling exit domes under the moveable stabilizers on the right lower side. The fin is fixed in place; the rudder is a small but effective control surface. There is a strange recess right in front of the Stabilizer. The upper and lower aft fuselage "Christmas tree" antennas disappeared during the build, and I just have not constructed replacements yet. The blade antennas on the lower side of the aft fuselage are chunky but ok. (These are part of the START treaty satellite verification additions, like the strake lets on the wings)
Painting went well, one color FS36118 Gray overall. Italeri would have you paint the model with 35237 Dark ghost gray; I'll assume this is to show the faded effect on the paint, but 36118 is Tech order correct. The other markings are correct on the instructions.
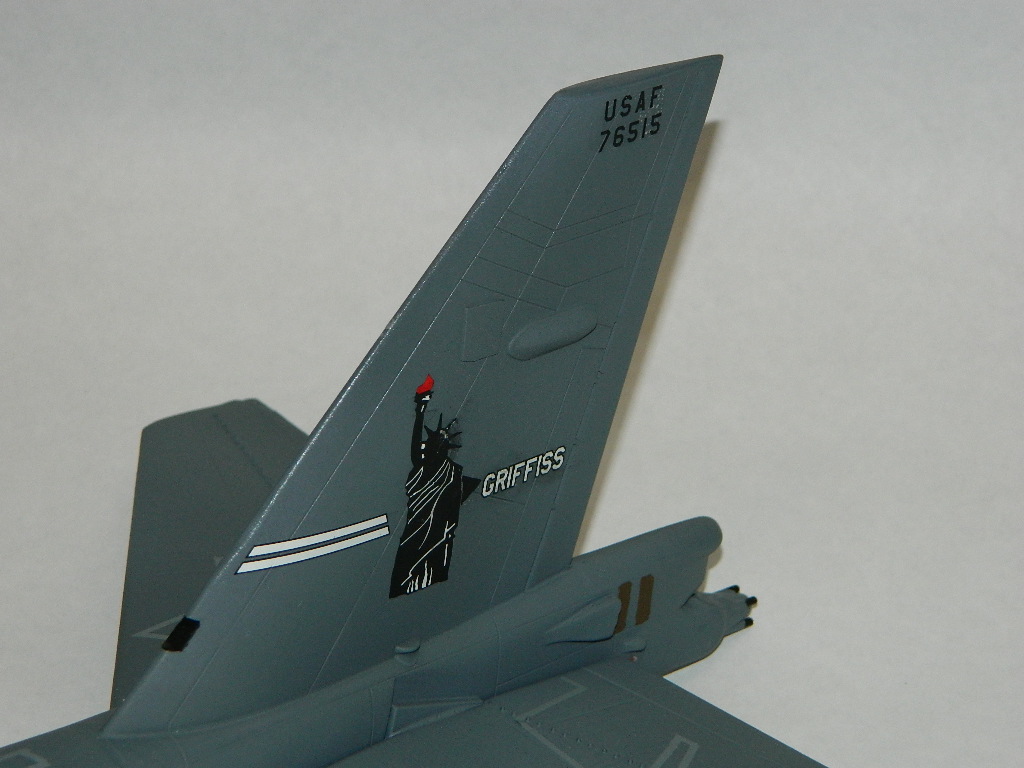
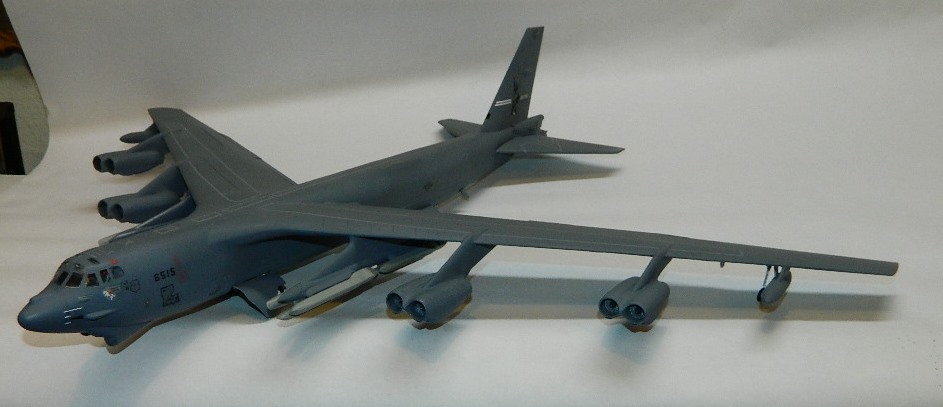
As previously noted, Italeri provide three separate Desert storm birds and one marking setup from 1977 (the SIOP Scheme); as this kit is the release with the ALCM modifications, only two of the four aircraft are presented as strakelet-modified ALCM carriers; Marking A, 56-0183, and Marking B, 57-6515.. As presented, Marking C, 57-6473, and Markings D, 58-0251,were not ALCM modified with Strakelets. The kit has no provisions for conventional munitions carry; you will be building a stateside strategic alert bird with 12 ALCM if you build out of the box, which means they are accurate for ALCM only carry. The "Magnificent Seven" B-52's with conventional ALCM that we launched from Barksdale can be modeled from this kit, but they only carried a partial load. Again, I'll be addressing this in a later build article.
Marking A is a Wurthsmith AFB, Michigan bird, with Triangle K on the tail, in over all 36081 Gray with 34201 tan/Green, deployed to King Abdul Aziz AB, Jeddah, Saudi Arabia; Marking B is a Griffiss AFB, New York bird deployed to Moron AB, Spain in overall 36118 Gunship Gray with nose art for the Statue of Liberty; Marking C is a Barksdale AFB, Louisiana bird deployed to Diego Garcia AB with 36118 Gunship gray and nose art for "hard to Get" and the "Fleur du Lis" on the tail; and Marking D is a Wurtsmith SIOP white-belly bird with SAC tan FS34201, SAC Light Green 34159, and dark green 34079 uppersurfaces.
I was going to do the SIOP white-belly jet from Wurtsmuth AFB, but really wanted a Griffiss bird. Gloss coat, then decals. I chose the Griffiss bird which was "chopped" to Barksdale during Desert Storm; hence the Barksdale Dedicated Crew-Chief block with the Louisiana outline on the nose, and the painted- out unit markings on the nose.
The decals also addressed the missing cooling intakes on the extreme nose in front of the side blisters, and had some white markings that I can't figure out. Ejection triangles and Tail flare warning triangles were also included.
The wing walk decals are unfortunately short by about 2"; they end just outside the #1 and #4 struts, but should go out past the external tanks. This is shown on the three-view diagrams but the actual decals don't reflect this. They behaved well where I had properly gloss-prepped the surface, but I had to resort to using drops of Tamiya thin cement over the ones on the nose where even Solvaset® would not settle them into the paint surface. After a second gloss coat, I used Humbrol spray can Flat coat enamel to finish. I like this stuff better than Testors dullcoat, as it comes out truly flat and doesn't' attack the underlying paint like Lacquers are wont to do. Doesn't' stink as much, either! (And It was too cold in my work area to airbrush acrylics this weekend… my other flat coat fallback) !
Finishing the model involved installing the landing gear and doors, and attaching all 12 cruise missiles. Interior of the wheel wells and doors were painted flat Medium Sea Gray prior to cementing in place. The missiles are simple two-part moldings; cement together, clean up the seams, and drill out the missile exhausts. Use the holes to stick the missiles on toothpicks to hold, spray light gray (I believe they are FS36375 but have never seen the Tech order), and inject some Vallejo White putty in the orifice to simulate the exhaust plugs… cement to the pylon and you are finished.
There is a lot more that could be done or said, but time runs out on reviewers… so my assessment is the same as 1994 or so when I first built this kit. It's a great starting point, and looks like a BUFF when done… for now it's the game in town for late-model 1/72 BUFF models.


Interior

Instrument panel Installed

Canopy after Polishing
Forward Fuselage Detail
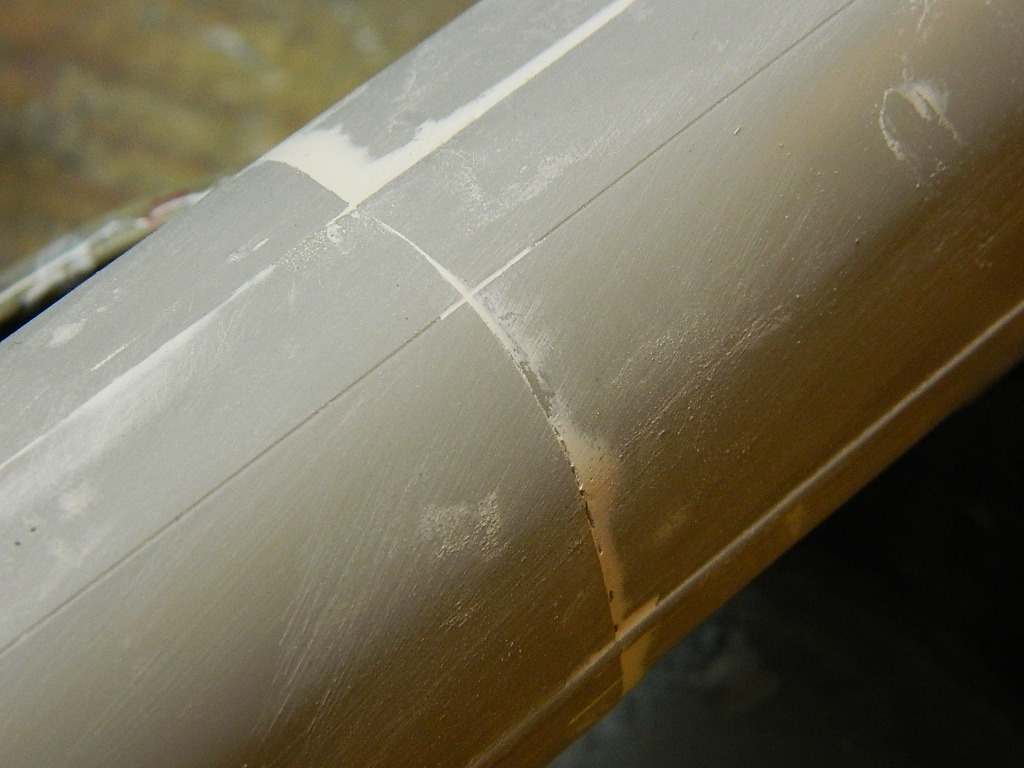
Fuselage Front & Rear Seam with Putty

Tail Section Putty
Stabilizer Attachment
Engine Detail Front
Engine Detail Aft
Kit Wing Box Installed

Wing Dihedral Brace
Wing/Fuselage Fit
Kit Wing Dihedral
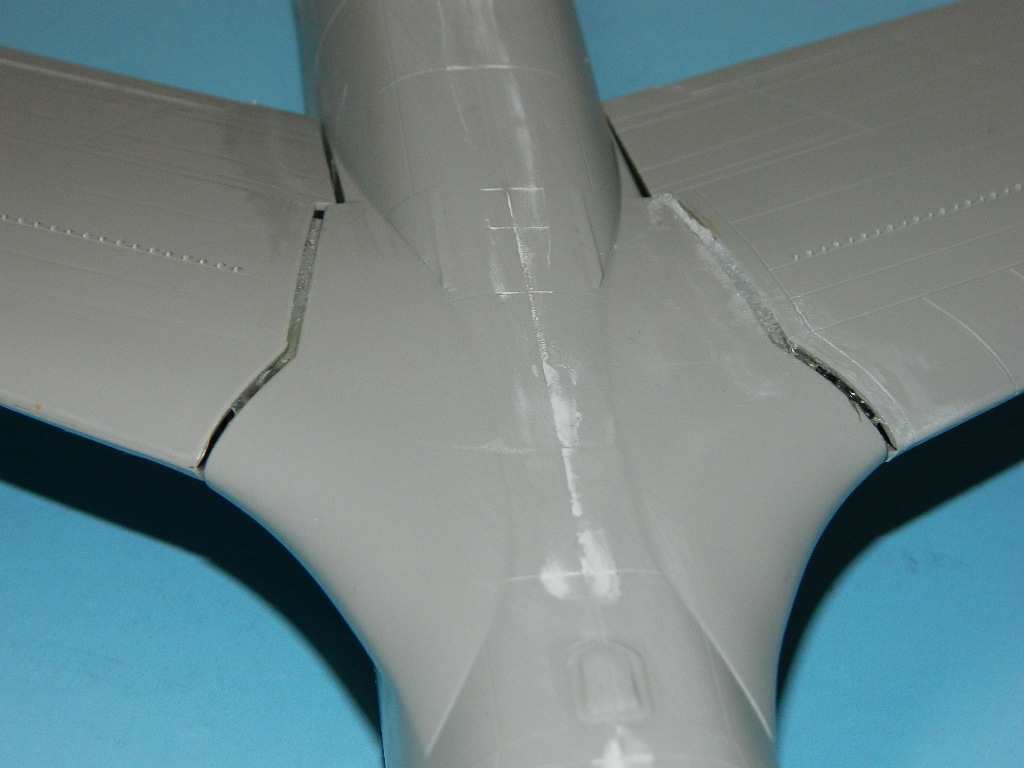
Wing Gaps with Correction
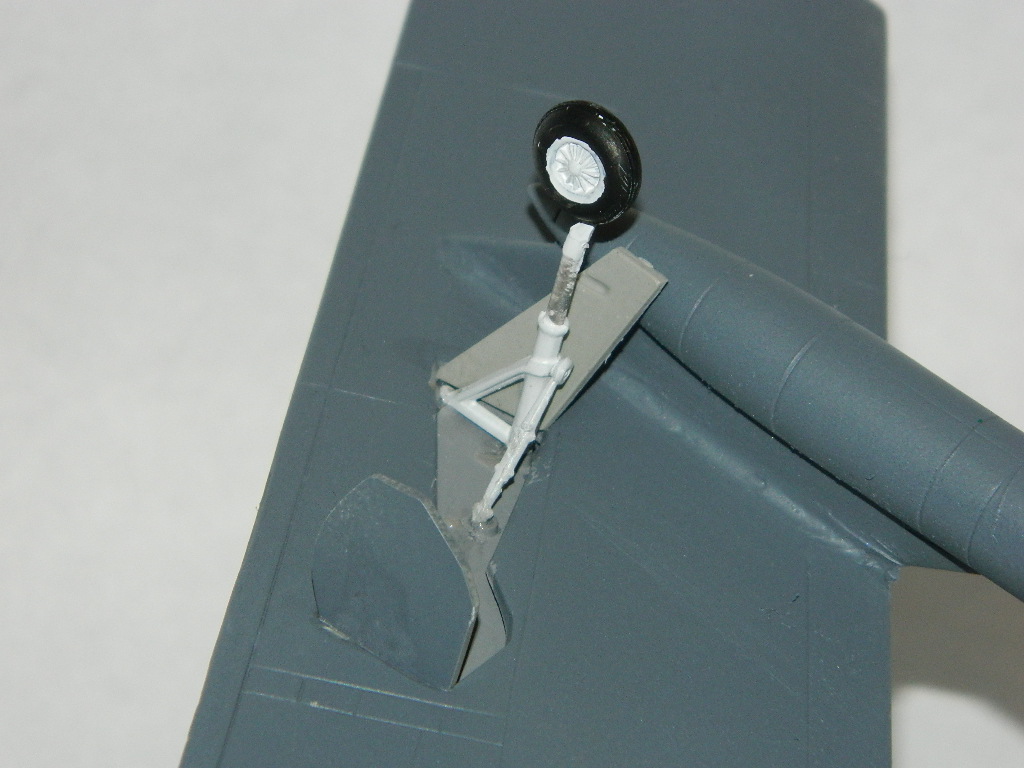
Wing Outrigger Wheel
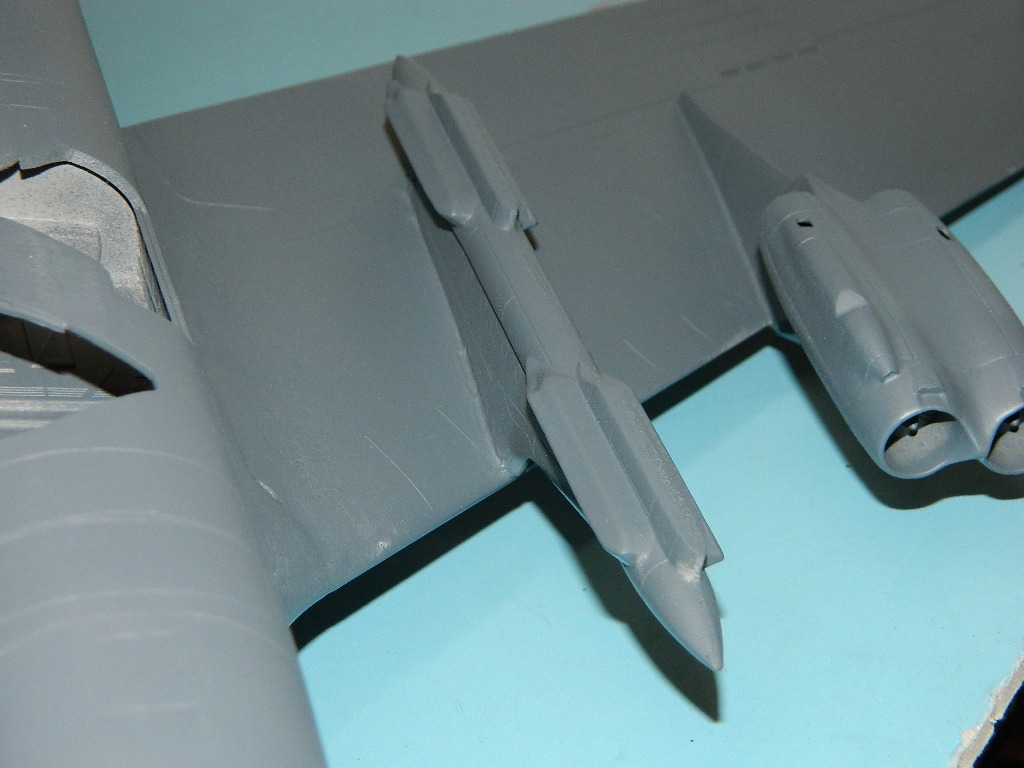
ALCM Pylon

ALCM Installed

ALCM With Tail Plugs

Tail Turret & ECM Details
Tail Detail
EVS Poor Fit

EVS & FLIR Pods
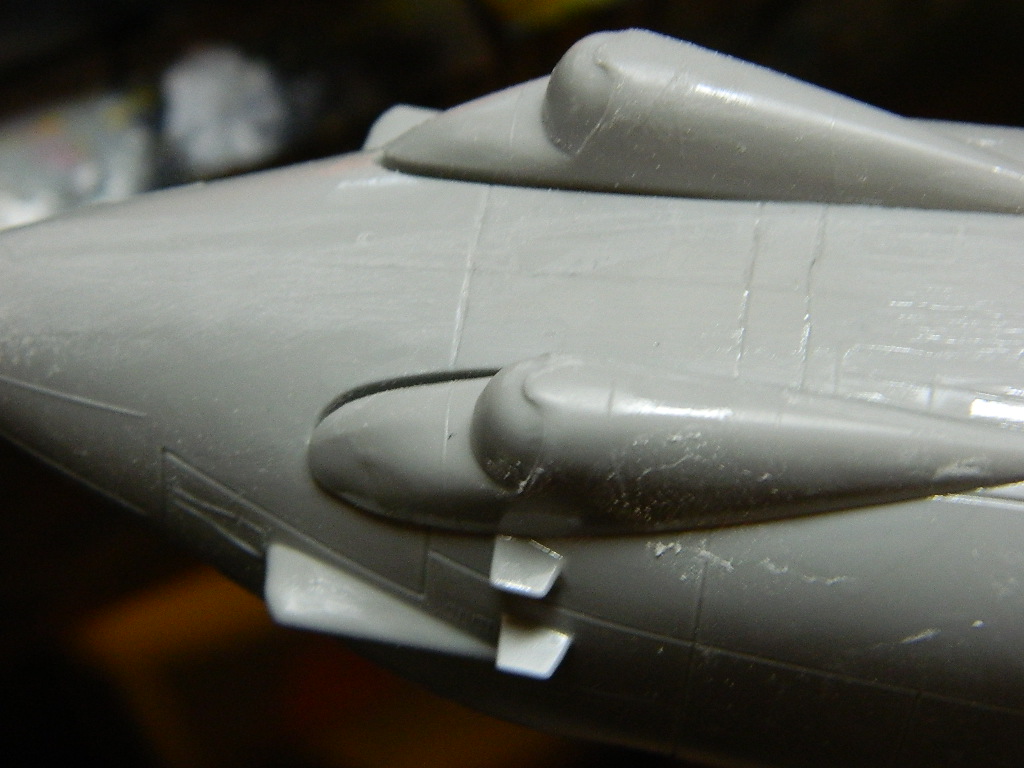
START Strakelet

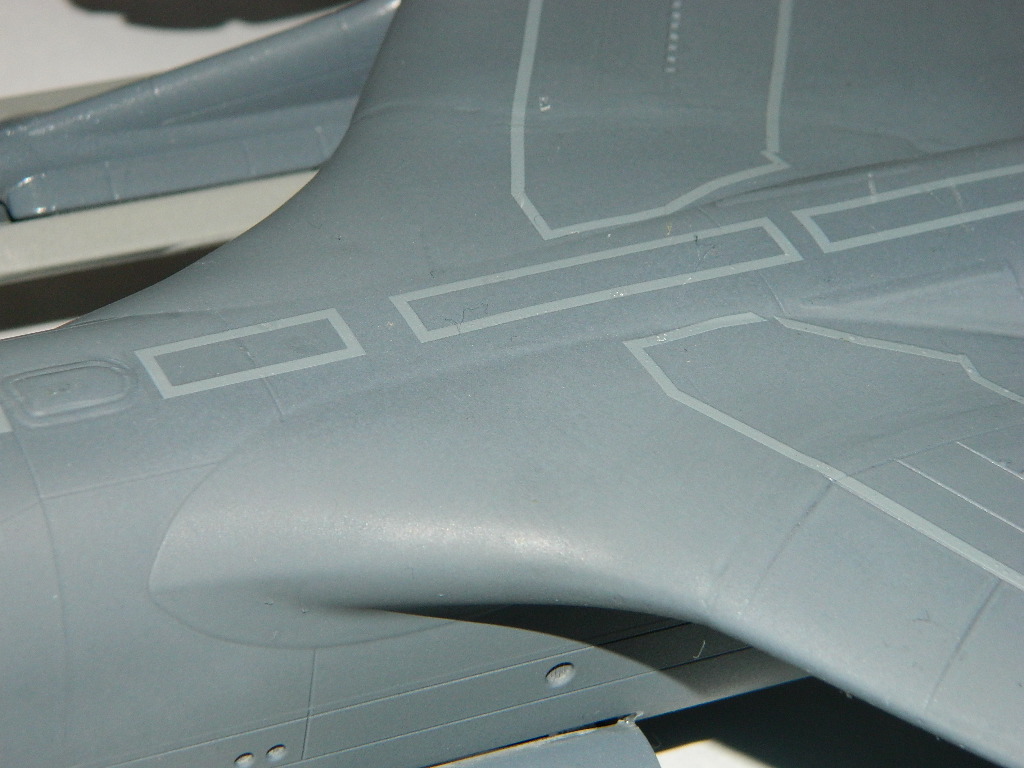
Short Wing Walk Decal

External Tank
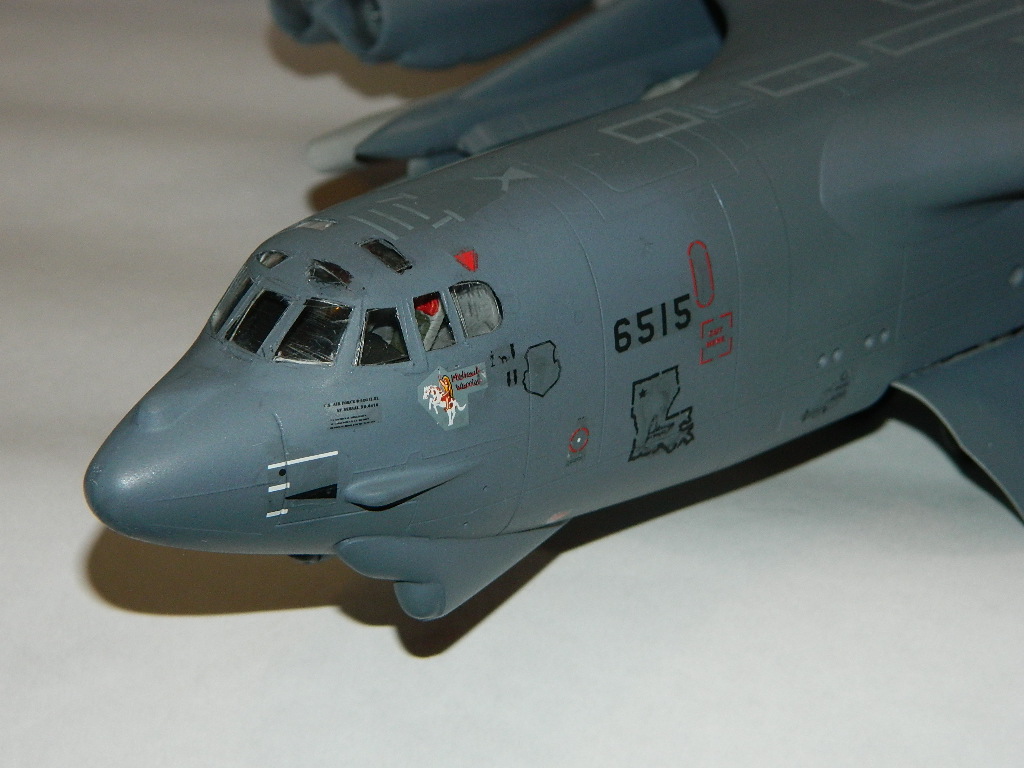
Nose Detail

Nose Gear
Comments
Add new comment
This site is protected by reCAPTCHA and the Google Privacy Policy and Terms of Service apply.
Similar Reviews