
B-17F Flying Fortress
The B-17 Flying Fortress. Is there a more iconic aircraft of WWII? I’ve always loved the aircraft, especially the B-17F. The beginning of the air war in Europe was spearheaded by the B-17F. The most famous is the ‘Memphis Belle’, but there were other B-17s that flew much longer than that. One of those was assigned to the 303rd Bomb Group, ‘Knockout Dropper’ was one of the first B-17s in the 303rd, it was also the first to finish 50 and 75 missions over Nazi occupied Europe.
Until recently you were only able to build a B-17F by using the old Revell kit. When HK Models announced the B-17F and after seeing it at Telford in 2019 I had to build one.
In a sturdy carboard box, comes a beautifully packaged model inside and out. The box art is very inspirational painting of the Memphis Belle. Inside you are treated to eight sprues of light grey plastic and two sprues of clear plastic, plus two nose cones. The instruction booklet is very helpful and includes the inventory. There are two vinyl stickers for the Belle included. Decals are provided for two different aircraft, Memphis Belle and Old Faithful. But the important thing is how does it build?
The grey plastic is really nice with excellent exterior detail. There are some mold release marks throughout the interior, most are hidden. The engines could be better. This is one place that I think the old Revell kit is superior to the HK offering. The interior of the HK kit is very nice and has most of what you will be able to see and lots of things you won’t be able to see. The modular constructions will not be to the liking of many, but it makes perfect business sense. Also, I can tell you that the fit is very good. Some of the detail parts are simplified. You are treated to the two common nose setups. Overall, I really love the kit, but let’s build it and see what happens.
I wanted to use as much aftermarket as I could resource. I started with the Eduard wooden floors, cockpit, waist position and engines. The Brassin landing gear and wheels are good replacements. I had the Look instrument panel. I also had to review the Quickboost props and Aires engines so they were added as well.
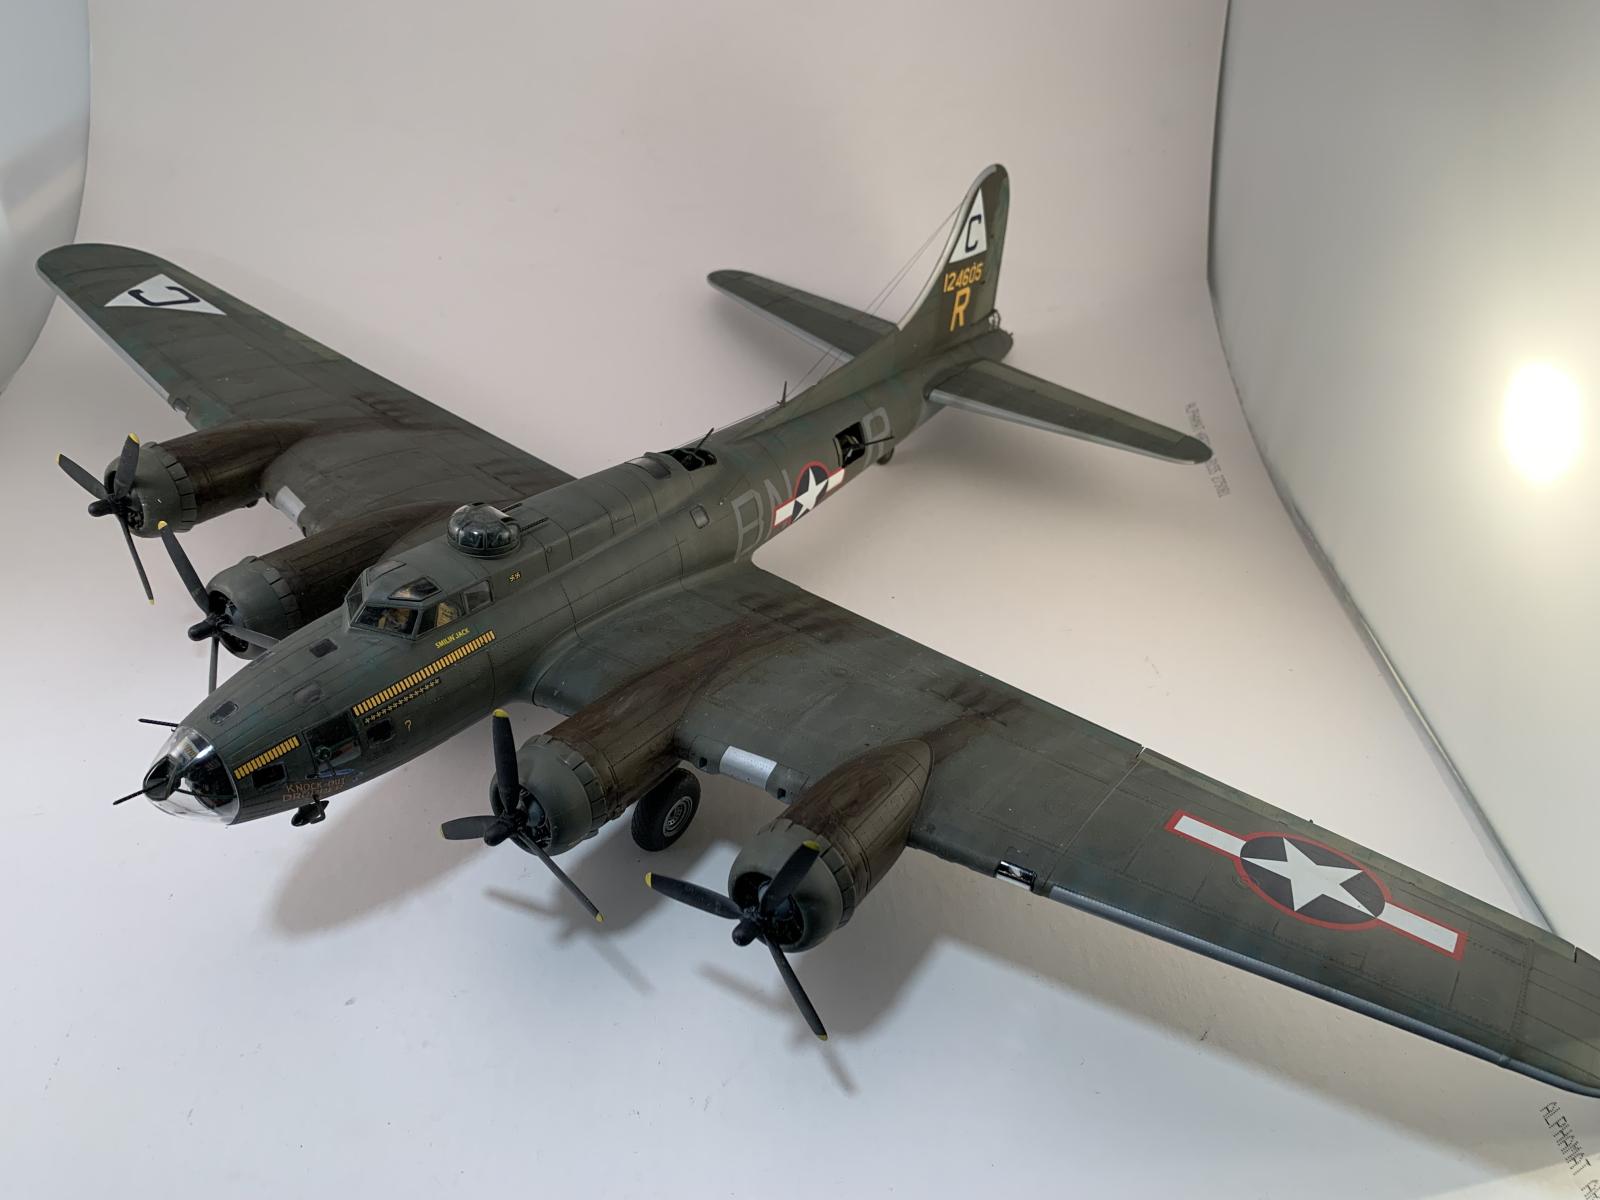
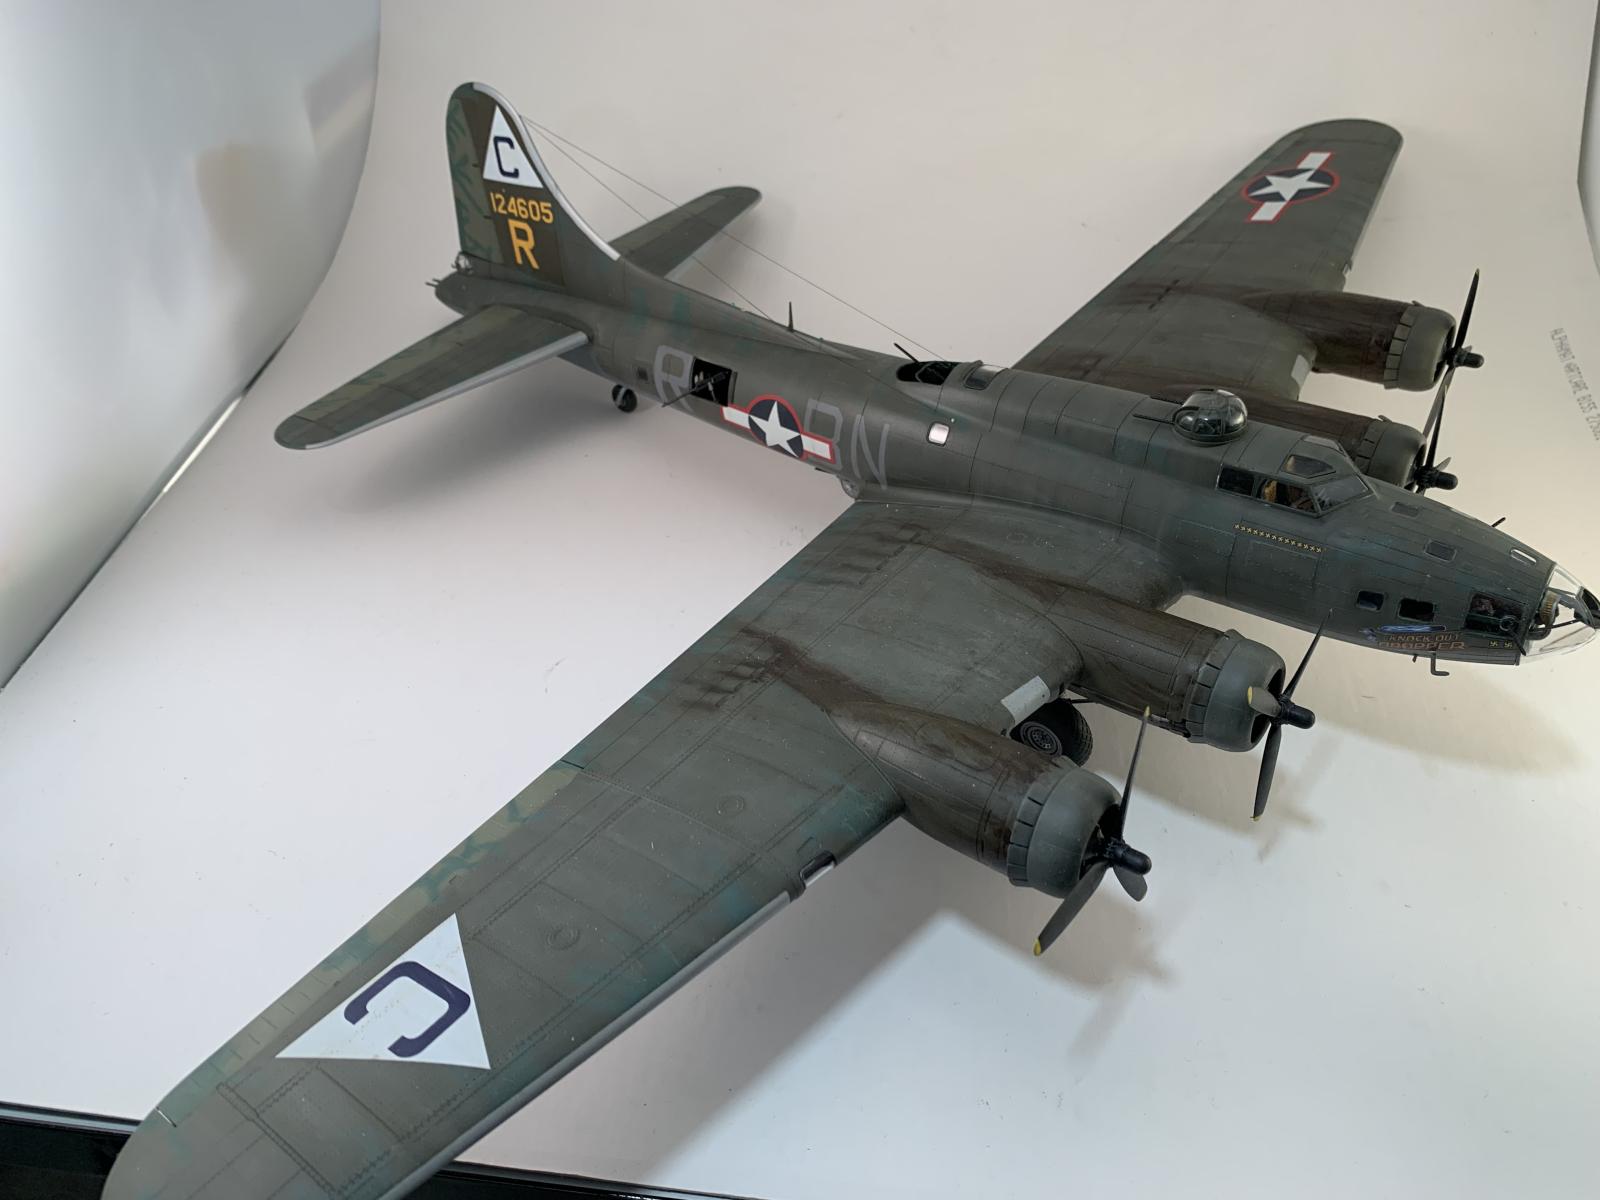
Now I needed to decide which markings to use. I did not want to do the Memphis Belle. I elected to do ‘Knockout Dropper’ from the 303rd BG. A lot of things conspired to have me select this aircraft, so I took it as a sign from God to build her. So now I just needed to figure out what needed to be added or upgraded.
Doing a review of the HK kit would not be complete unless you were comparing it to the Revell kit. Overall external detail is significantly better, especially if you like restrained rivets. Yes they are recessed but this is not an issue for me. The rest we’ll talk about as we go along.
As is usual, construction begins in the cockpit. In comparison to the Revell kit, the HK kit is far superior. The cockpit is very complete, however it is missing the throttle and propeller pitch control levers. Now truthfully you can’t see a lot of the inside of the cockpit, but I wanted to try some new things like the Look Instrument panel and some Eduard photo etch. Now the first thing I will say is DON’T use the Eduard seats, because they have a cutout in the seatback for the shoulder harnesses and these were not used on WWII aircraft. The seatbelts are provided in a couple of sets and my HK, but wartime aircraft did not use them. The cockpit is painted Bronze Green. You can use a variety of colors, some are Tamiya IJN Navy Green or AK Bronze Green. I used both throughout the build for slight variation. I did apply some AK anti-slip paste to the floor. This was ‘dirtied’ up with some grey and browns for wear.
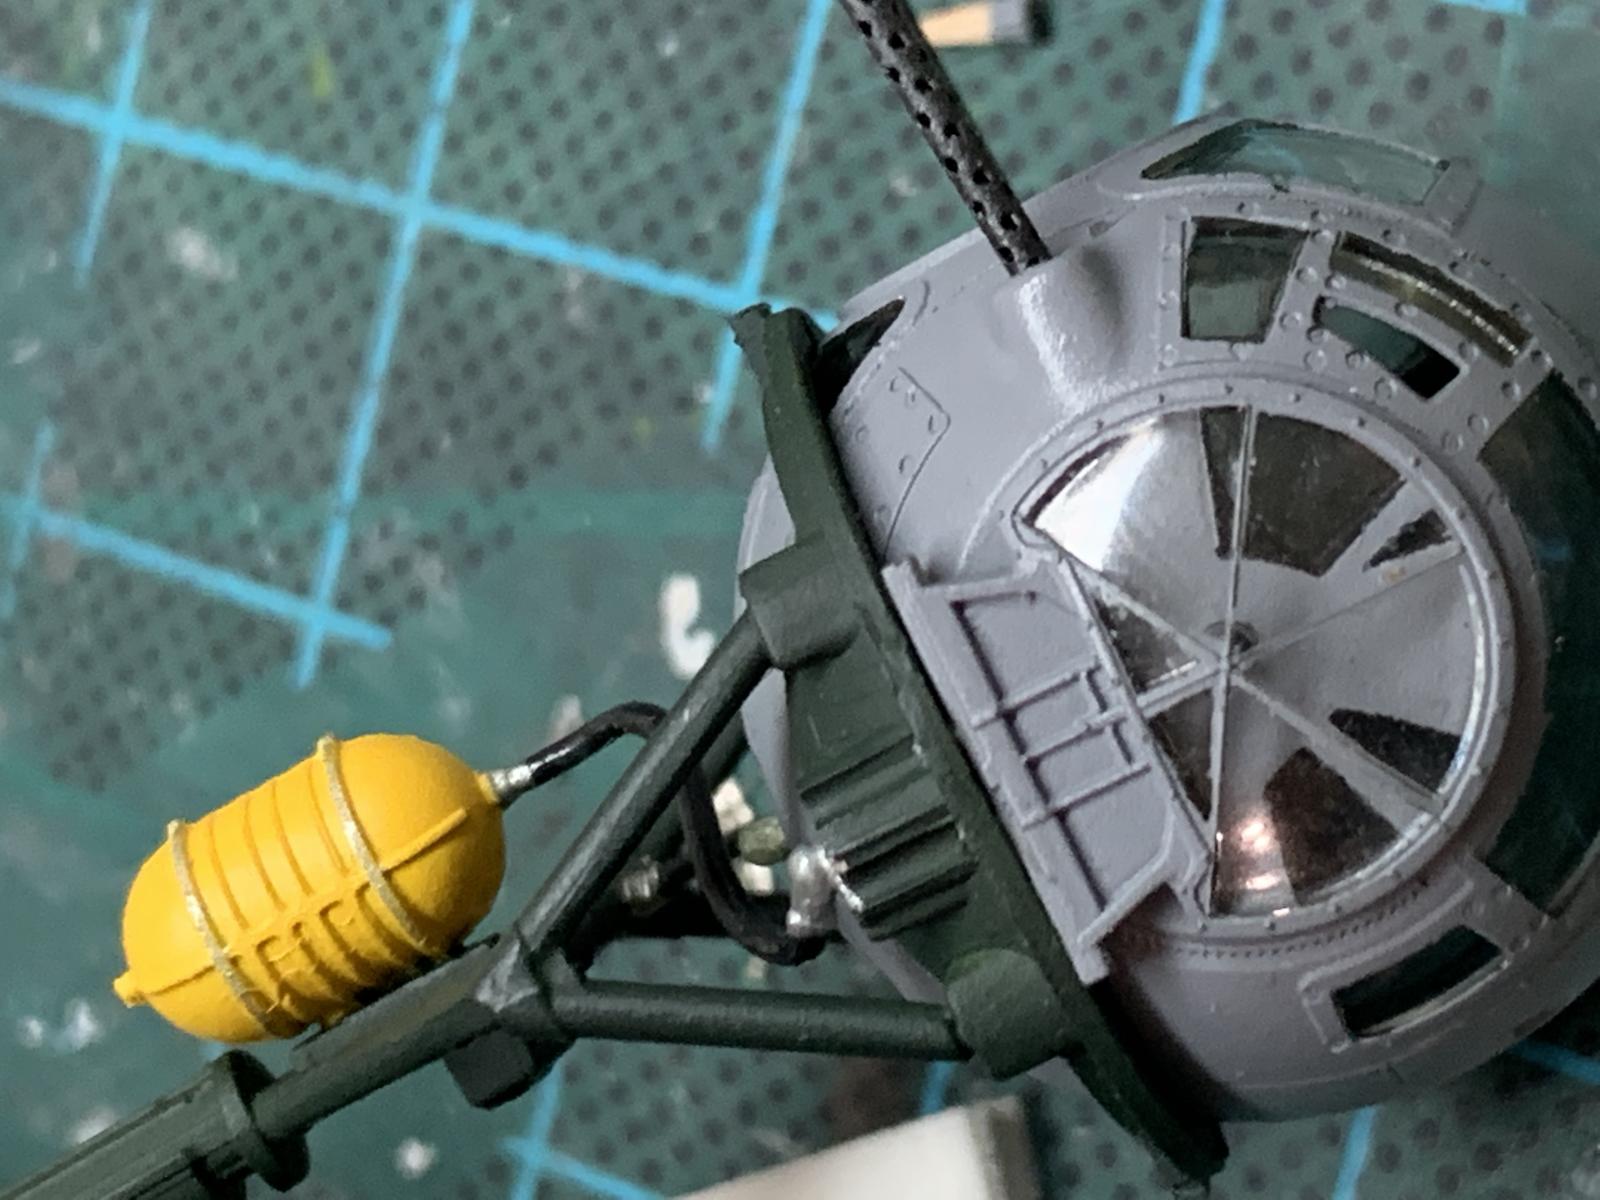
One nice thing about the HK kit is the inclusion of the oxygen bottles, which Revell doesn’t even represent. These were painted Tamiya Flat Yellow and a strip of aluminum tape for the straps. A lot of the photo etch parts, including the throttles were added to the cockpit. I scratch built some cushions for the seats with Apoxy Sculpt and painted a dull yellow. On those I added some US ARMY AIR CORPS decals from a Barracudacal P-40 sheet. They performed perfectly. Some adjusting of the Look instrument panel was necessary but nothing drastic. Truth be told, much like the rest of the interior, you can barely see it.
Construction moves to the bomb bay. I was going to have my doors closed so I did not add the bombs. The rest of it builds up well and fit is exceptional.
Moving on back in the fuselage, the radio compartment was next. I used the AK anti-slip paste here. Had I waited just a little bit I could have used the Eduard wood floors in this area. Oh well, I had this done by the time the set came out. There is a lot of Eduard photo etch that gets added to this area. Thankfully it all fit perfectly, and it is visible through the top hatch. Definitely worth the investment in time and money.
Still moving further aft, I started on the ball mount and the waist gun positions. I added the Eduard parts as I saw fit. I had to check a lot of resources for the proper positions, and ultimately the entire area in front of the windows is hidden.
There are a bunch of ways to mount the ammo cans for the waist guns. The kit ones did not seem correct for an early B-17F like Knockout Dropper. The early ones seem to have mounted the ammo cans to the ceiling aft of the guns. I used MicroWorld ammo chutes which are really accurate nickel chutes that look exactly like the real thing, but smaller. I had to scratch build the mounts using strip styrene to slip inside the ammo cans. Then superglue to add them to the mounts. Eventually it looked great. I think the ammo cans may have been a little too big for this purpose, but they looked great when mounted. I did scratch build the gun mounts and armor panels that were installed. The real Memphis Belle in the Air Force Museum has some great photos of these armor panels. I replaced the kit guns with the Brassin ones designed for the kit. These along with the Master barrel created mini replicas of the real thing and looked great.
My plan was to have the crew access door open. I should have looked before assembling the fuselage and doing the work. But I didn’t and because of that, there was no way to mount it effectively, so eventually I did end up closing the door hiding all that beautiful detail back there.
Building up the tail wheel area and the tail gun position was relatively easy. I did use the kit ammo cans here because they were so far hidden in there it didn’t make sense to use the PE ones. I recommend that you add the tail section to each fuselage half, PRIOR to assembly. This will allow you to poke and prod it into position to ensure perfect alignment. The only issue I had was that since I was using the Master barrels, I had to add them now. They proved to stick out and hit everything for the rest of the construction process. Thankfully they were up to the task and the manhandling.
The ‘turtledeck’ or fuselage spine as next up. I do recommend that you modify kit part I29 and cut it back a bunch. If you don’t the view out the window is halfway obstructed. That didn’t make sense to me, so I just used a razor saw and cut the part back some to the forward side of the window. After that the look and fit was perfect. I left all the glass parts off of the model until I was ready for final assembly. Adding the turtledeck was fairly painless. I glued one side at a time. This allowed me to get a good fit as I went along. I did use a small amount of filler but not much.
Like the tail assembly, I found it easier to add the nose halves to their respective fuselage halves to make sure they all aligned. There is still a need for filler because where it is broken down on the nose it is not a natural panel line. This would require some superglue, accelerator along with some scribing and re-riveting. Luckily, I had the tools to do it with. There are a lot of the Eduard parts added to the nose and some scratch building as well, but in the end, I was happy with the results. I did find the instructions for mounting the nose cone and the associated parts difficult to interpret but think I got it reasonably close in the end. Check your references as the kit provides two different types of Perspex nose cone. I used the Brassin guns in the nose and had to use a steel-colored bead to mount the guns to the inside of the windows. I stupidly had to add them later in the construction. Compared to the Revell kit, even out of the box this nose interior is far superior to the old kit. One thing I did not like was that the pitot tubes. The shape looked off and there were no mounting points, instead relying on a butt join. Not the safest or most robust method to do that. Also missing was the heater exhaust for the nose. You’ll have to check your references as KOD had it on the left side below the window, and the Belle has it on the right side aft of the windows. Obviously, a field mod. It is easy to add once you realize where it is. Just drill a hole and add a bit of Albion Alloy aluminum tubing. Done.
One other thing that you will NEED to do it to open up the appropriate hole in the ceiling. I didn’t then I had to figure out where the hole was supposed to be. I got it pretty close. Also, the instructions don’t mention if your subject has the astrodome to open up that hole. So, you’ll need to open them up PRIOR to closing up the nose. You’ve been warned.
Building up the tail planes is easy. They are slightly thick on the trailing edge but not noticeable.
Moving on the two turrets, was a challenge. The Eduard masks made the ball turret very easy. It would have taken all day to mask it without them. Don’t skip out on the masks. I have to admit that the ball turret was one of the reasons I didn’t build the Monogram or Revell kits. I could never figure out how to make it work. HK has that figured out and thank God it all fits perfectly. The rest of the ball and top turret built up nicely. I did notice on the top turret that I needed to sand the ammo boxes slightly so that the turret would slide in the fuselage with no issues.
I built up the tail wheel strut using the Brassin brass landing gear. It worked perfectly and had the right amount of strength. The Brassin wheels were left off until later.
One place that I was not happy with was the bomb bay doors. I was never able to get them to the way I liked them 100%. I should have taken my time or added them prior to adding the fuselage halves together. Another issue that I had was the cockpit access door. My original plan was to have this open as well, but like the crew door in the back, I was in too much of a hurry to figure out that I needed to scratch build a way to add it in the open position until it was too late. It was added closed. The fit here wasn’t the greatest, but acceptable.
Building up the wings was fairly easy. There were some modifications to be made as I was using the Aires engines and the Brassin Superchargers. One thing to note, on the B-17F there are no fuel vents on the outboard wing panels. These need to be filled with Apoxy Sculpt and sanded flat. They were added to later G models. The landing gear bays have a lot of PE parts inside them. They fit well and look great but will never be seen again. The inside was painted Alclad aluminum, and the tank was painted Tamiya Rubber Black. Initially, I was going to have the flaps down but there were a lot of mold marks in the wells so I didn’t feel like filling them all so they were closed up and none the wiser. Very small amounts of filler were needed on the leading edge along the vent openings but not a lot. Overall, so far, all the major assemblies were done with very little filler of any kind used, except for the nose pieces.
Adding the Aires engines was easy enough, if you understood the directions. I totally missed to leave the round extension on the back of the engines and cut them all off. Eventually I realized my mistake and had to pin them back into position. As a separate piece the engines build up beautifully. I didn’t experience any issues after I recovered from the mount problem. They look significantly better than the kit engines. I will definitely use them again.
The Quickboost props were another addition to this area. The only thing I had to do was to add the shaft to mount it to the engines. Once that was sorted out, they built up perfectly. KOD did not have the Hamilton Standard prop logo, it has the yellow stencil data, but it went horizontally instead of vertically to the blade. I had never noticed that before. These were set aside until final assembly.
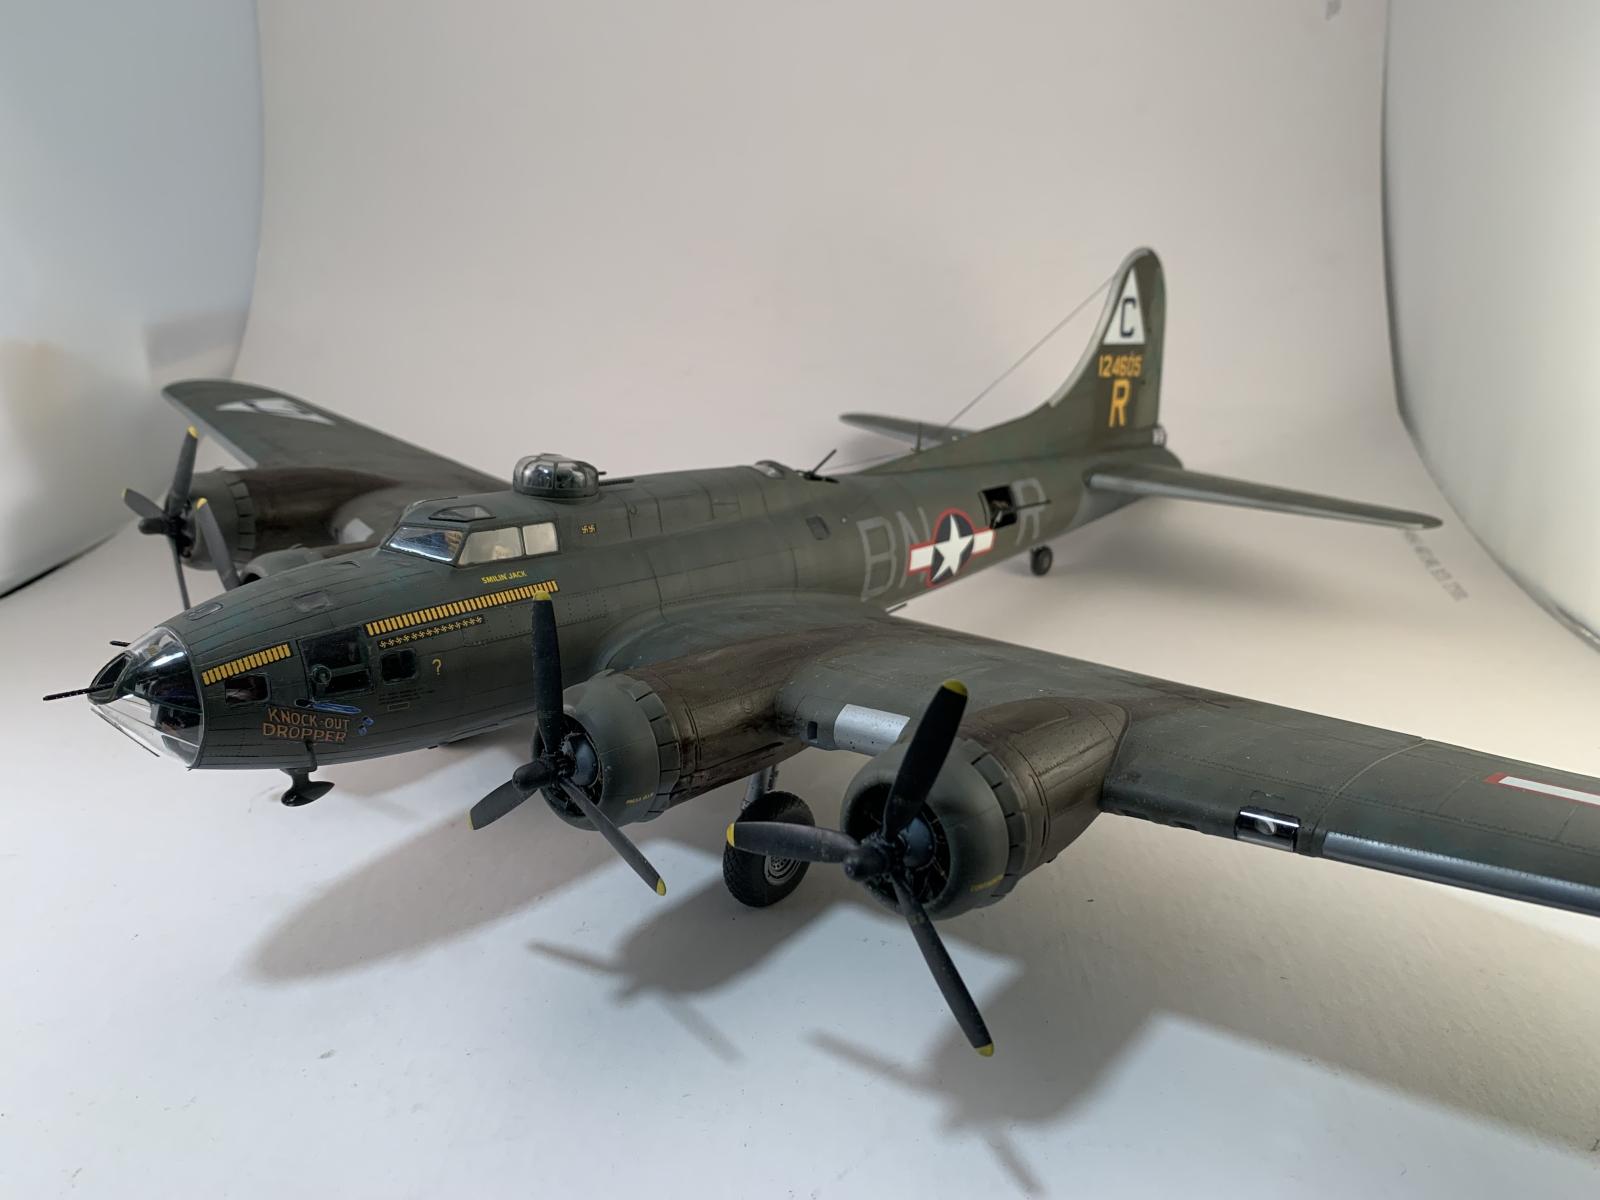
All openings were masked off with Tamiya tape, foam and foam earplugs and some round paper circle masks for the engines. It was now time to paint the model, but what color to use? I know what is required for an early B-17. They came out of the factory in Olive Drab No. 41, with Medium Green No. 42 applied in theater for splotches of camouflage and the undersurfaces of Neutral Grey No. 43. But which paints to use? I have used Mr. Paint (MRP)as my paint of choice lately and I wanted to see what the new AK paints looked like. I guess I could figure it out as I go along. So starting with Alclad Grey Primer and Microfiller over the entire model to check for any imperfections and there were some that needed to be addressed. This was followed up with Alclad Aluminum and I must admit at this point I realized that the aircraft would look really good in NMF. Definitely going to do a G in that paint scheme. Then some zinc chromate was added like the real thing, and then I used Tamiya NATO Black to pre-shade the whole model. I added extra, depth to the areas that were going to be getting ‘dirty’ from exhausts. Some white marbling was added to fade some of the top colors. Then the bottom of the airplane was painted in the MRP Neutral Grey (MRP-141). I followed this up with MRP Olive Drab 41(MRP-139) on the top surfaces. I’ve always wanted to try using the PE masks to get random patterns. So equipped with some Uschi van der Rosten and RB masks I set about varying the paint. I used the AK colors which were darker and some Model Master Olive Drab to spray through the masks. This gave at least three different shades of Olive Drab. In hindsight I should have started with a lighter color as the airplane is pretty worn and then brought the MRP in. Oh well. I masked off the fabric control surfaces and used Model Master enamel Faded Olive Drab paint to paint them as they are very different than the fuselage colors.
Lucky for me in the Squadron/Signal book, “Pride of Seattle- The story of the First 300 B-17s” has a perfect overhead view of Knockout Dropper. So I was able to load up the airbrush and paint the Medium Green 42 splotches. It is apparent there were different painters, and the paint patterns were very distinct. I tried my best to replicate the different patterns.
I masked off the vertical tail and painted it straight AK Olive Drab. This particular panel is usually noticeably darker than the fuselage. It came out quite nice. Once I was happy with all the colors it was time to seal it all up. I use Tamiya Clear thinned with Mr. Leveling Thinner. It is beautiful stuff.
Now which decals to use? I had purchased the Zotz and the Kits-World decals for Knockout Dropper. There were things I liked and didn’t like about both sheets. I loved the faded look of the US insignia on the Zotz sheet. Zotz code letters were the wrong color and too thick. Kit Worlds are too short in height but the right color and thickness. The Zotz nose art was the proper size. I thought the KW was too large. So in the end I used some from both sets and then disaster struck. Actually, it was just poor modeling or lack of attention. I added the codes and noticed that they were a little small and the wrong font on the Zotz sheet. So I switched over to the Kits World ones. Then I added the Zotz US insignia and didn’t pay attention to their position, so they were too high. I couldn’t live with that, so I ended up pulling them off with masking tape. Since they were over the codes, I pulled up the US insignia, the codes and some paint too. After much gnashing of teeth, I decided that I would replace them. Because I used the Zotz decals which were pinker than the insignia red of the Kits World ones, I couldn’t leave the pink code on the wing. So, I had to pull that one up too. Of course, some paint came up with that as well. It was becoming a game of wills. After purchasing another Kits World, because the Zotz is sold out worldwide. I at least had matching US insignia. But what to do about the codes? Well I belong to a group on Facebook that use vinyl cutters to make masks so I reached out there to get some codes the correct size. Thanks to the help of Jon Hand, I was able to mask off the codes and paint them Neutral Grey to match the belly. Then I was finally able to add the US insignia in the proper position. I finally was happy with the results.
Everything was sealed and made ready for the weathering. I start my weathering by applying a coat of Alclad Flat. I do my weathering over a flat because it defuses the effect which I think is a more natural look. First up was a panel line wash of burnt umber artist oils thinned with turpenoid. This imparts a dirty feel to the model. I use a toothpick and brush to ‘flick’ some spots especially around the engine areas. This replicates thrown engine oil.
I deviated from my usual weathering sequence. A friend was also building a B-17 and asked how I would do the oil streaks. Well I figured out what a better way to do oil streaking than with oils. The same burnt umber artist oils that I thinned down had thickened up, so I tried to do it on one engine. Well one engine became four and I was quite happy with the results. Luckily I had to go away on a trip for a week so the oils dried before I came back.
Then I did the paint fading. I used dots of Titanium Buff and White and blended them in with turpenoid damp brush. I swirled it around and then pulled it in the direction of airflow and vertically on the fuselage. This faded the paint, not as much as I would have liked, but it did dirty up the markings.
Following that a little chipping was done here and there. I could have done more. But this was a case of where less is more. Chipping was followed up with some very thinned Tamiya Buff sprayed directly overhead to sun bleach the entire upper surface of the model.
Some pastels were added to the supercharger exhausts as these were quite discolored. I just some Tamiya pastels here and there for variations of tone on the top and bottom of the wings. Things were sealed up with another coat of Alclad Flat.
I added the smaller items that are needed. The biggest things being the clear pieces. They all fit well enough. I could have gotten a better fit on some but, overall, I was happy. Adding the guns and barrels brought everything together. I used a variety of ammo chutes. I used RB Productions when I needed to have a big bend in it and then other times, I used the Microworld ones. I used some pins to help the Microworld ones attach properly. Other minor things were added like the antenna under the rear fuselage and with that the model was done.
Overall, this model is far superior to the ancient Revell one. I loved the detail, especially the surface detail. The interior detail is much better than the old kit, but it could have been better. Some detail is a little soft here and there, but the kit fit well and, in the end, it is definitely a B-17F. The inclusion of both nose cones is a nice touch as well. The mold release marks that are on the flaps and bomb bay doors was annoying as was the lack of molded on attachments for the crew and pilot doors. The turrets, especially the ball turret are real gems and look great when mounted in place.
Aftermarket is nice to have, including the ammo chutes, the Brassin guns, superchargers, wheels and landing gear. The Quickboost props are really nice, as are the Aires engines and I’ve already purchased more for my other HK kits. The masks set from Eduard is essential in my opinion. I hate to mask canopies anyhow but there are a lot of clear parts that need to be taken care of.
Overall, I really enjoyed the build. The fit is exceptional with very little putty or filler required. I was worried about the modular breakdown but as long as you get rid of all of the sprue attachment points there are no problems. Could the kit be better? Yes. Is it worth the price of admission? Absolutely. I really had a fun time building it and will build at least two more. What more praise can I offer a kit? Bring on the B-17G early and late.
Highly recommended


Reviewer Bio
Floyd S. Werner Jr.

Building models since the age of 7, I’ve become known for my Bf-109s and helicopters. I currently run Werner’s Wings. I was previously the ‘star’ of the Master Class Model Building Video series. I’ve been published numerous times on various website, including Hyperscale and ARC. My work has been in FSM and Great Scale Modeling 2001, as well as, numerous other model magazines. I’m a published author with my Squadron/Signal Walkaround book on the Kiowa Warrior. My models have continuously won many regional and national awards. My unique model photography gives my models instant recognition for their historical perspective.
I’m a retired from the Army after 21 years of flying Cobras and Kiowa Warriors, including tours in Iraq, Bosnia, Korea, and Germany. I’m also a retired Flight Officer for the Baltimore City Police and flew their helicopters chasing bad guys. I’m currently flying Cobras and Hueys with the Army Aviation Heritage Foundation.
I’ve been married to my high school sweetheart, Yvonne, for 42 years. Our daughters have blessed us with six grandchildren. My passions continue to be his family, friends, helicopters, models and airplanes, especially the Bf-109 and my beloved AH-1 Cobra. My motto has always been - MODELING IS FUN!
Comments
WIP Pictures?
Is there an in-box review somewhere to balance the build review against? Seeing a successful build by Floyd is no guarentee for the rest of us, he'd likely be able to whip any kit into a good looking model! Plus, all the aftermarket seems to perhaps point to a less than awesome base kit but that may be a wrong impression...
Cheers
Add new comment
This site is protected by reCAPTCHA and the Google Privacy Policy and Terms of Service apply.
Similar Reviews