
Audi R8 LMS GT3 SPA 24 Hours ’15 with Detail Up Set
The Audi R8 GT3 is a mid-mounted V10 engine sports car produced by Audi to compete in the GT3 touring car racing series. This series is based on a vehicle that must be available for sale to regular consumers with minimal changes. Due to the low cost for entry to the GT3 race series, many teams have taken part and the Audi R8 LMS GT3 version has been delivered to many racing teams around the world. It is very active in both endurance and GT races. This new kit from PLATZ reproduces the AUDI R8 LMS GT3 from the 24-hour Spa race in 2015 in 1/24 scale. My example also included the Detail Up set specifically for this kit from NuNu.
The box includes an impressive collection of well molded sprues with no visible mold issues or flash. There are four sprues in black styrene, one sprue of clear parts, two silver sprues, a ladder of poly-caps, four tires, a sprue with four rims, a separate white body and four decal sheets. The detail up set is made specifically for this kit and is pretty expansive. There is one large photo etch sheet, three large decal sheets, a strip of seat belt material and two metal parts for the replacement antenna. There is a ton of detail packed into the kit and the Detail Up set.
The first thing that I want to talk about are the instructions. With the Detail Up set and the separate painting guide for the second scheme, there are three important sets of directions included in this release. The instructions for the main kit are pretty good, this is my first car kit in a long time, but I had no major issues with the assembly or painting guidelines. The instructions for the Detail Up set are another story. On the second page many of the steps don’t contain enough detail and none of the text is translated. The parts placement is also quite vague for things like the webbing installed in Step 9. Also Step 11 makes no mention of the fact that you will need to anneal the PE parts to match the curve of the kit part and I have no idea what PE part 3 is supposed to do in this step. You will need reference photos or much more knowledge of this car than I have to understand these instructions.
The kit instructions are much better and seem pretty standard for modern car kits. All of the paint callouts are in Mr. Color and I chose to use Tamiya paints instead, I will highlight the differences as I come a crossed them. Step 1 starts with the assembly of the lower rolling chassis. I added the wheel wells to part C6 and left all the detail parts for the suspension off until after initial painting. I also glued parts B39/B38 for the transmission together and set this aside. Skipping ahead, I added part B7 to part A9 (the base of the driver’s compartment) and set this aside as well. The last two subassemblies in this first set of subassemblies were from Steps 5 and 6, in Step 5 I attached C10 to A1 and in Step 6 I attached B59/C4/B50 to B63. Once the glue had set on these parts I sprayed everything XF-1 Flat Black.
Next I sprayed all of the suspension parts except the brakes like the shock absorbers, steering rack and front splitter Tamiya Gunmetal. Once these were dry I attached everything except the brakes. At this point I needed to add the Carbon Fiber decals from the Detail Up set, so using the Detail Up instructions as a guide I coated everything from the Step 1 and Step 6 with a coat of Alclad Gloss. After this cured, I added the decals. These are actually pretty impressive and add a ton of detail. Take your time and have decal solutions handy. The decals for the dash board need a lot of help to settle into the complicated curves and the same thing can be said about the rear of the car.
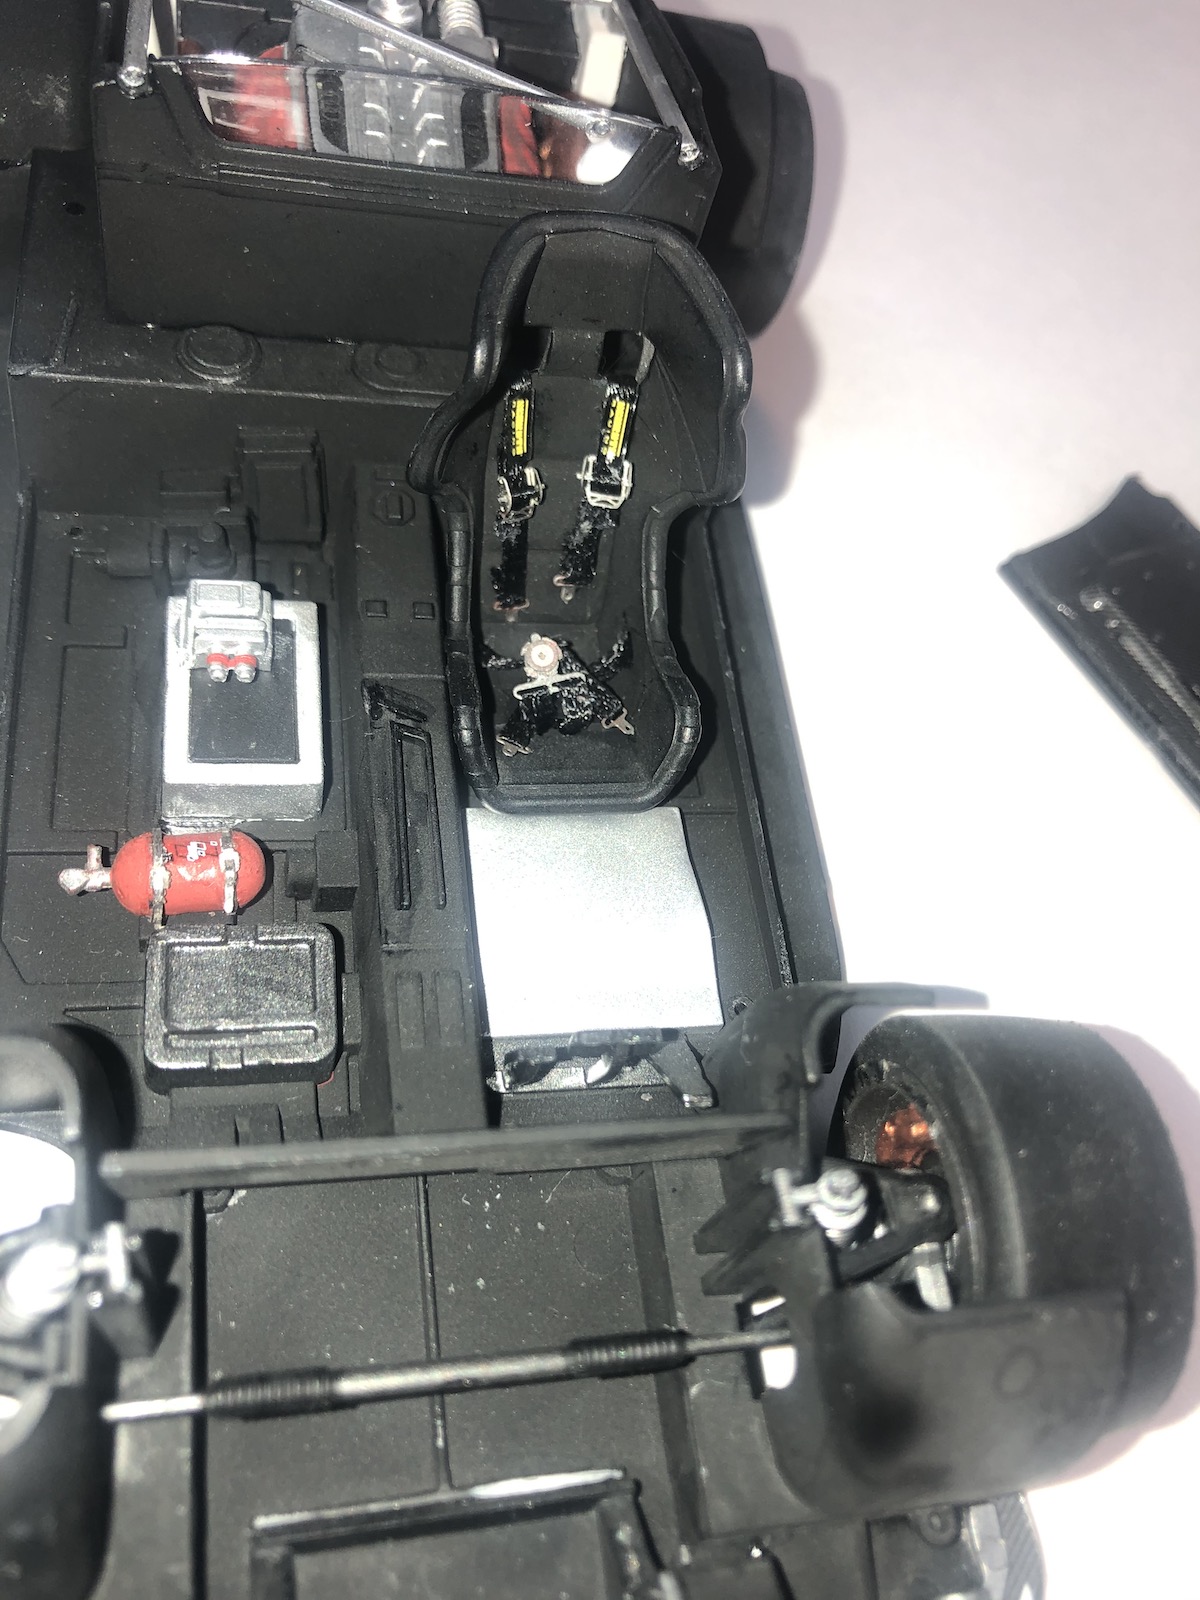
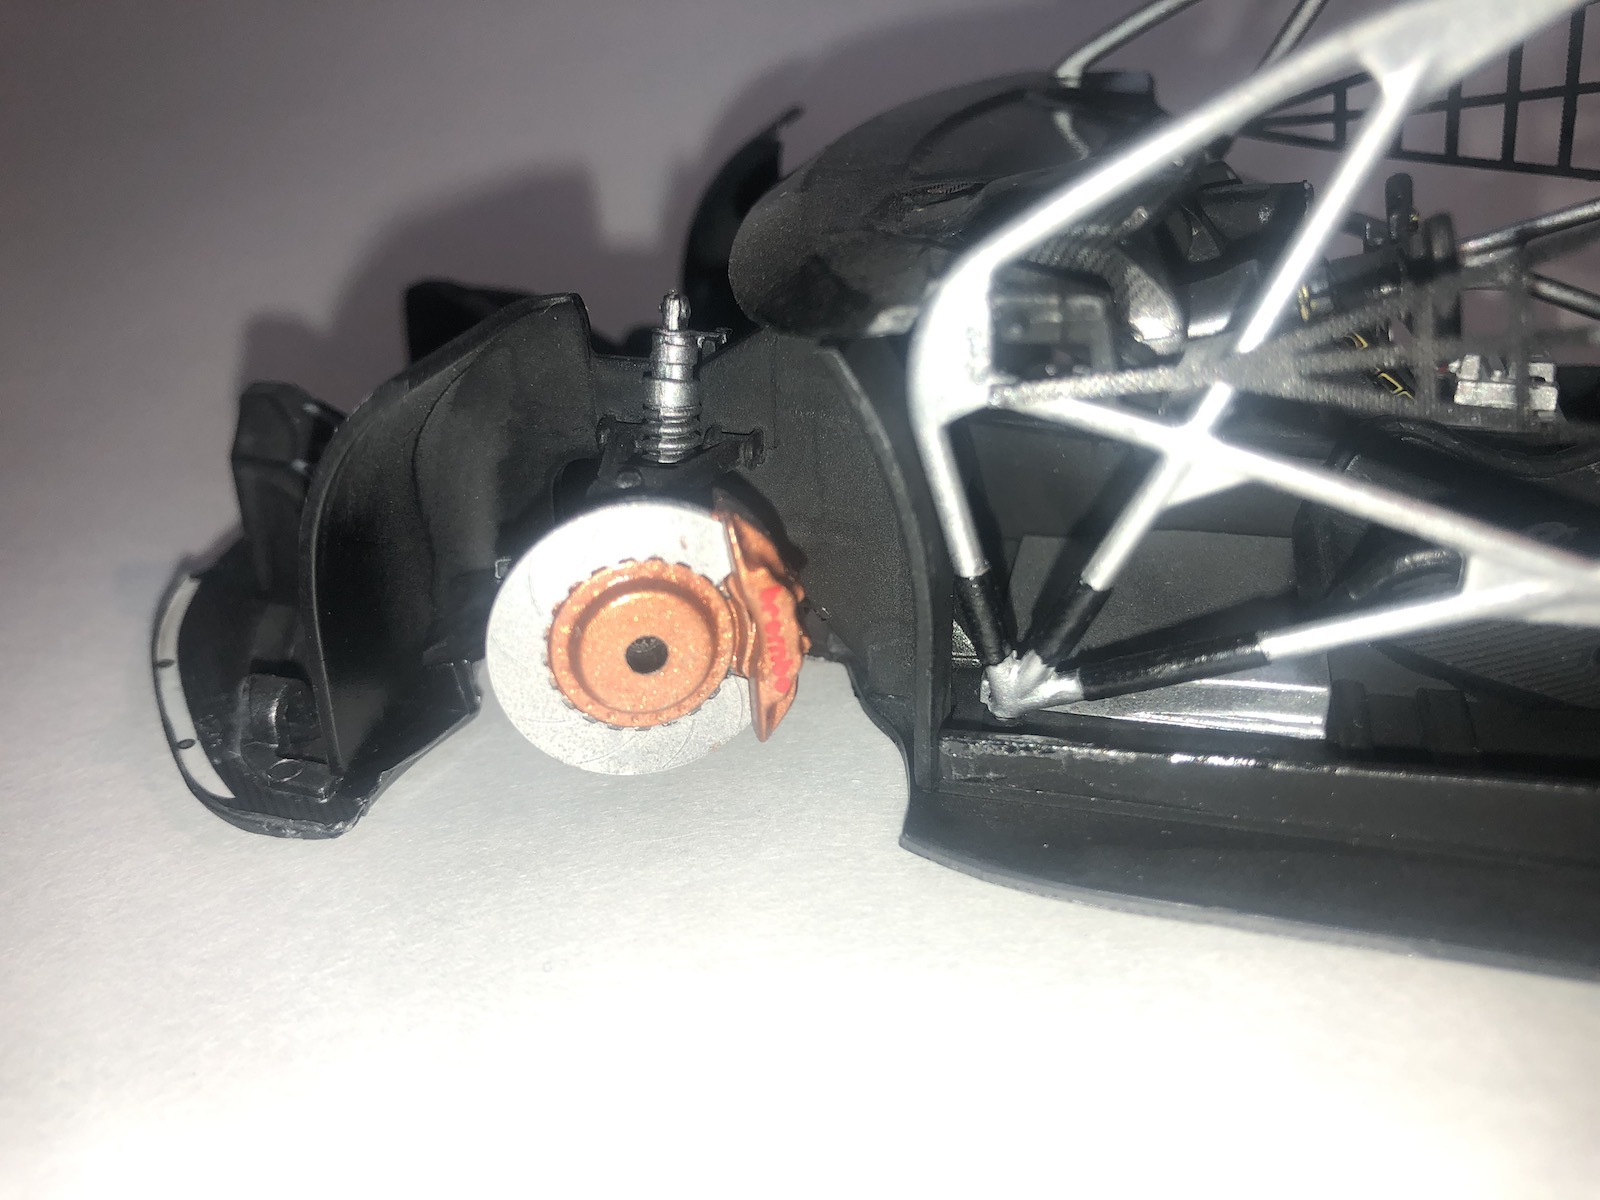
Next I finished the assembly/painting on the brakes and painted the exhaust. The brakes have PE from the Detail set the look great. I painted the disks Tamiya Gunmetal, the centers of the disks and the calipers I painted Tamiya Copper Metallic. The same paint was used for the exhaust. I finished up the rest of the detail painting in Step 4 with no real issues but the Detail Up set does include new straps for the fire extinguisher. These are extremely nice but a little tough to work with, they need to be formed to the curve of the extinguisher, removed and a section needs to be cut out of the straps. This allows the rear part of the extinguisher to still attach to the base.
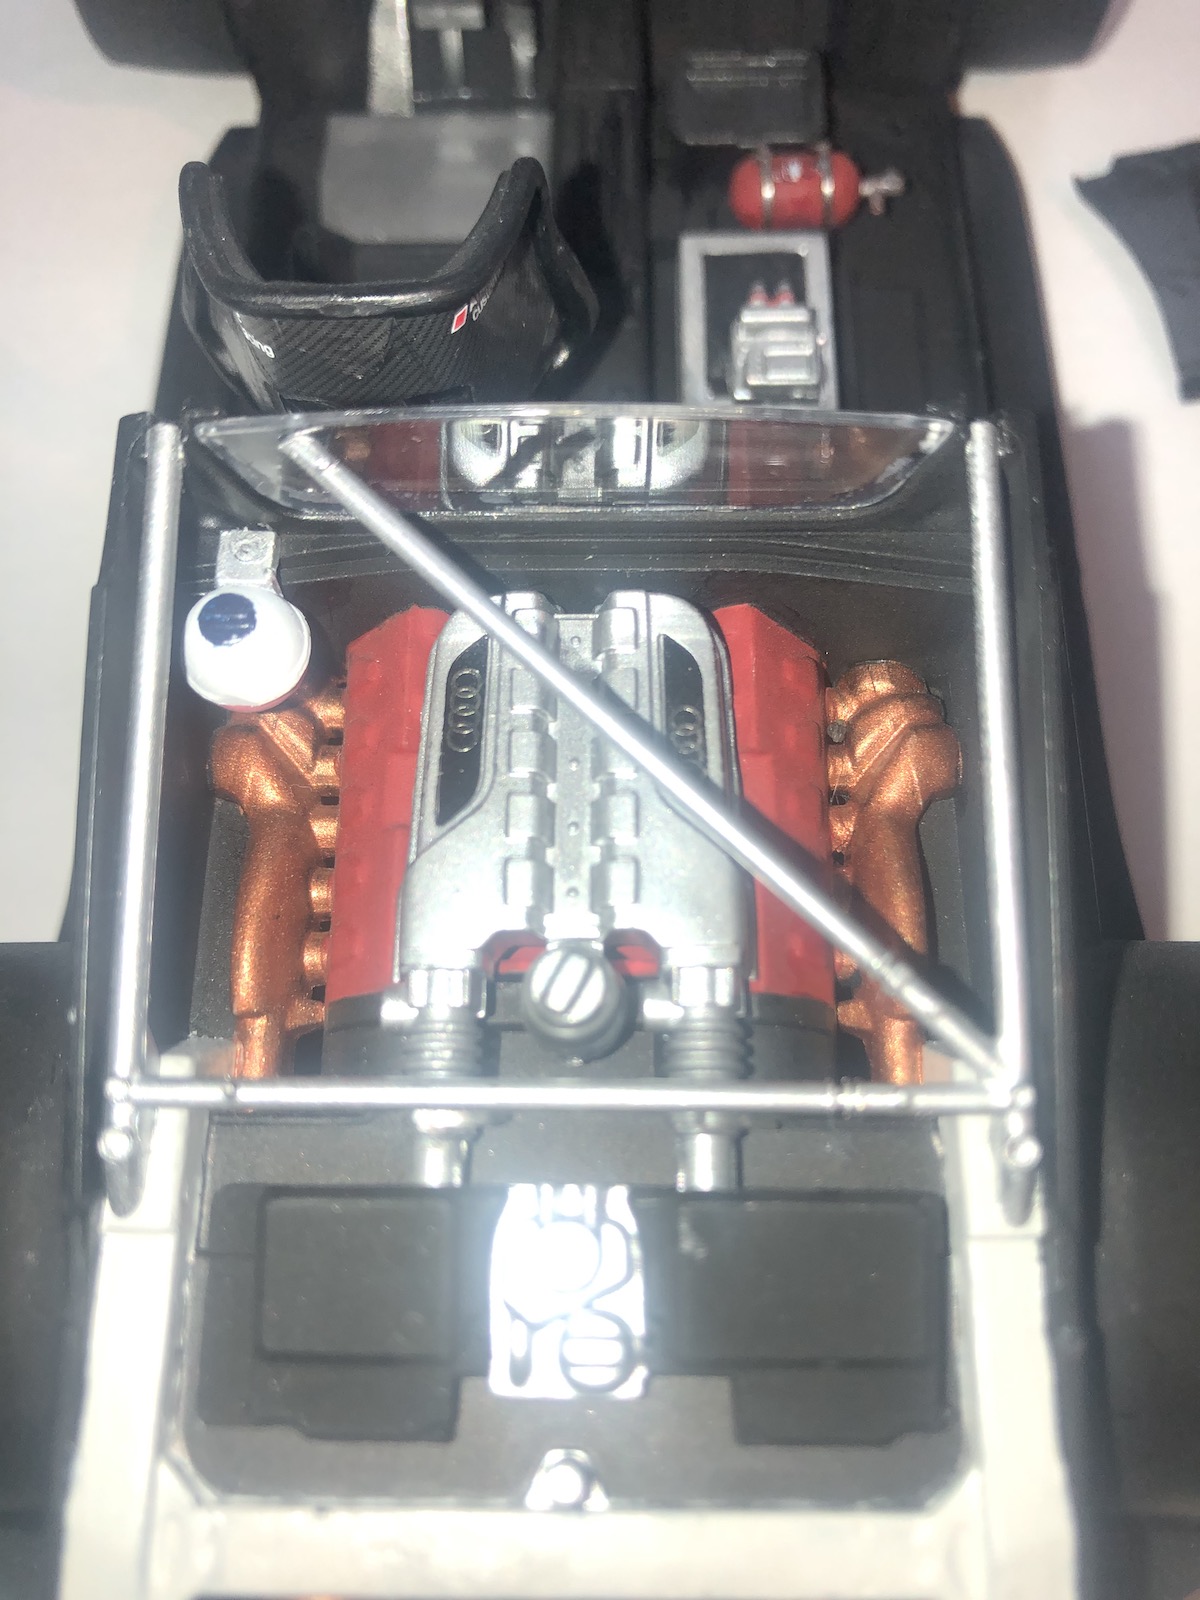
Step 5 covers the interior of the engine bay and there is a lot to unpack here. The Detail Up set includes detail straps for the engine as well. These are easy to work with and look great. I painted the roll bars, engine top, and anything else marked as Mr. Color 8 Model Master Chrome Silver. Anything marked 33 I painted XF-1 Flat black. Mr. Color 10 was replaced with Tamiya Copper and Mr. Color 3 was replaced with Tamiya Flat Red. The engine deck was listed as Mr. Color 61 and I used Model Master Metallizer Burnt Iron. The edge of the engine bay was listed as Mr. Color 11 and I replaced this with XF-20 from Tamiya.
The last part in this area that needed painting was part B43, I used Tamiya Flat Blue for the cap and a 1:1 mix of Flat Red/Flat White covered the pink bottom part. I mostly brush painted the details in this area. Prior to finishing this area, I added to the two decals to the top of the engine, installed the engine headers and the roll cage into the engine bay subassembly. I set this assembly aside for later.
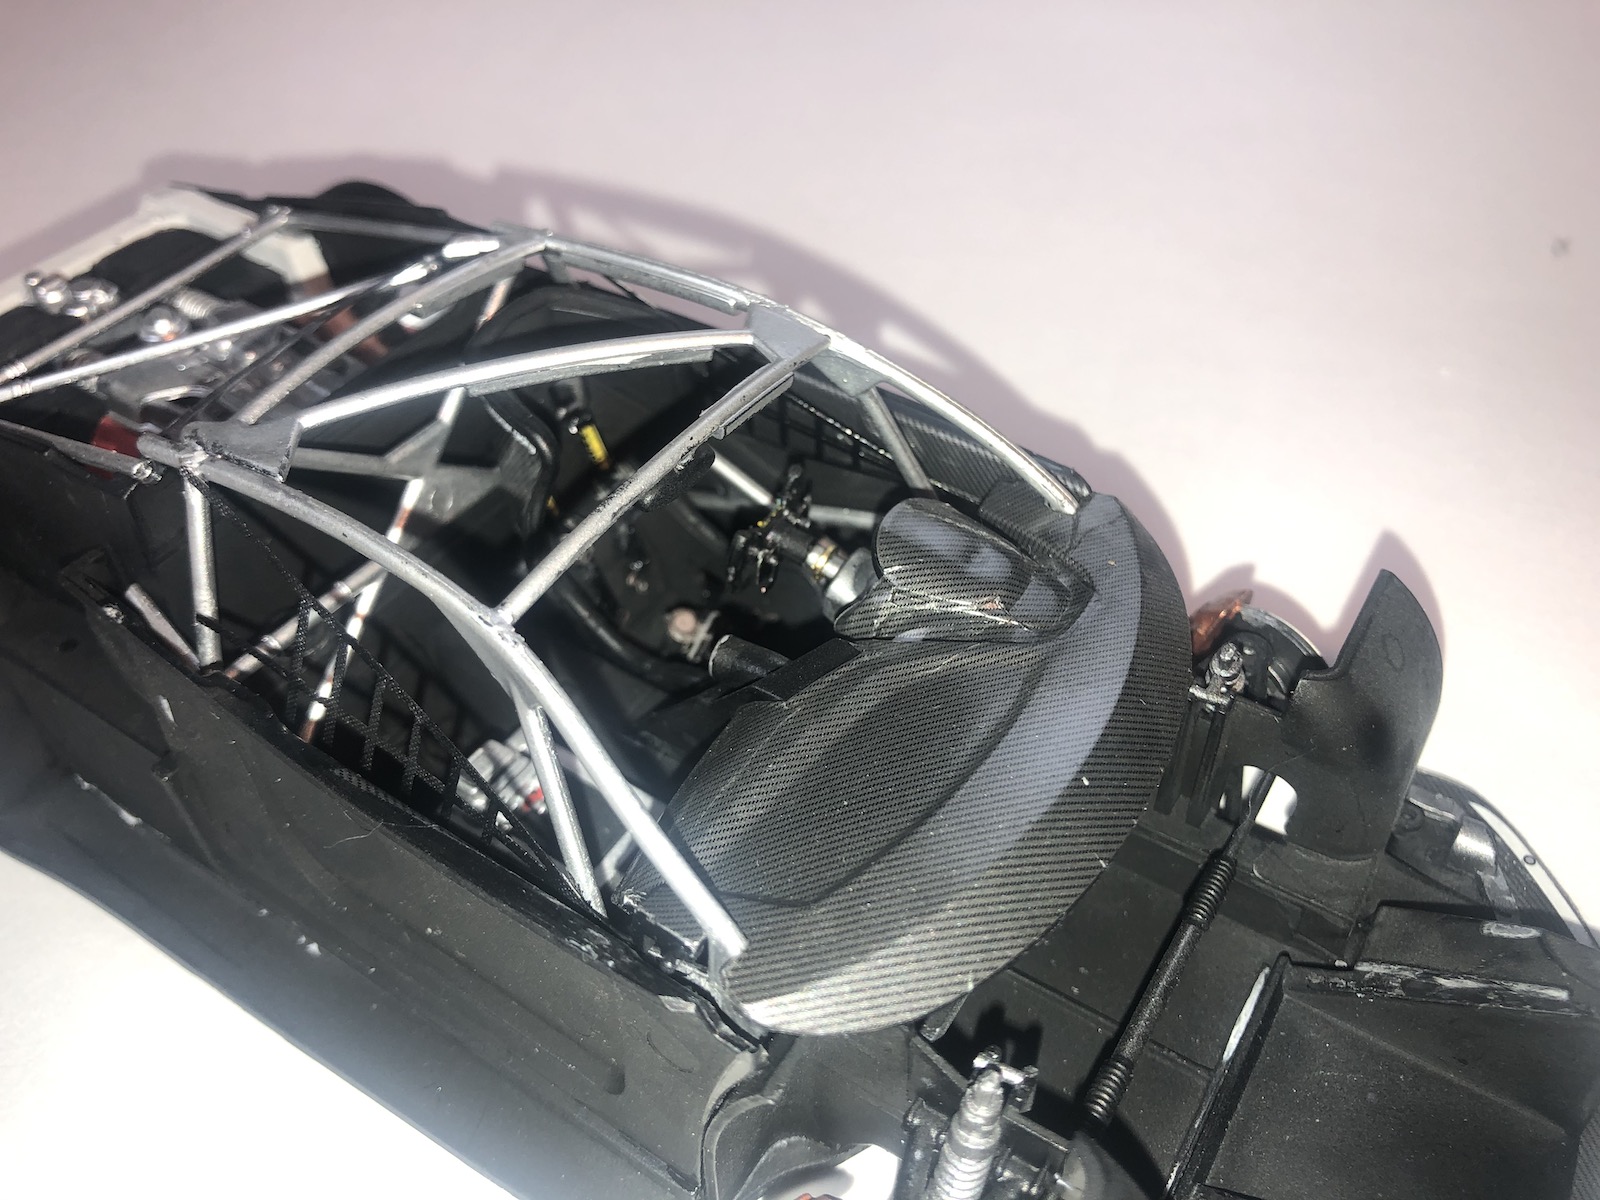
Moving on to the driver’s area, I replaced the gear levers on the steering wheel with PE from the Detail Up set painted Model Master Chrome Silver. This paint also highlighted the air vents. Before moving on I added the kit decals for the switches and the screen. These are nice and add a lot of detail but both decals 21 and 25 needed a lot of decal solution to settle down. The molded switches stand out a lot and the decals need a lot of help to settle in. Next up is the roll cage, this goes together pretty well and I had no major issues.
The roll cage was also painted Chrome Silver with XF-1 highlights where shown. The Detail Up set has an awesome set of PE parts to replicate the safety netting. I painted these XF-1 but there were some issues with the instructions for these parts. It is nearly impossible to tell from the instructions how they are intended to be installed. I tried installing them as shown but ended up swapping the sides. This made it easier to install the parts. However, after I completed the build I found reference photos that showed them on the inside of the roll cage with the ends wrapped around the roll cage to tension the netting.
The last parts of the interior to be completed are the doors and the seat. I painted the seat and doors XF-1 and once dry they both received a coat of Alclad Gloss. Both the doors and the back of the seat needed decals from the Detail Up set to add carbon fiber detail. Once again you will need the decal solutions handy, there are a a lot of complex curves that are very difficult to get the decals to fit over. Next up are the seat belts, the kit includes decals for the seat belts but the Detail Up set contains some very nice replacements. These are built from multipart PE sets for the buckles and attachment points. The belts themselves are replaced by woven nylon belts. My only complaint is that the belts don’t replicate the “Sparco” details from the decals. So cut that part out of the decal and placed them over the replacement belts.
After the seat was complete, I installed all of the various subassemblies on to the rolling chassis. The last part of the chassis was the wheels and tires. I painted the wheels Tamiya Gunmetal with a silver hub. The tires are molded out of separate rubber parts and there are no real issues with them. However, the tires are angled from one side to the other and the instructions gave no clue on how to install them. The box top and various reference photos show that the thicker part of the tire needs to be on the inboard side of the wheels.
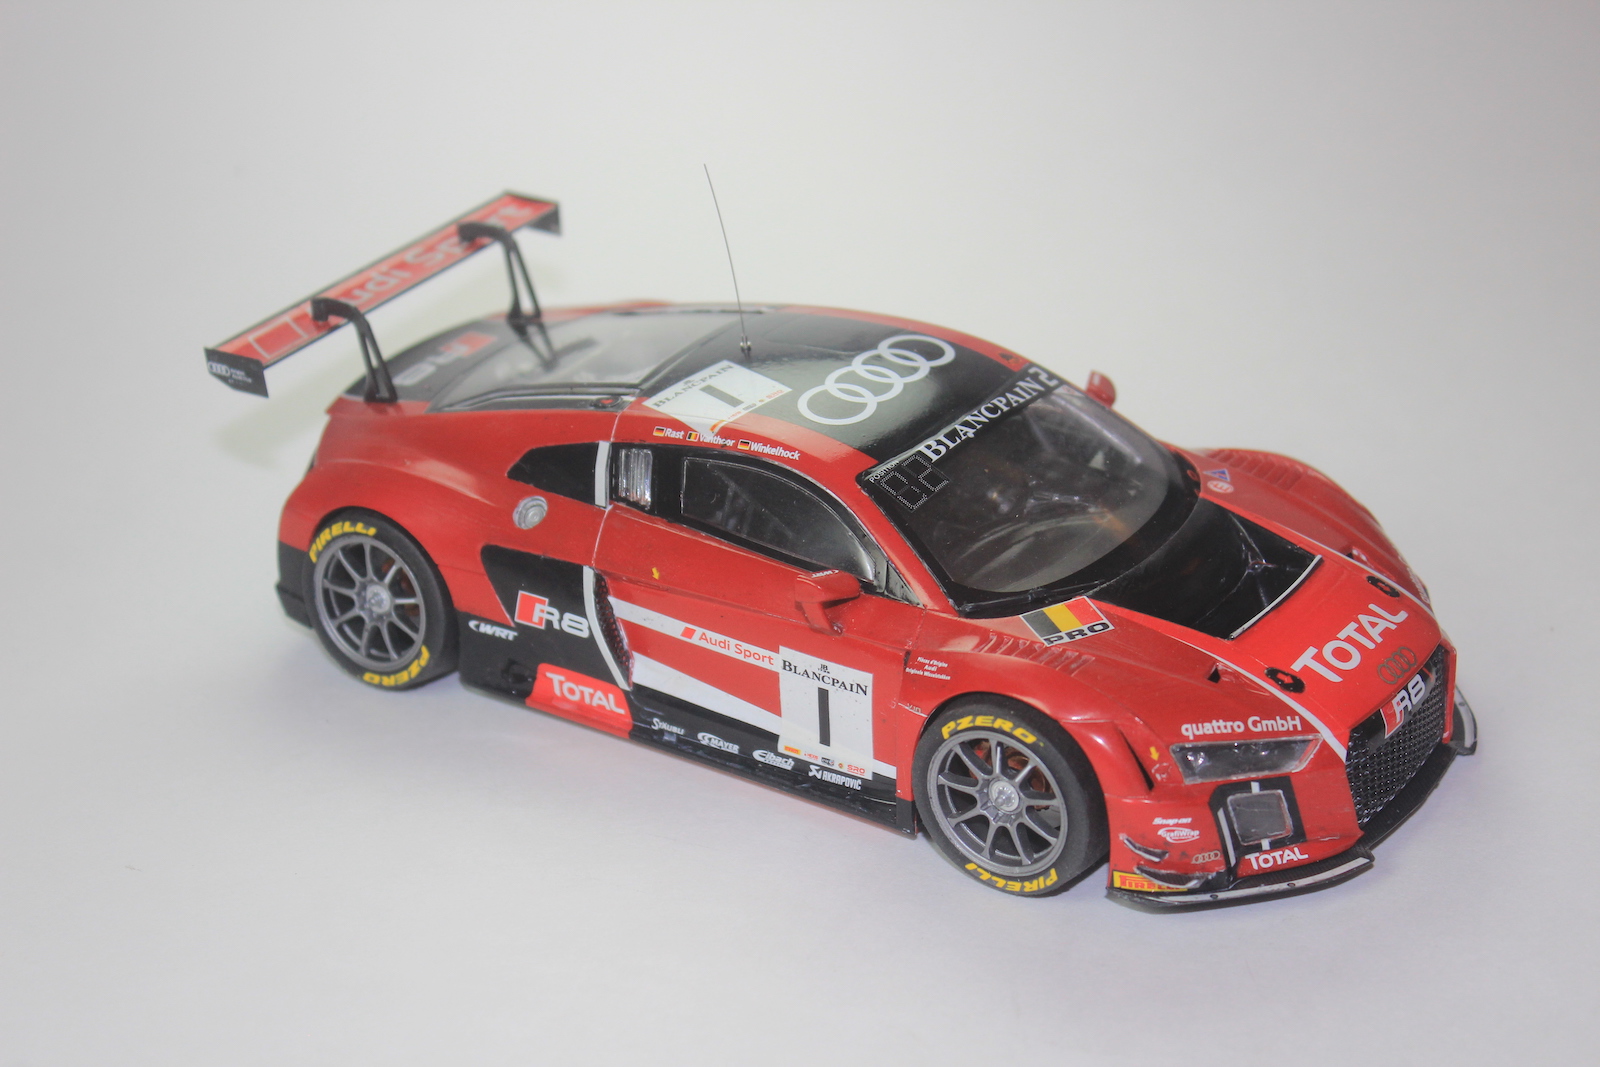
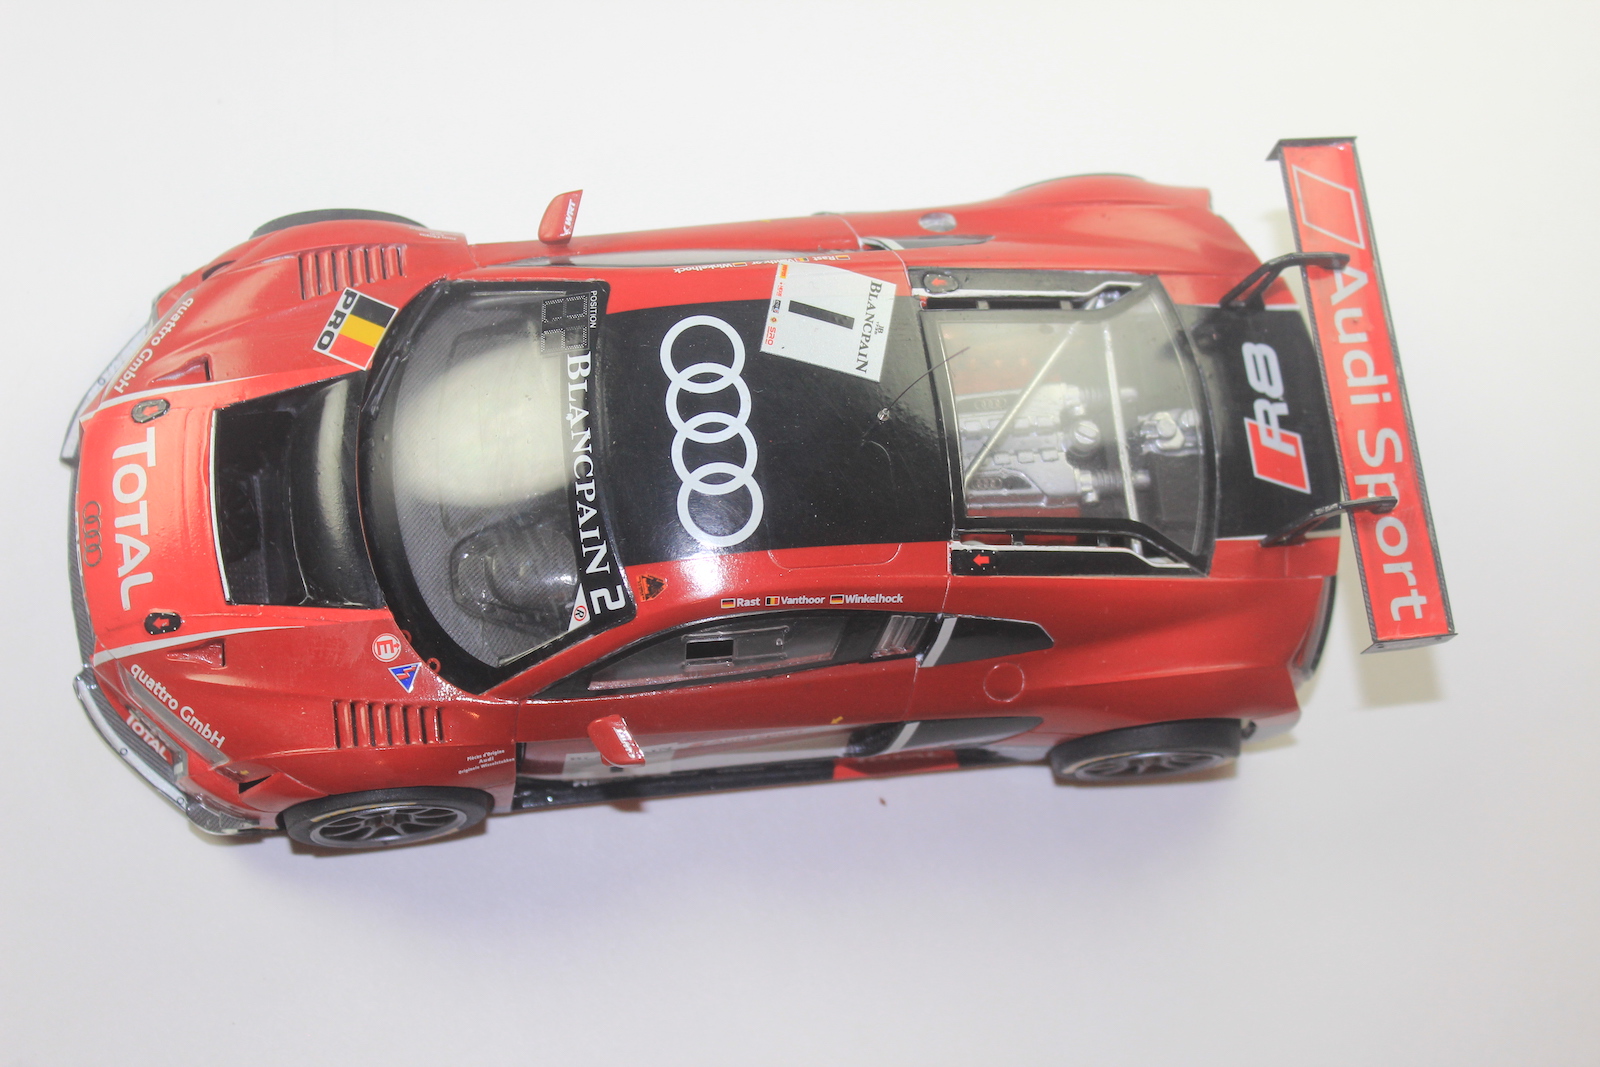
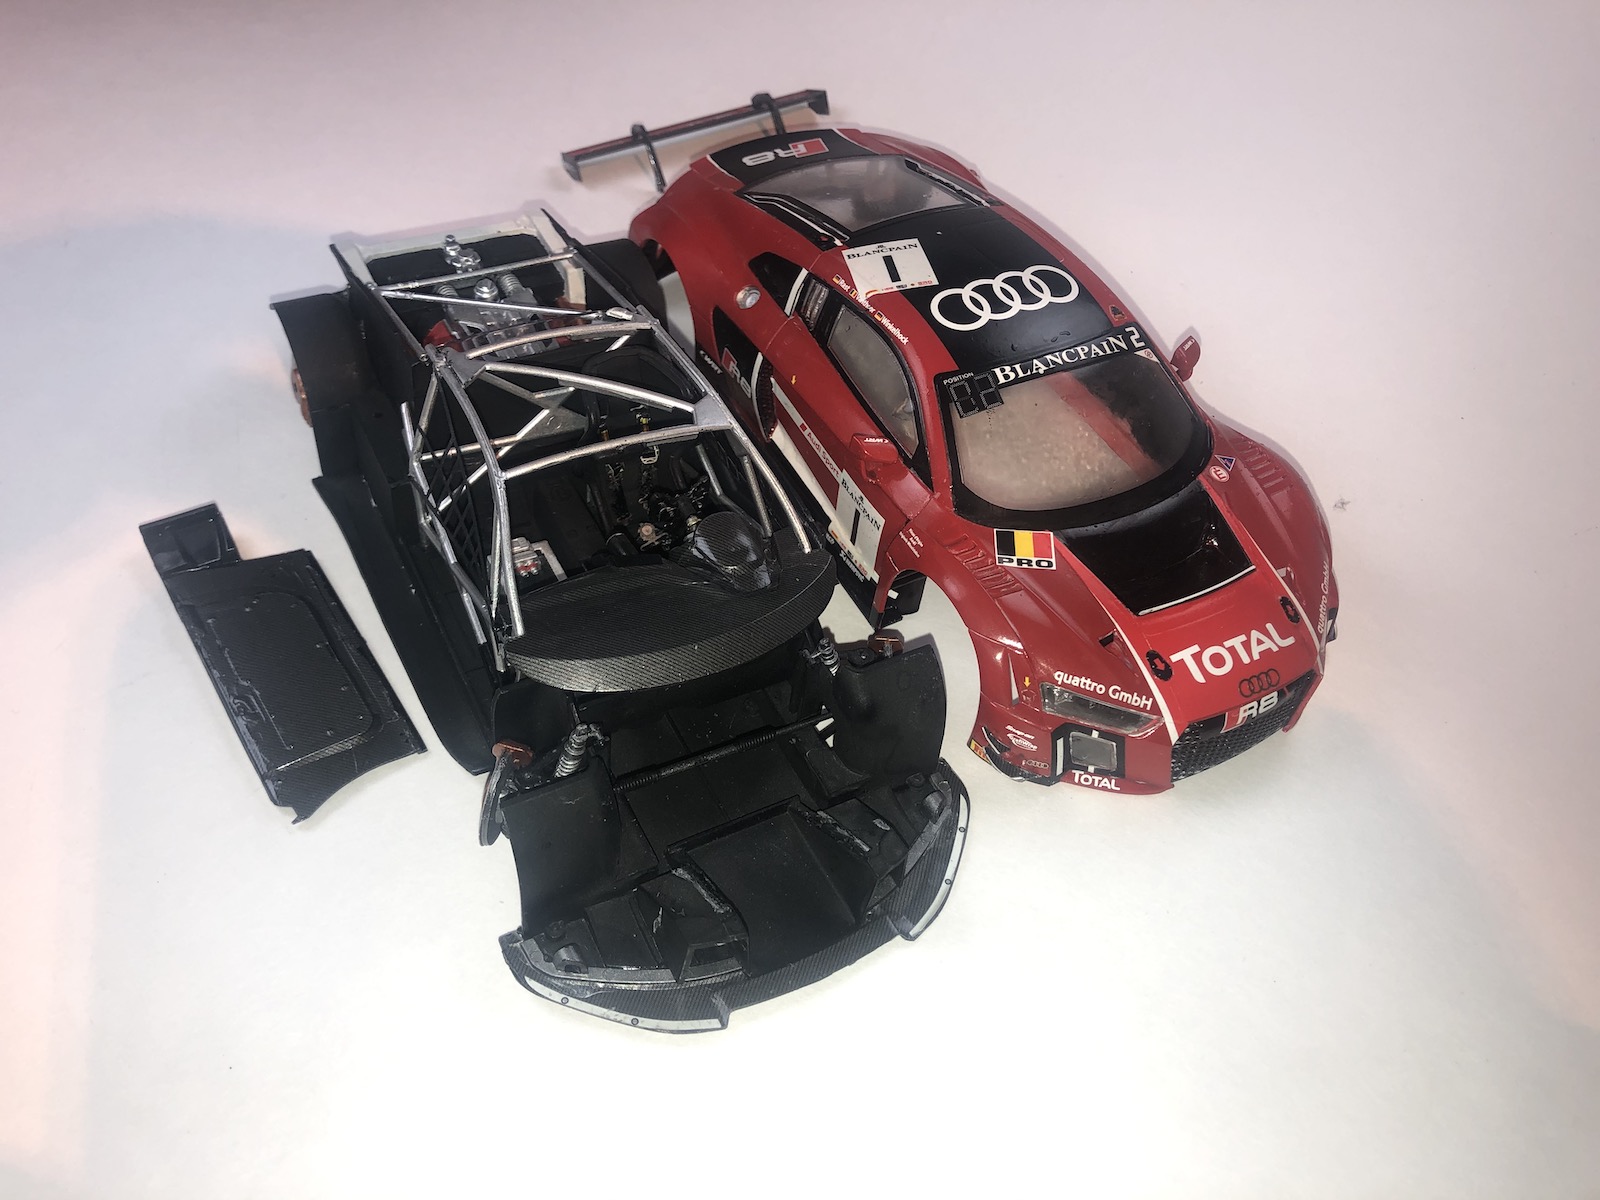
Moving on to the body, this is proved in a very nice single piece of white styrene. Overall, the detail here is nice and the molding quality is good. I started by painting the interior XF-1 and I left nearly all of the detail off until after I had completed the exterior paint coat. There are two options for paining here that I will dig into later but I chose the red option included in the main instruction booklet. On the decal guide there is no mention of the color to be used for the body, so I chose Tamiya Flat Red for the base coat.
Once the base coat is complete it was time to add the details. First is the front grille, the Detail Up set includes a PE replacement that is quite a nice addition. However, this grille has a pretty complex shape and the PE parts will need to be annealed to make it match. I found the PE parts to be pretty think and tough to deal with for this process, so I opted for the original styrene parts. The instructions for the PE grille parts are also extremely vague. I had no issues with the rest of the detail parts or the clear parts. I did leave part B12 and parts B46/B48 off until after decaling was complete as there were PE replacements in the Detail Up set.
Once most of the details were added it was time to add the decals. There are decals for two different cars here, one bright red and one in a silver grey. I chose the red option for my build as I stated above. There are two decal guides, one for each vehicle but no actual painting guide. This makes some of the detail paining difficult, especially with the rear of the vehicle as it is nearly impossible to tell what is supposed to painted black of the car using only the black/white decal guides. You will need reference photos to get the rear of the vehicle correct. There are ton of decals included for both options and unfortunately my examples had some issues. Two of the larger decals for the widows and the right door were misprinted. They were missing much of the black ink and I had to hand paint replacements over the white decal film. Also, the register of the red decal for the center of the hood was a little off from the flat red I chose for the base coat.
Overall, the decals performed well over a coat of the Alclad Clear Gloss. I had a small issue with the decals that surround the door windows; as designed they leave massive gaps of clear plastic. This doesn’t look right, so I shifted them forward to match the window frames and filled the gaps with XF-1. The only other issue I had was with the small set of decals that have the raised Audi emblems. These function almost like stickers and can be a little difficult to work with. All of the decal responded well to decal setting solutions. They even settled down well over the rubber tires.
The final steps were to add the last of the external details. Starting with the rear spoiler, there are PE replacements for everything except the center wing. These are all well-made and easy to work with. One item to note about the PE supports is that if you choose to use them you will have to fill the holes for the styrene ones in both the wing and in the rear of the car. This is not mentioned in the instructions for the Detail Up set. It also looks like there are PE nuts for the side parts of the wing to replicate the nuts on the styrene parts. However, these are not mentioned in the instructions at all and there are two sizes included with no clear distinction between them. Next are the parts in Step 12 of the Detail Up set, these replace B12, B46 and B48. The PE parts for B46/B48 are great but I had some issues with the windshield wiper. The PE here is very thick and tough to bend, I even had trouble while using my bending tools. It should probably be annealed to allow it to be bent easier. I found the styrene part to be much easier to work with. The last detail part I want to address is the antenna. This is a two-part metal affair that is an awesome addition and huge step up from the kit parts.
Overall, this is an awesome kit. I haven’t built a car kit in years and I had no serious issues with it. It was very quick and fun to build. The Detail Up set does add a ton of detail, and for the most part is well worth using. My only wish is that the PE was easier to work with when bending. I would definitely recommend this kit to anyone that is interested in modern touring car racing or a fun colorful build. My thanks to Platz Hobby and IMPS for giving me the opportunity to review this kit and it’s Detail Up set.


Comments
Add new comment
This site is protected by reCAPTCHA and the Google Privacy Policy and Terms of Service apply.
Similar Reviews