
Atlas ICBM
Horizon Models of Australia has released their third kit, the Atlas ICBM in 1/72 scale. This comes after kits of the Mercury Space Capsule and Mercury-Atlas rocket both in 1/72. If you have built either of those then you know you how good Horizons kits are and if not the following review will show you.
The kit is made up of 3 sprues of gray plastic. Two of sprue A and one B. The biggest difference from this kit to the mercury atlas kit is that it is missing the mercury capsule sprue. Horizon gives you three options for payload though, option A is the first SAC launch, option b is the “New Nickle” launch from 1961 and option C is the Mk4 RV test flight from 1960. My choice was to build option C as it launched from the Cape and the other two were from Vandenberg.
The directions come in a fold out format. Steps 1-7 are build instructions and steps 8-9 are decaling. This kit has a very extensive decal sheet that is full of stencils, codes, and specific markings and shows how much research went into the design and construction of this kit.
Construction
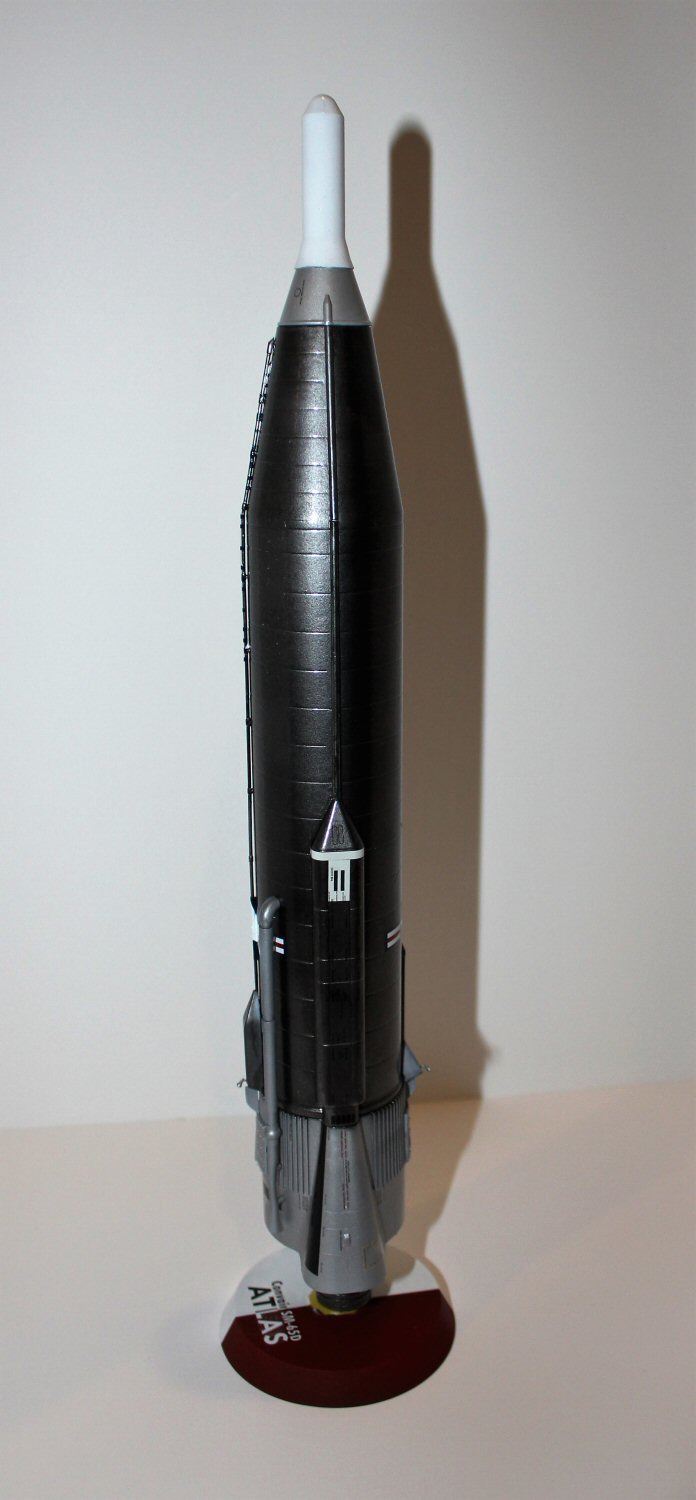
Construction starts with the two halves of the rocket body. Horizon has you opening certain holes in the rocket body and lower fairing for various pipes and nozzles. As this is the same rocket body as the mercury atlas kit be careful which holes you open as there are differences between the two kits. Step two has you joining both halves together and attaching them to the lower fairing. Set this assembly aside to dry. From this point on I recommend studying the directions as certain parts go on certain sides based on the front or rear of the rocket. Also, Horizon has a unique way of doing their decals. It also means needing to paint certain areas of the rocket before finishing construction. Step three has you adding various fairings and pipes. I don’t recommend completing this step to totality, I found that if you add the side fairings from step 3 and 4 it allows you to have less seams to fill on the rocket body. You will also see in step 4 that one side of the rocket has a large pipe that goes from the top of the side fairing to the top of the rocket. This covers the entire seam on the right side of the rocket thus making it a simple task to fill the one seam that would be visible. Once both fairings were attached and the left seam filled I set the whole assembly aside to dry and I decided on the payload for the rocket. I attached both halves of the MK4 RV together and filled the seam. I then attached it to its mounting ring (part b12) and left that aside to dry as well. Then it was time to move on to the first round of paint and decaling.
Since the rocket needs to have some decals added before it is fully built I decided now was a time to paint. Since the real icbm is made up of different types of metal I chose Alclad paints for this project. I started with the main body of the rocket which is stainless steel. All stainless parts were given a base coat of Alclad gloss black and then given a 24-hour period to dry. Then multiple coats of Alclad stainless were sprayed to give the rocket a realistic look. The process was repeated for the fairings and piping that needed to be in stainless that were still on the sprues. The lower fairing and certain piping for the rocket body are in flat aluminum. These were given a coat of Alclad gray primer and then dull aluminum was sprayed after the primer was dry. I then decided to finish the painting by painting the rocket engine assembly parts (I glued the three engine bells together first as found in step 6) their appropriate metallic colors and then gave the warhead a coat of gloss white. As these parts were drying I started to take a good look at the decaling that needed to be done as steps 3 and 4 ask you to apply decals before continuing the build.
Again, this decal sheet is very extensive. Stencils, markings, all kinds of codes, I feel that the decals make this kit. There have been other atlas kits over the years but mostly they just have very simple decal sheets, nothing like this kit. When finished, you will have left over decals but you will also have an incredibly accurate atlas icbm. Once the paint is dry I gave the fuselage and warhead an overall coat of alclad clear gloss so that the decals would stick better. I let this dry for 24 hours and then paying careful attention to steps 3 and 4 and referencing step 9 (decal step) I added the united states air force decals and national markings. The decals went down nicely and settled into the grooves on the rocket with a single coat of micro sol and set. After letting them dry the build continued by adding the nose cone assembly to the top of the rocket as found in step 5. I then went back and finished steps 3 and 4 adding the various pipes, exhaust ports, Vernier jets and fairings that needed to go on after the decals were added. Step 6 was attaching the engines to the lower plate along with the exhaust pipe that attaches to the bottom of the rocket in step 7. Step 7 is the final assembly step it has you attach two metal plates to the sides of the rocket and then has you attach the rocket motor assembly to the rocket. The last part of the step is attaching the base to the rocket itself. Horizon wants you to paint the base gloss black but I chose to paint the base to make it look like the rocket gantry and hold down locks. It’s half red half white and a yellow plug that goes into the central engine bell. I used Tamiya acrylics for this. I attached the base using superglue and when the super glue was dry it gave me a great platform to complete the kit.
Decaling
Steps 8 and 9 have you decaling the kit. Step 8 is the common markings, and is split into four parts, front, rear, and each side. Be sure to read all the notes on the page as some decals need to be covered by other decals so make sure you do them in the proper order. All the decals went on easily with one coat of micro set and sol except for one. I had one decal. (number 11) disintegrate. It may have been user error though and not the decal sheet as none of the other decals had any issues. Step 9 has the unique decals for each icbm. The unique way that Horizon came up with to give you a realistic look was to give you decals to wrap around the pipes that cover the decals you put on in steps 3 and 4. It gives the illusion that the lettering and national markings are painted on and do look good when done properly. I used a few coats of micro sol to get it to wrap and hold to the pipe easier but once it was dry looked amazing. After all the decals were dry different areas of the rocket were given coats of Alclad semi-gloss clear and matt clear coats to seal in the decals. This ended the build
Final Thoughts
This is a great kit and is very highly recommended. I can only hope that Horizon makes many more of these early rocket types. I can’t thank IPMS enough for letting me review this kit and Horizon for making it.


Comments
Add new comment
This site is protected by reCAPTCHA and the Google Privacy Policy and Terms of Service apply.
Similar Reviews