
Arado Ar 234B-2/S3
I’ve built a number of models from this fledgling company, and must state one basic observation: they provide some fascinating subjects. I probably don’t need to go into a lot of historical background regarding the revolutionary Arado Ar234, except to say that it was the world’s first jet bomber and a truly amazing aircraft in many ways. I became fascinated with it during my teens when I built the venerable Lindberg kit, enthralled by the design.
Leave it to Fly to come up with not one, but several different configurations of this pivotal aircraft in my favorite scale, with more to come. I checked up on the Fly internet site and was not at all surprised to see that the two earlier releases are now sold out. Get them while you can!
On to the build. This is very much a multi-media kit, with numerous large resin castings for the cockpit, landing gear wells and assorted other details. A photoetch sheet supplies a number of other goodies, including a quite presentable set of seat belts with a clever fold-over effect to make the buckles more three-dimensional. The kit provides no moving surfaces, although it would be a fairly straightforward process to cut them out and reposition them if you so desire. Surface detail on the plastic parts are very fine – if anything a bit TOO fine. I found that there was little difference between panel lines and moving surfaces, so scribed the latter a bit deeper just to make a visual distinction.
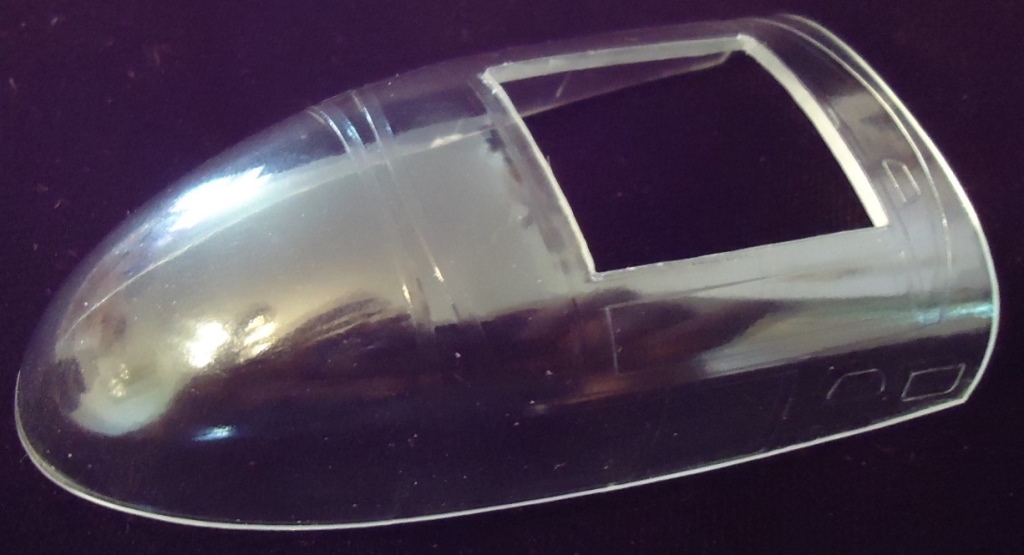
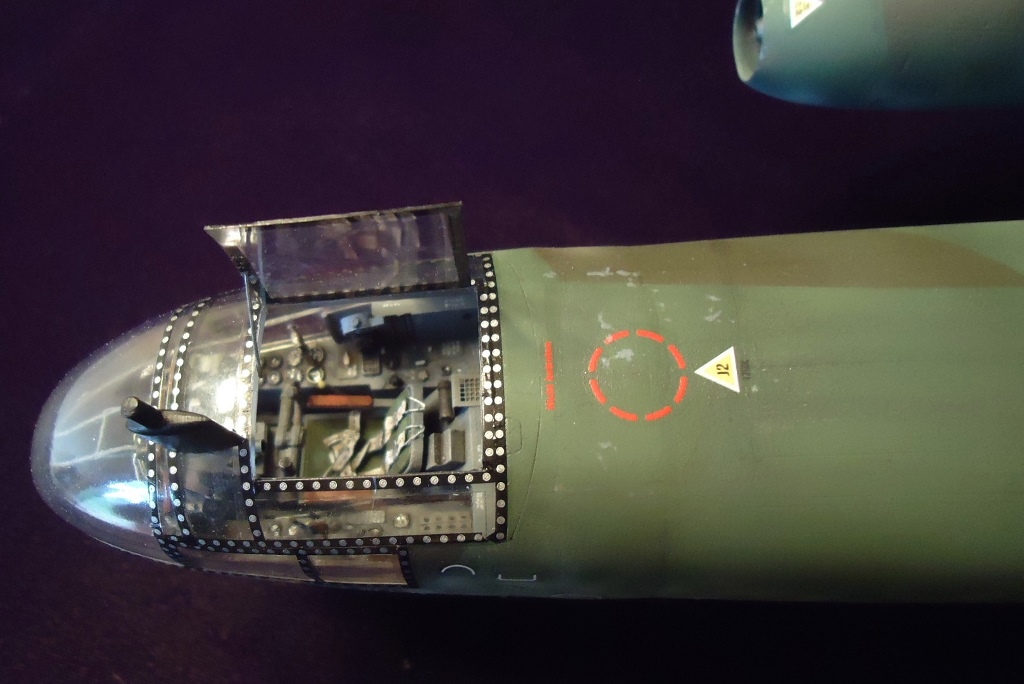
Before I even began assembly I was faced with a hard choice. With aircraft of this scale, I always like to have open cockpits, and for one as well-detailed as this I really felt that some form of open egress was an absolute must. Unfortunately, Fly chose to model the canopy closed. Swallowing my nerves, I took the chance to carefully cut open the access hatch and was pleasantly surprised to find the clear plastic quite workable, rather than hideously brittle. Care needs to be taken if you wish to make this alteration, but it’s a bit less scary to do so than with some other kits I’ve dealt with.
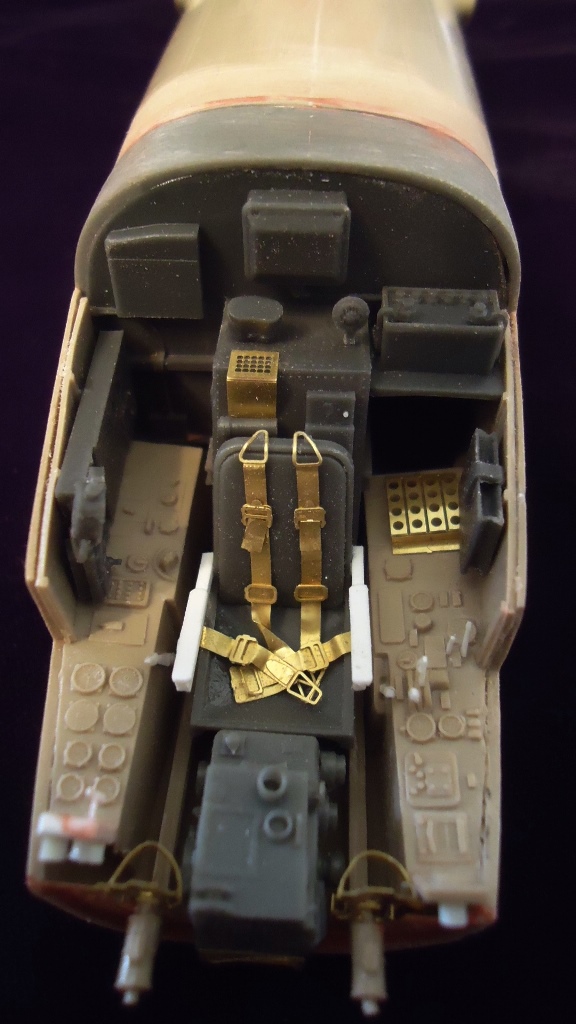
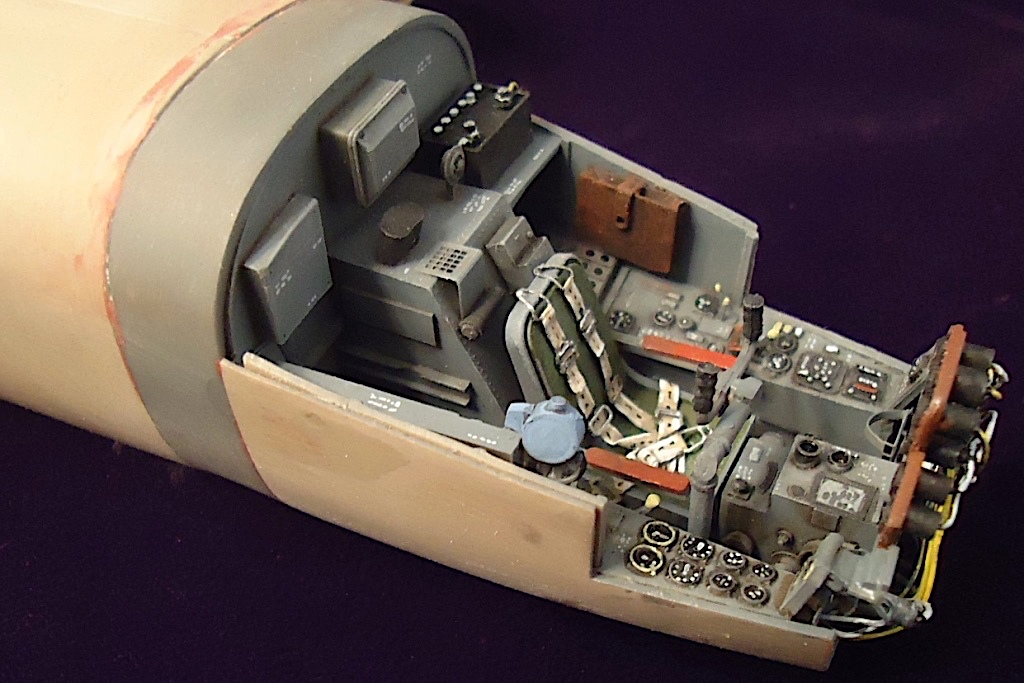
After that, the first assembly of note is the cockpit area, and this is also where about 90 percent of the detail goes. It is a VERY complete rendition of this highly visible area and benefits from care in assembly. Although the instructions suggest you install the plastic foot pedals, the photoetch sheet actually supplies a lovely pair which I used instead for a more delicate look. The one thing missing is the numerous wire leads to various instruments, and I replicated these with fine solder.
There is also a kind of brace for the front of the control panel that is designed to support it against the front canopy. There were two problems with this – first, the photoetch assembly provided was both under scale and extremely flimsy. Supporting the wired-up control panel with this and then gluing it to the clear canopy seemed like a guaranteed recipe for disaster. So I compromised by making a kind of “cradle” for the main control panel along the top of the two side consoles and scratch-built a larger, more effective support which could attach to the control panel without actually having to mount against the canopy.
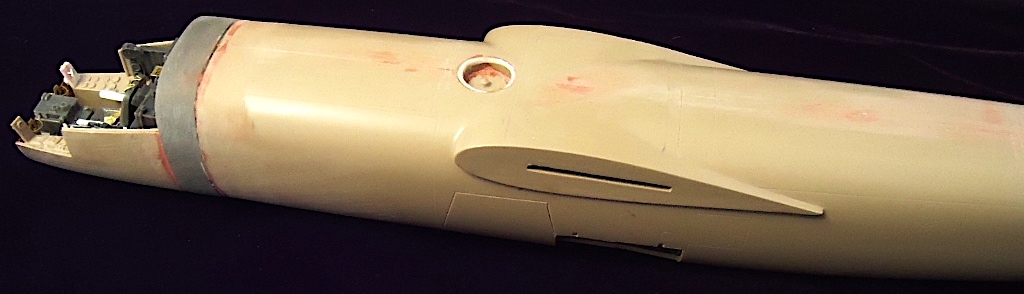
After this process, I chose to alter the assembly process a bit further. In typical cases, you assemble the interior, paint it and then install it. Because the cockpit is such an integral part of the fuselage on this model, I opted to avoid painting the cockpit until I had assembled it to the fuselage to avoid marring any paintwork. As I also opted to use the optional resin fuselage extension (mostly to test its fit for this review) and so this change of plan turned out to be a good move.
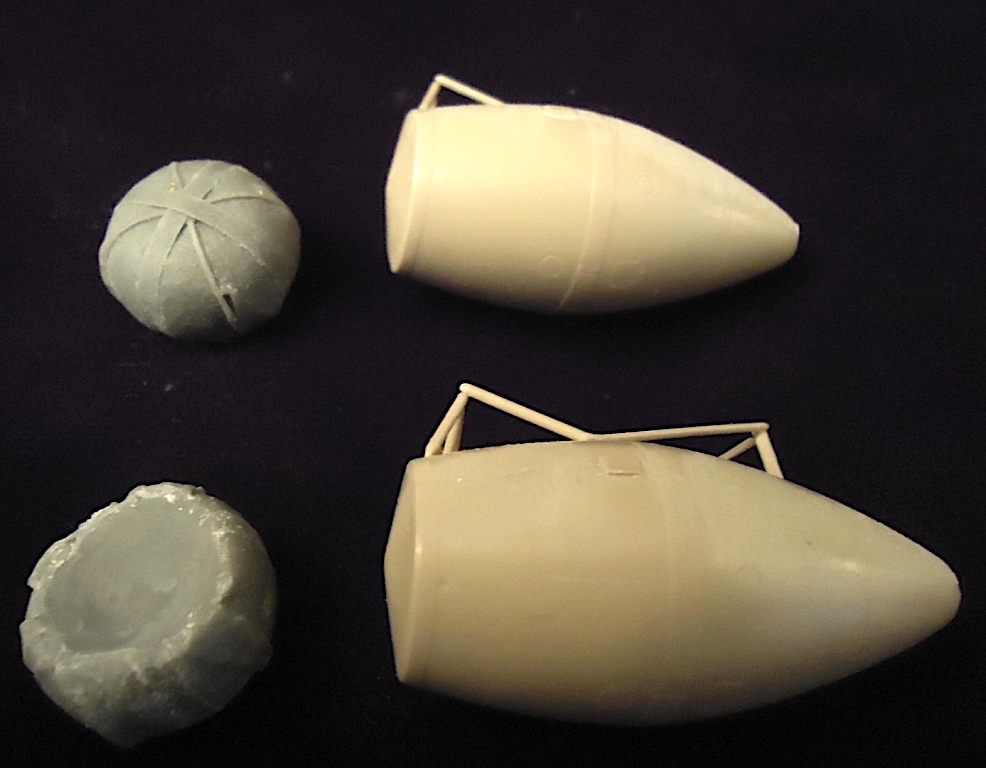
There are definitely some modest fit issues around the cockpit area and some filling and sanding is required. The large cockpit casting includes the front landing gear well so matching this up closely with the plastic fuselage is important. I found that the large mold plug that came with the casting could remain in place so long as I trimmed the edges a bit – adding a little heft to the front end, although I still chose to glue some lead in to ensure this didn’t turn into a tail-sitter.
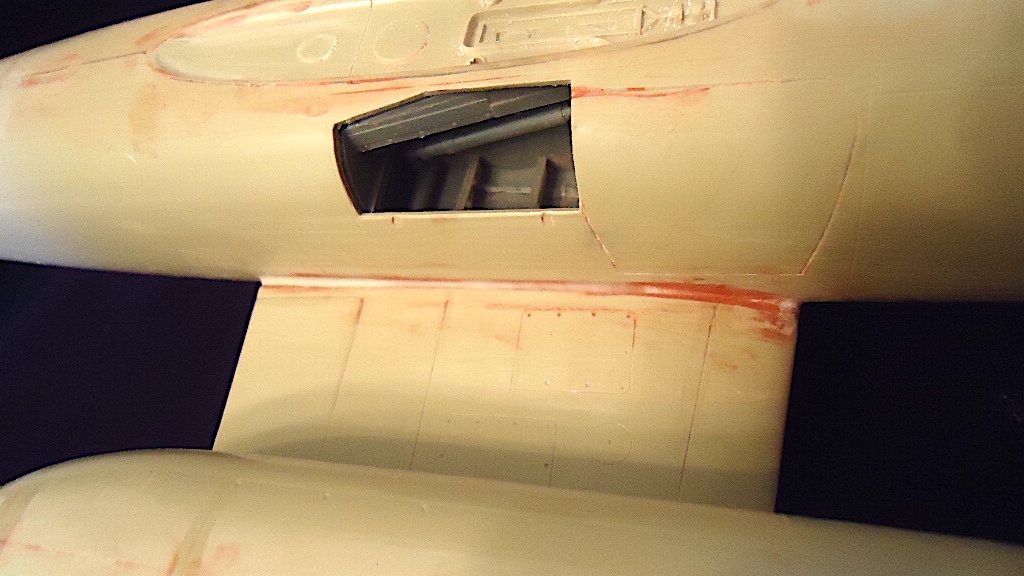
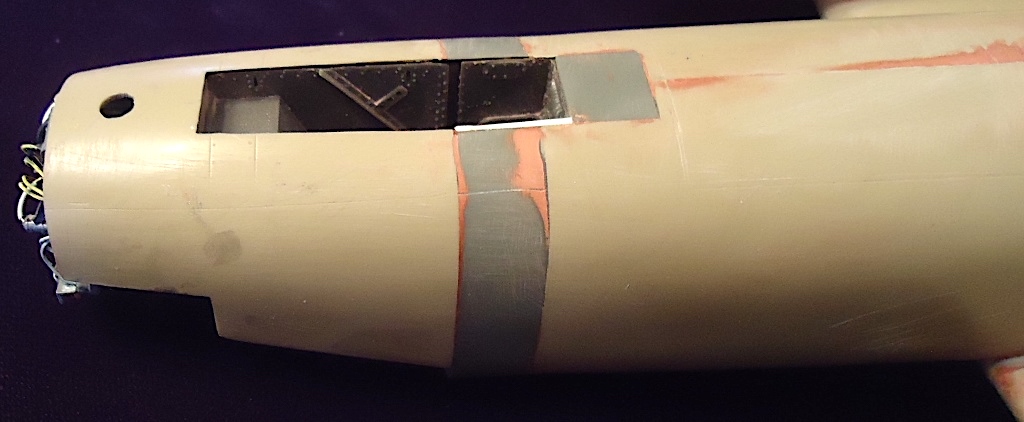
You also need to insert the main gear wells into the fuselage before closing things up. The only real problem I encountered during this stage was for the optional open fan-thingy that sits on the spine of the fuselage. I had some difficulty in getting this opening to be really round, and finally used to Evergreen tube to create the proper shape. In retrospect I could have avoided a fair amount of difficulty if I’d just left it closed, but . . .
Once the fuselage was smoothed out and even, I painted the cockpit in situ, as it were, and had less trouble than I’d expected. I also glued the other main components together at this time, finding the fit to be pretty good for the most part. There was a little trouble with the wing installation though, and I had to carve out the tab slots pretty extensively to get things to slide into place.
It was at this stage that I almost paid the price for a miscalculation on my part. In my haste to get this baby assembled, I had glued the main wheel wells into the fuselage with some superglue, assuming this would do the trick. As you can guess, my relative lack of experience with multi-media kits really let me down. What I failed to consider was how much flexing the fuselage would undergo during the latter stages of assembly. I was test-fitting the main landing gear legs when one well suddenly popped loose, tumbling away into the fuselage and completely out of sight.
Needless to say, the air in my workshop turned blue as I vainly tried to coax the piece back into position. At this point, I’d already installed and painted the cockpit as well as all the other major structural parts, and it was beginning to look like I had a true disaster in the making. Fortunately, I eventually could pry off the separate bomb well at the bottom, which permitted just enough space for me to nudge the large resin block back into position. After which I locked everything solid with a generous application of epoxy putty and flop sweat. My advice to the inexperienced – use every bonding material you can to ensure these large castings remain in position. They only glue along their edges and that makes things potentially more than a bit flimsy (as I found out the hard way).
After recovering my wits and heart rate, I added the rest of the details, which thankfully did not threaten any additional drama. I assembled the engine pods separately, and these also include some nice castings which take a bit to juggle into position. I found I could glue the plastic pods together first and then jockey the resin front and back inserts in through the open top, fixing them into place once I was satisfied with their location. The rear tear-dropped shapes are plastic, and I was a bit concerned about them fitting into the resin engine backs, but they snuggled in so well I didn’t even have to use glue. The completed pods then fit the wings fairly well with only a modest amount of filling and sanding.
The canopy is a two-part affair which needs to be glued together VERY carefully, as only a single strip of decal is going to cover the seam. The completed canopy proved to be a smidge wider than the fuselage, so I added some plastic strip and sanded it down to fare them in better.
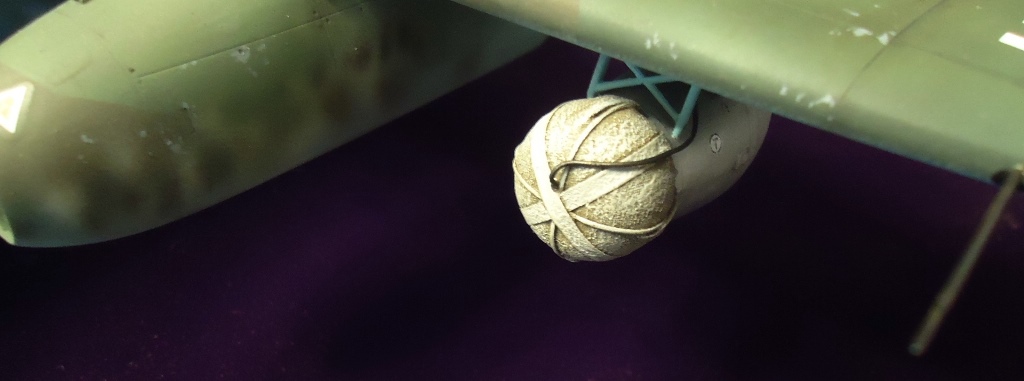
This kit offers some interesting add-ons, including drop tanks and RATO rockets. Oddly enough, it does NOT include a bomb, which I still find a bit puzzling. Of course, you can find suitable bombs in other kits, but the lack is puzzling. In order to display the lean lines of the original craft, I elected to forgo the drop tanks but assembled the RATO packs. I just could not resist the lovely cloth effect of the integral parachutes. Interestingly, the only real difficulty I had with any resin parts during the whole assembly involved those parachutes, as the molding plug was quite large and took some time to remove. In addition, the plastic RATO parts feature a subtle cone effect on the nose, which meant I had to then route out the backside of each pack so they would snuggle down better. Although time-consuming, the end result is quite nice and looks good.
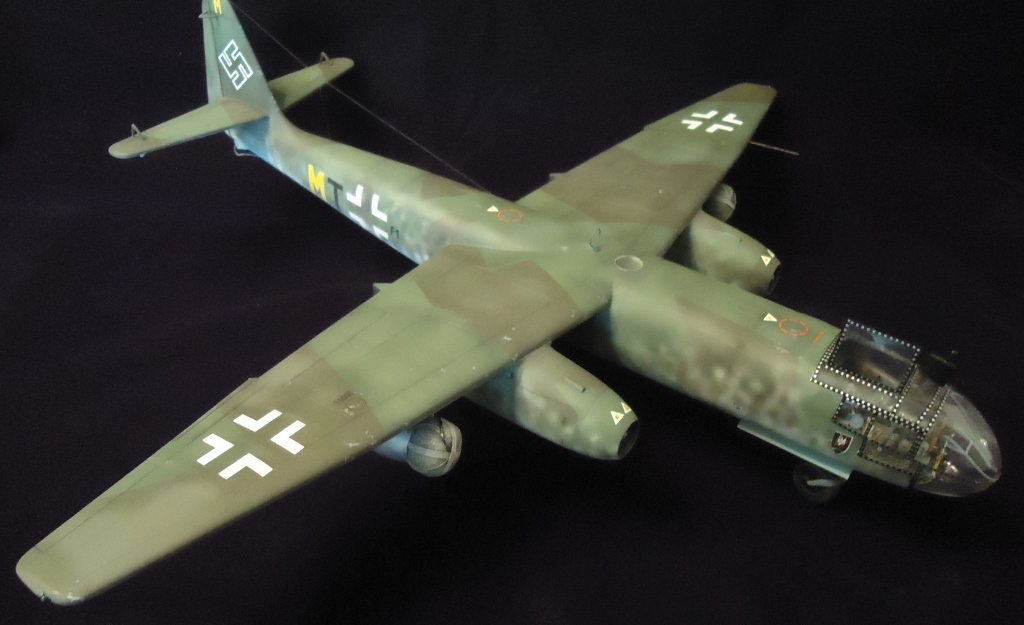
At this stage I could seriously consider the paint job. I elected to do a semi-generic model based not on the kit decals, but on a set made by a friend of mine some years back to fit the Combat Models vacuform kit of the same scale. The kit decals were used for everything else, including the stenciling. Fly’s decals are thin and very sharp, but have a tendency to fold over on themselves, which created serious frustration when I was trying to apply the wing walks. Eventually I gave these up as a lost cause, rationalizing that a lot of these aircraft didn’t have them. Well, maybe.
After that it was fiddly bits, although I found myself handling this model like glass. Every once and awhile you stumble into a build that simply provides issue after issue. It’s not that the kit itself was problematic – far from. But anything that COULD go wrong DID go wrong, and because I truly value this model, I had higher frustration levels than usual. The final result says it all, I think, and no one can fault Fly for providing such a well-detailed, attractive kit. I’ll admit that it’s not for the inexperienced, but anyone with some familiarity with multi-media kits should not find it particularly challenging. For all my self-inflicted wounds, was it worth it? Absolutely. I LOVE the look of the final result, despite my numerous mistakes and missteps. I can’t wait to get my hand on the four-engine job for maybe a tandem with a V-1 on top. Fly did a wonderful job on this model – I can recommend it without reservation.
As always, my thanks to IPMS/USA for a chance to add this revolutionary craft to my collection, and to Fly for making such a terrific kit available to us diehard 234 fans.


Comments
Add new comment
This site is protected by reCAPTCHA and the Google Privacy Policy and Terms of Service apply.
Similar Reviews