
A3D-2 Skywarrior and Landing Gear Set
The A3D-2 Skywarrior strategic bomber, commonly referred to as “The Whale,” was the heaviest operational aircraft to be operated from an aircraft carrier. It’s service as a bomber was sort-lived and it became a successful refueling and electronic warfare/ reconnaissance platform serving the US Navy and its defense contractors for many years after most aircraft of its age had already been retired. There is little info actually available in print or online for this aircraft, but from what I could see the kit carries the lines well and appears to be, for the most part, an accurate representation.
The Kit
Molded in a soft, light gray plastic, it consists of approximately 370 parts on many sprues. Also included are two spues of clear plastic, three real rubber tires, three frets of PE, and three decal sheets – a very impressive box full of goodies. Care has been taken to protect the PE and the many fragile items/clear parts by wrapping them in a thin foam before bagging them in plastic. Upon inspection, it became apparent that there will be a follow-on variant (recently announced as a KA-3B, to be released in January, 2014) with the PE being the biggest give-away with the bomb bays doors having two configurations included. All told, about 25% of the PE is not used.
Construction began with a detailed cockpit section. It all went together quite nicely and looked good upon completion. However, the decal for the front console doesn’t correctly line up to fit the recessed instrument clusters. If you look closely, the control yoke is partially through one of the instruments. Secondly, I felt the PE that makes up the side consoles lacked proper detail. Although there was some relief to them, it was very little and disappeared following one coat of paint.
Next came the radar antenna assembly. I decided not to build this option as there was no real detail to ensure the radome could be shown in the open position – no hinge points or support shafts. If one does decide to use this option, it can be left off until final assembly. Be sure to install the bulkhead when joining the fuselage halves.
A highly detailed nose gear assembly was next. (A personal comment here to voice my displeasure with actually having to install the entire strut assembly during the nose wheel well construction.) As I did not use the stock gear, I cannot say I would have been pleased to have to persuade the nose rim/tire into the yoke – it’s unknown if the plastic would completely cooperate. The SAC gear was a definite advantage in allowing for easy installation of the rim/tire. It does suffer from the fact it has to be completely installed first, as well. A quick build of the main struts was next and was performed without incident.
Next came the bomb bay assembly. For all of the detail here, it is also missing some very important items. First, where are the racks/carriages to hold any weapons? – it seems like a pretty important feature for inclusion in this bomber version. Second, where are the fuel tank panel covers? There are two pronounced oblong holes that are, in my best guess, designed to be access panels to the main fuel tank. Given the tanker version is due out soon, one could deduce they will have the proper fittings in that kit.
This was followed by the main wheel well assembly. There are some issues here that one should be aware of. Part E59 shown in step 9 and E56 in step 10 are swapped in sequence. Make sure to dry fit all parts here, as there is a lot going on and, in my opinion, it is not completely clear to the builder until it is mostly all together. Again, I did not use the stock gear but can say it is best to build these up leaving all gear parts off with the exception of the rotating knuckle, parts E17/24 and E28/33. I was able to attach all of the remaining parts at the conclusion of the build with super glue and tweezers. SAC gear comments will be found at the end of this review.
Lastly, a quick build of the crew entry/in-flight nuclear fuse-arming access compartment and I was ready to join the fuselage. NOT! Here is where great care is required. Multiple fit checks are required, as every bulkhead is oversized and will leave seam gaps. I spent a good deal of time here, only to think I had it nailed and missed by what can be considered a highly technical term called a skosh. Something I wish I would have done, and that I hope other builders will do, is to glue a length of flat styrene to either side of the upper seam. It is a long, very unsupported area that gave me the greatest amount of grief.
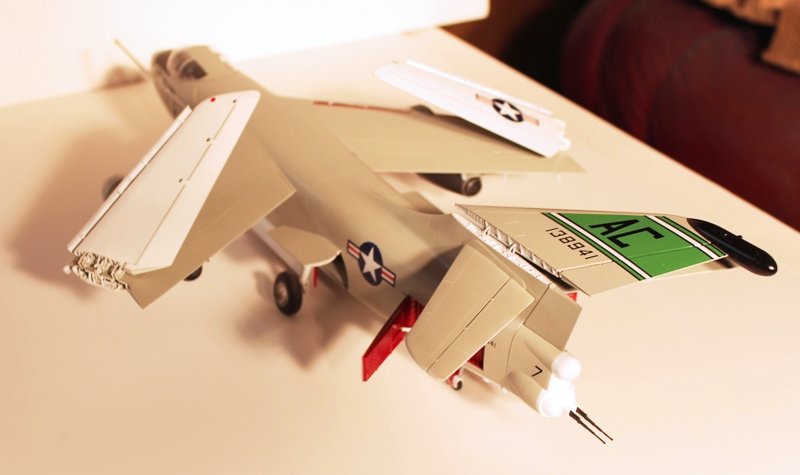
The remainder of the construction was pretty straightforward and, with some attention to detail and proper dry fitting, it all went together quite well. My only concern here is the main wing attachment cries out for a larger or multiple tabs. The PE for the hinge points on the wings is a bit tedious but is worth it as it really pops. There is really a very small amount of contact area to support the folding tail. It was not a happy joint during a few steps and a short ride in the car.
The next to the last step is to build both engines. They each have a great amount of detail and would be nice to view but, again, there are no hinge-points or supports included, so I decided to close them up. Dry fitting of each nacelle to the pylon is essential to a decent fit. A better view of the CSD orientation from the front would be welcomed for many modelers. A hint to those who don’t know – both of them are oriented the same. A review of the engine online is quite helpful.
I finished with Model Master enamels, insignia white on the bottom and, to keep color scale in mind, I used flat gull gray oversprayed with Model Master gloss coat before and after decaling. I felt the decals were quite good. They lay down nicely with a quick shot of Solvaset. There are a few on the main sheet that are not shown on the full color painting and marking guide. There are two additional sheets to let you choose a different BuNo if so desired. Markings are provided for one unit, VAH-9 Hoot Owls.
One odd item of note in conclusion is the option of two tail assemblies. I choose the one with the bulbous fairing for its striking look. The strange part here is that there is no explanation of which one is correct based on the stock BuNo. Unless you are really concerned about everything being perfect, it is just an observation.
The Gear
This is my first use of a Scale Aircraft Conversions gear set. With that being said, I did find it to be superior to the kit-supplied gear in both detail and actual positioning based on photos. If I were to have a complaint, it would be for SAC to include their own instructions so the modeler truly understands how to assemble them correctly, and also to inform them of which stock parts are to be used to complete the gear. Given the size of this kit, the added strength of these being made from metal will surely help keep it in the upright position for the duration.
In closing, I had a great time building this unique subject. A better understanding of the aircraft would be nice, but as mentioned, reference material is hard and expensive to come by. I would bet future releases will be just as striking. Don’t kid yourself, this is a large aircraft, even in model form. Made sure you consider where you will display it and consider using the below-deck storage features by folding the wings and tail (my chosen option.) Besides, it gives it a different look and allows you to show off the entire PE used in the wing/tail fold area, beside saving shelf space.
I would like to thank both Stevens International and Scale Aircraft Conversions for graciously donating both these items to IPMS, and IPMS for affording me the opportunity to review them.


Comments
Add new comment
This site is protected by reCAPTCHA and the Google Privacy Policy and Terms of Service apply.
Similar Reviews