
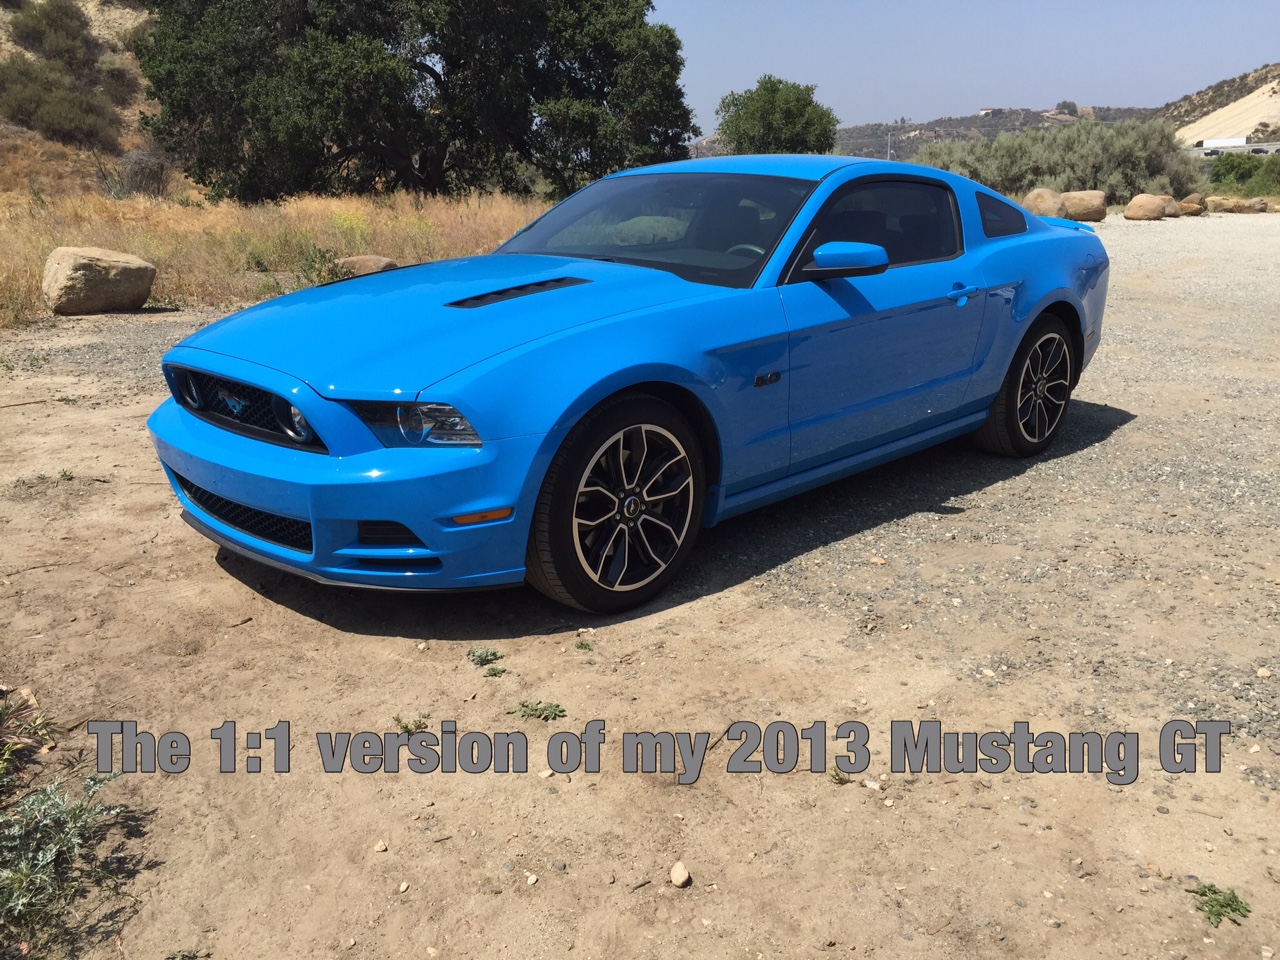
2014 Mustang GT
In 2010 Ford introduced a restyled Mustang known internally as the S-197 platform. The fifth generation of the iconic pony car featured design cues from the 1960s fastback including a body shape with hard edges, scalloped side panels and hooded headlights for a more aggressive look. As it turned out, this generation would mark the return of the Mustang muscle car. In 2011 the GT version featured the return of a much improved 5.0 Liter Coyote V-8. This dual overhead cam 32 valve power plant made over 400hp in its normally aspirated form. The S-197 platform was also the basis for the return of the infamous Boss 302 (2012-2013). This kit represents the last year of S-197 body style that was replaced by the current S-550 body style in 2015. In the last few years I’ve reviewed a number of Mustang models on this site so it’s no secret that this is my all-time favorite car. The only thing that’s changed since then is that after a 30 year hiatus I have one in my garage. My ride is a 2013 Mustang GT premium package with a six speed manual transmission. The finished model you see here is largely representative of the kit with a few modifications. My goal was to reproduce my car in 1:25 scale.
The Kit
This is part of Revell's “Street Burner” series of muscle car kits. It represents a 2014 version of the Mustang GT with some custom parts to trick it out if the builder so chooses. The parts are molded in white, clear, red clear and chrome. There are metal axles provided since this is a semi curbside model. The under chassis details are all integrally cast but there is a nice 5.0 engine and accessories’ to fill the engine compartment under a removable hood. The custom items are an optional cowl induction hood, Recaro seats, choice of wheels and rubber tires (two types) and graphics on the decal sheet. The parts are well cast sharing a lot in common with the Shelby GT 500 kit (4938) without same level of detail. The simplified approach means some obvious details are not included like an interior rear view mirror, stick shift knob and radio antenna. The glass is molded as a single piece to make it easier for a younger modeler. There is a decal sheet included with instruments, badges and custom graphics.
The Build
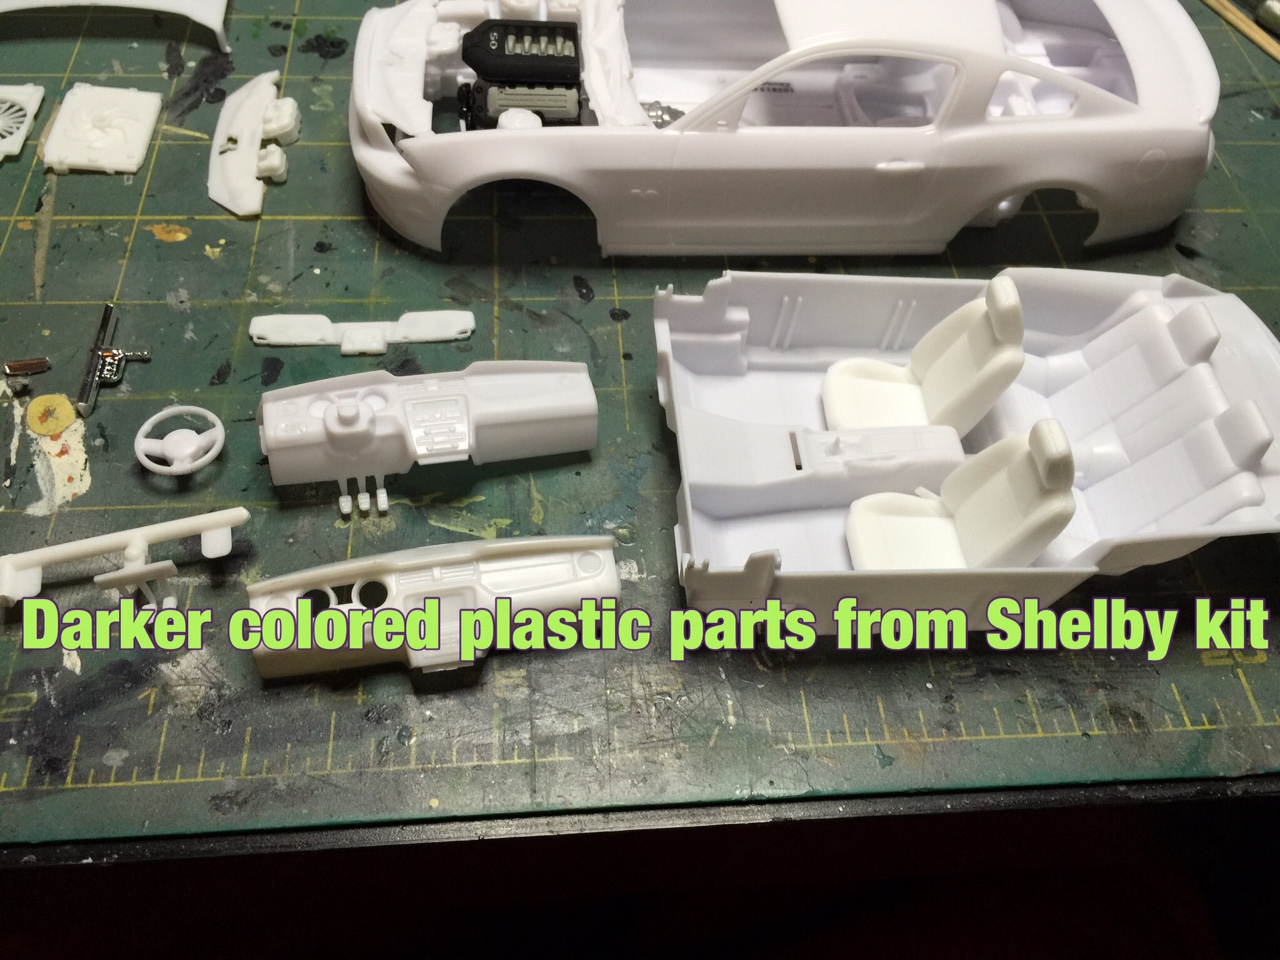
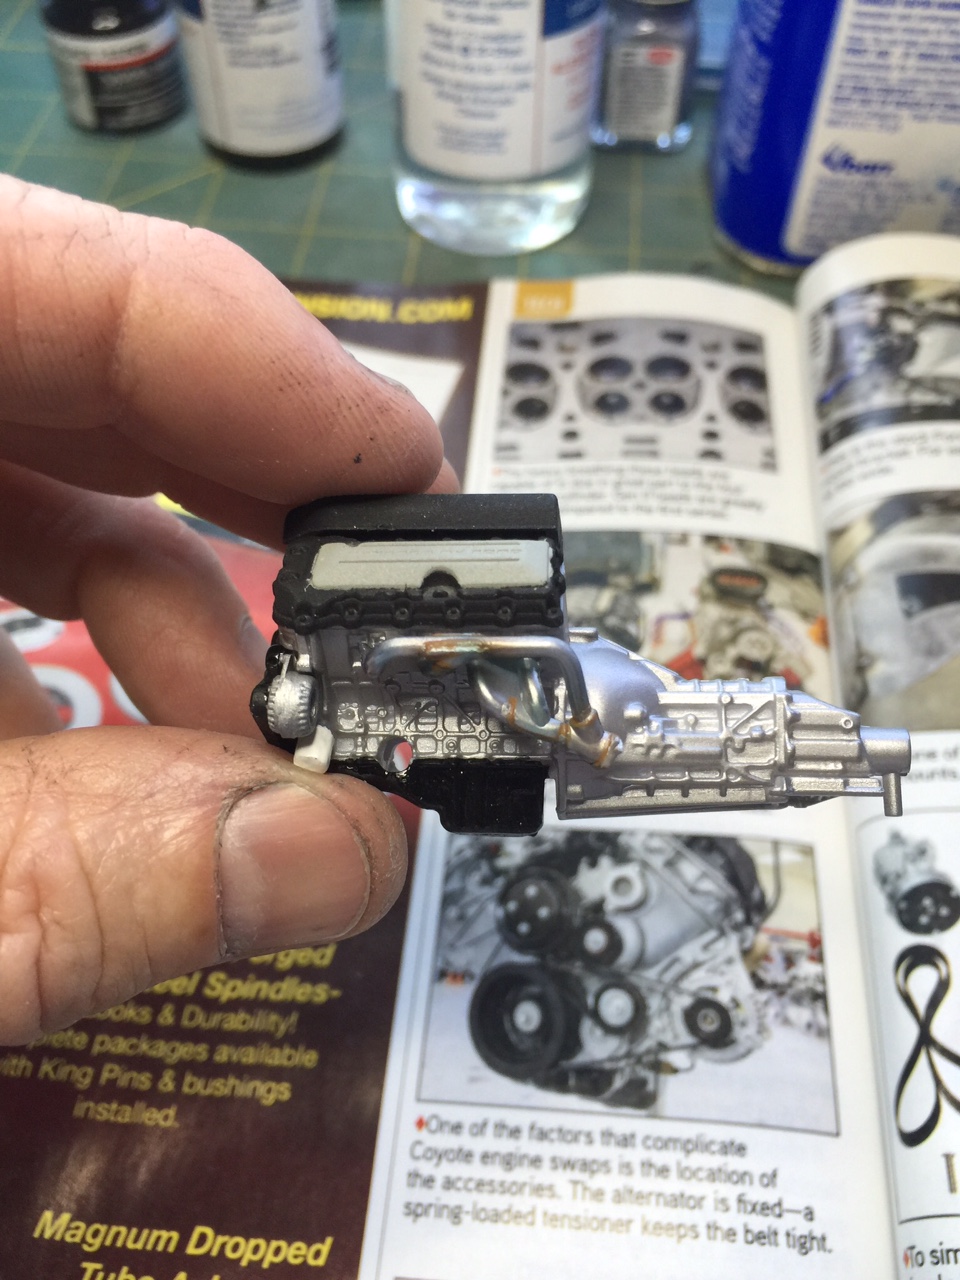
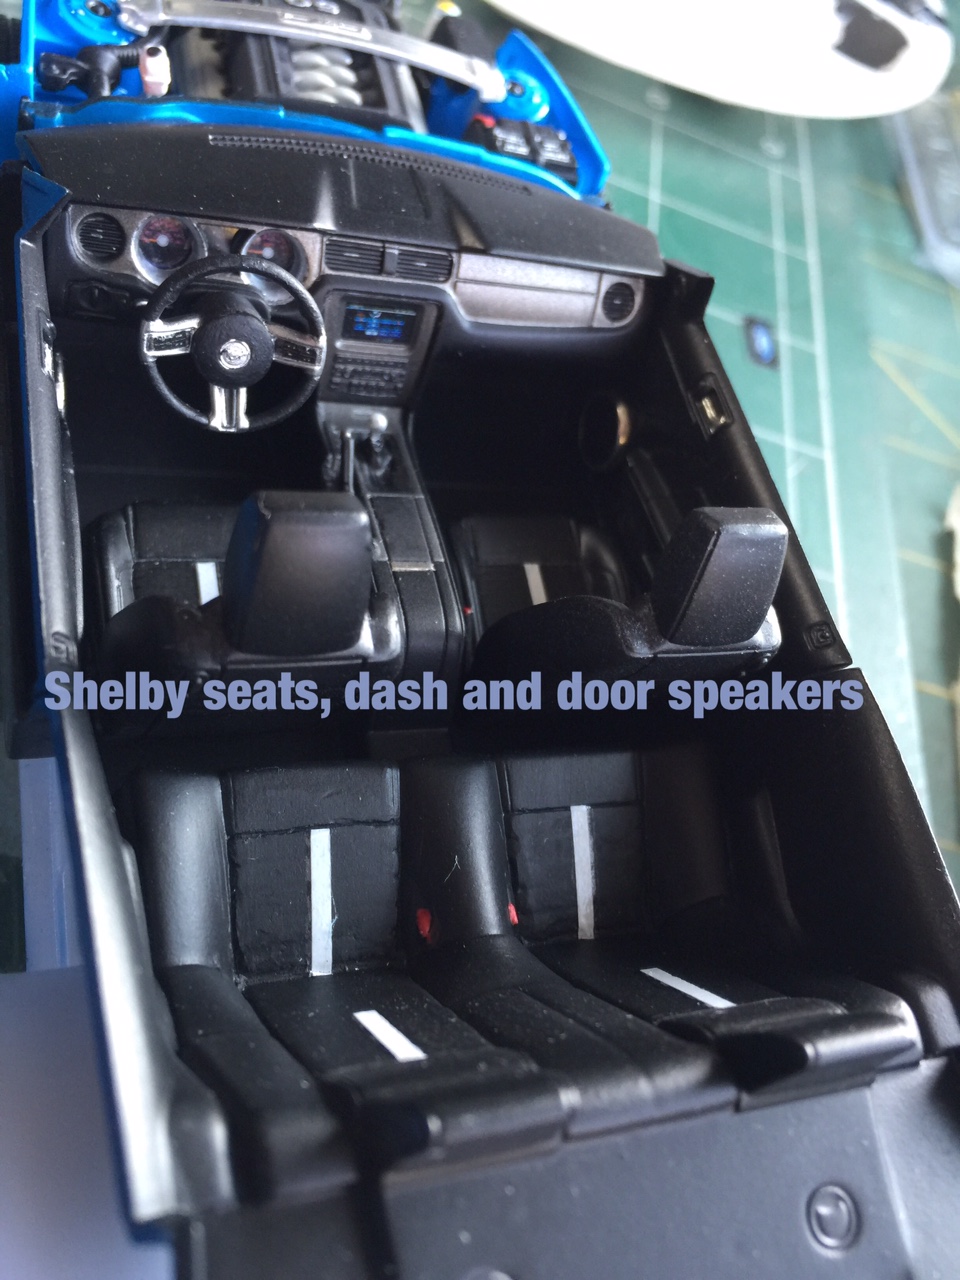
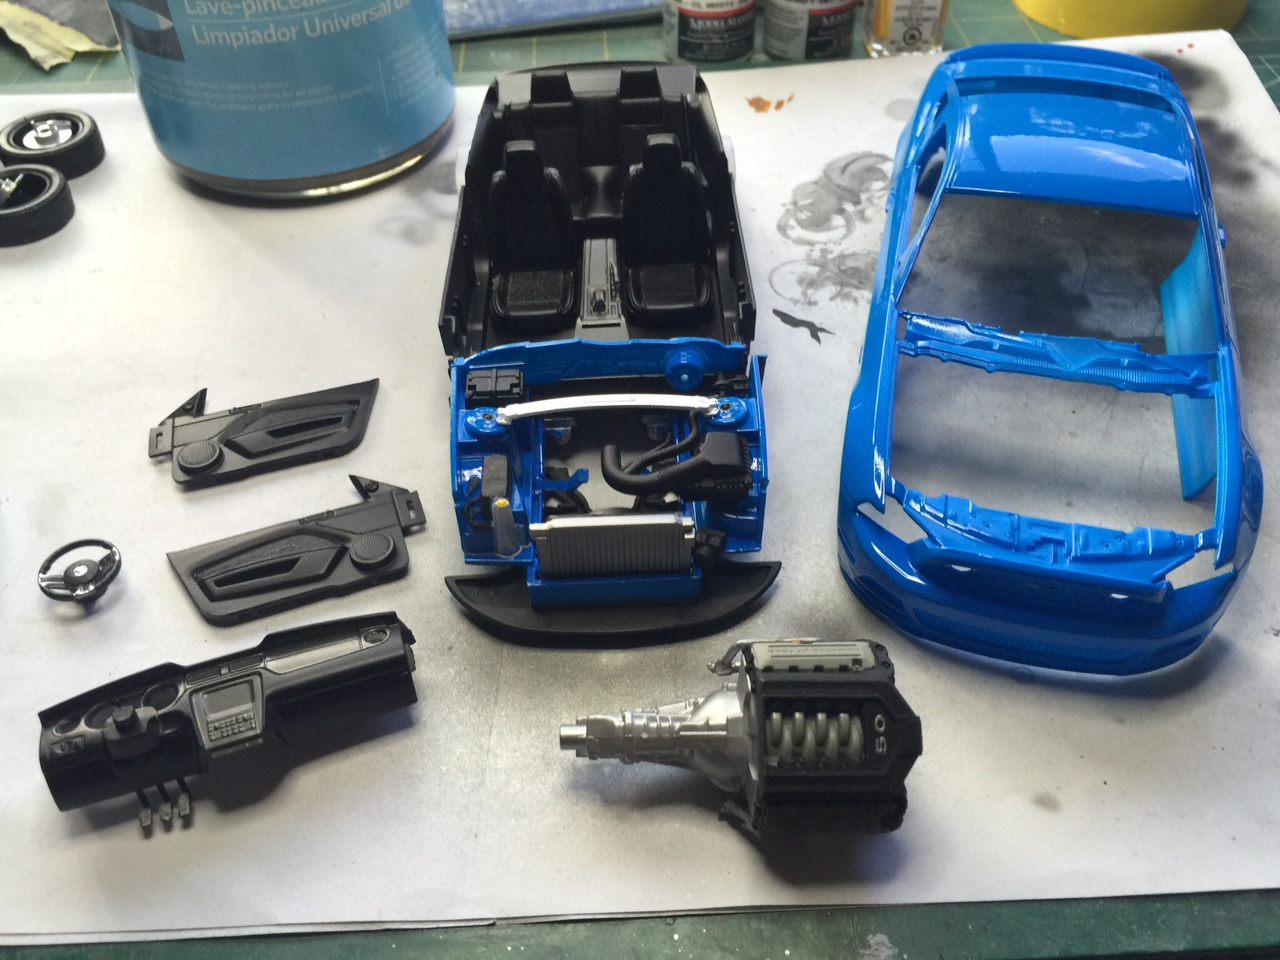
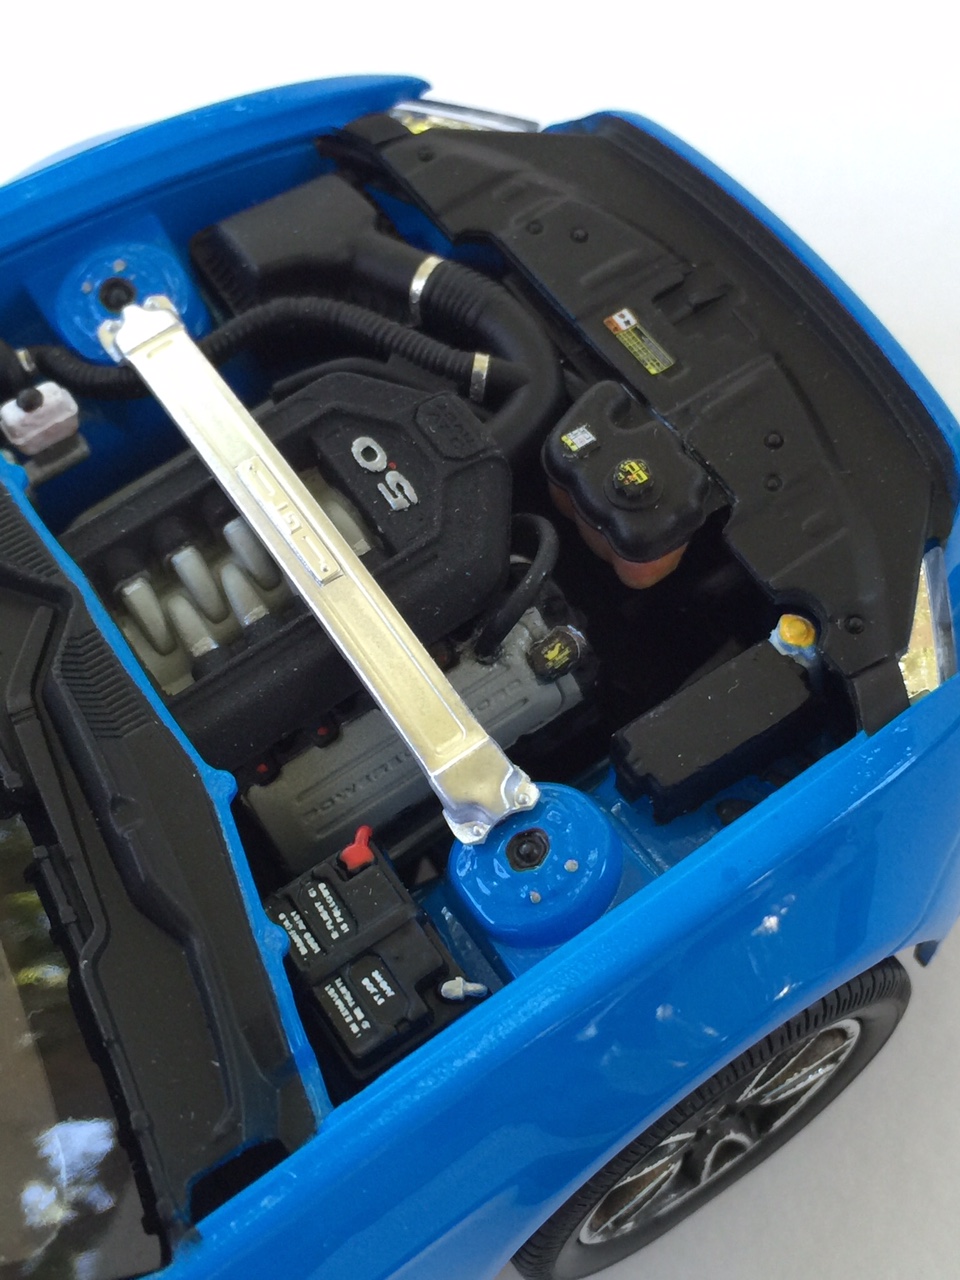
As I said my goal was to replicate my daily driver so the kit OTB had some short comings. Recaro seats are the only option provided and my car doesn’t have them. The dash mold in the kit has the base stereo that doesn’t match the “Shaker” sound system in my car. Large door mounted speakers that come with the premium stereo are not included and the navigation system is not present on the dash panel. Surprisingly the wheels that come with the kit closely match the 19” rims that were on option for the GT in 2013. I had reviewed the Revell 2010 Shelby GT kit (#4938) a while back and I knew that it had some of the missing details lacking in this kit. As it turned out, there was more then I remembered. The Shelby kit featured the rearview mirror and shifter knob as well as the door mounted speakers, the Shaker stereo and navigation system molded into the dash board. The seats closely matched mine with the exception of the center pattern that I filled with putty. I also used the radiator and fan assembly, the coolant overflow tank, the brake booster reservoir and master cylinder, rearview mirror inserts and the separate glass panels in lieu of the kits one piece part. The engine is first up and it’s a spot on match for the 5.0 Coyote engine. The chassis is molded in one piece so you have to carefully paint the various parts to make it look decent. Next up is the interior and here I did several modifications to match what I see everyday. I used the dash, pedals and instrument decals from the Shelby kit since they had the right electronics and better definition in the instrument cluster. The steering wheel is from the the base kit. Door panels and seats are next and it took a little work to match my car here too. The door panel inserts were filled and re-scribed to match the real ones as were the front seats (from the Shelby) and the backs in the base kit. The body is a one-piece mold with some fine mold lines easily removed with some light sanding. Luckily, the 2013 body didn’t have any styling differences from the 2014 so no modifications were needed to backdate the body.
Paint
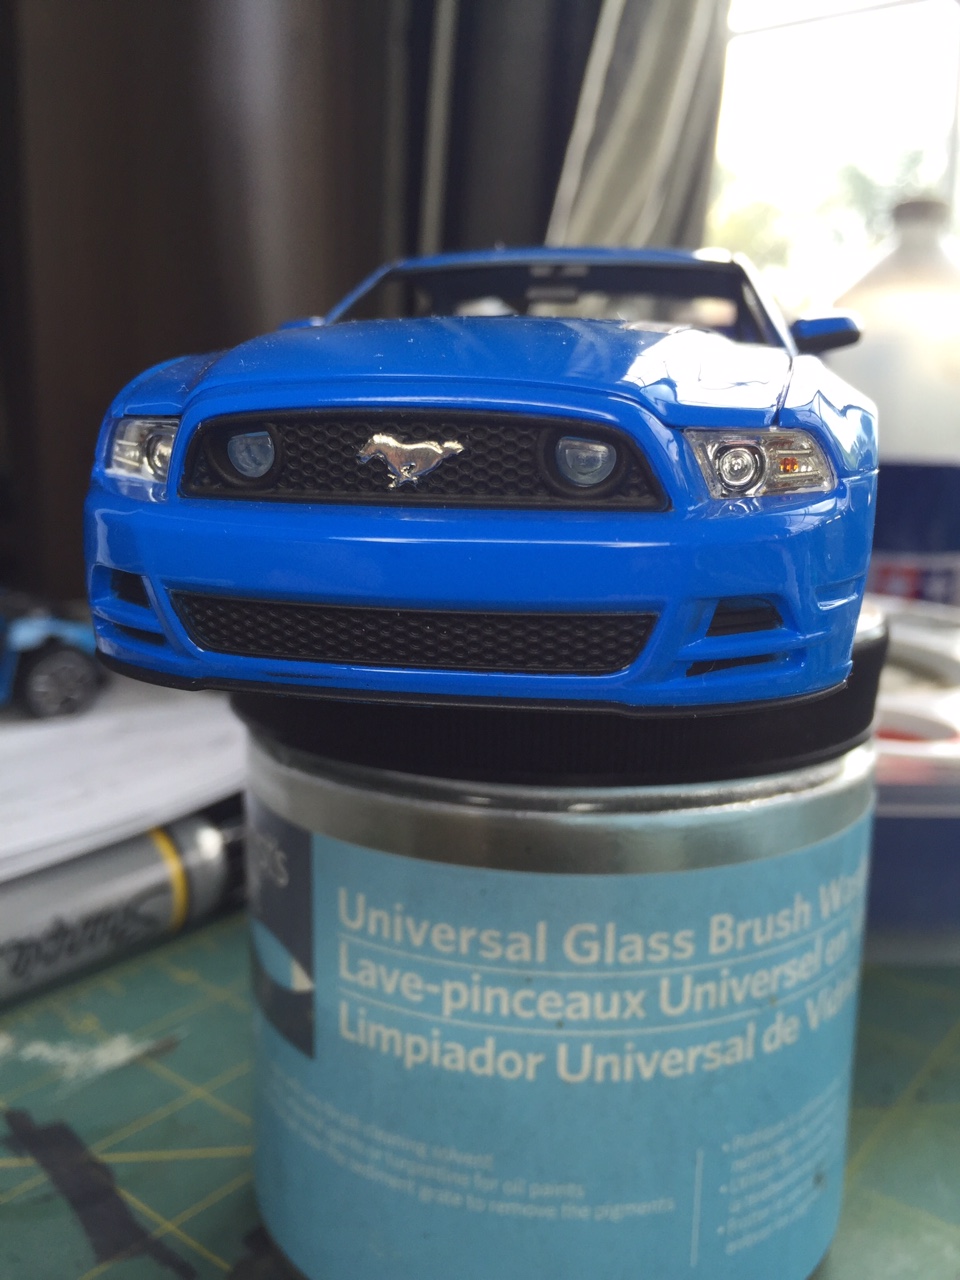
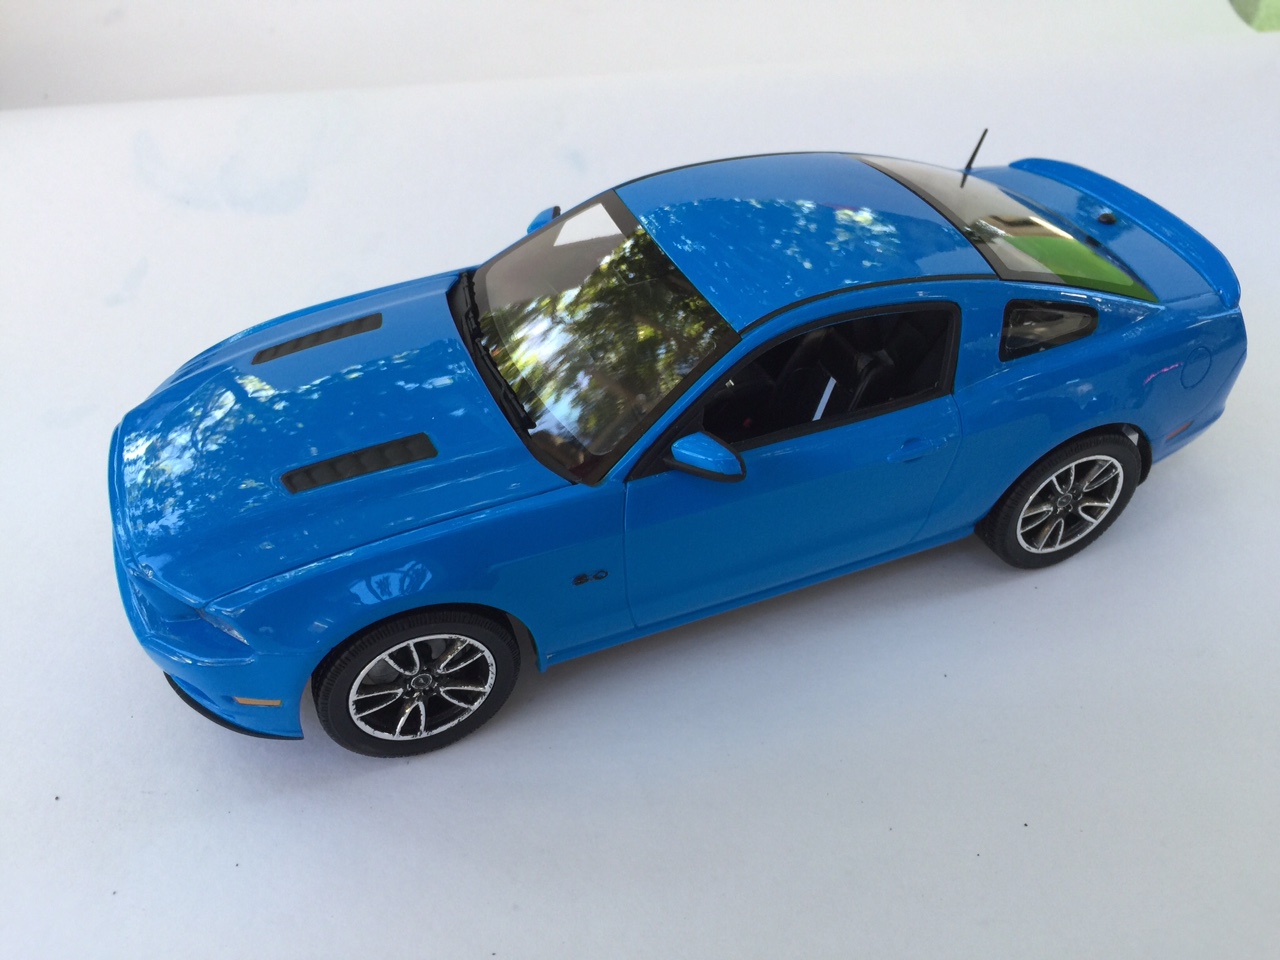
My car is finished in Grabber Blue, a color originally offered on the 1969 Shelby and later Boss 302 as well as other production Mustangs. I remembered a review I read a while back when I was building Revell’s large scale Shelby GT500. In it the builder used paint from Gravity Colors so I went to their website and there it was, Grabber Blue in a three part paint system. This system consists of a color coat and a clear coat that’s a mix of clear coat, thinner and catalyst that cures to a durable hard finish once its mixed together. I’d never used this system before but what a surprise. The color is a dead on match to the real thing and the clear coat self levels to a deep gloss. Make sure you wear a respirator when you spray this stuff because its very strong. I also bought Gravities three part polishing compounds and can highly recommend them as I used them on this project and on a few others with amazing results. The rest of the painting involved tedious masking to black out the grills, trim panels and window blackouts along the inside edges.
Final Assembly
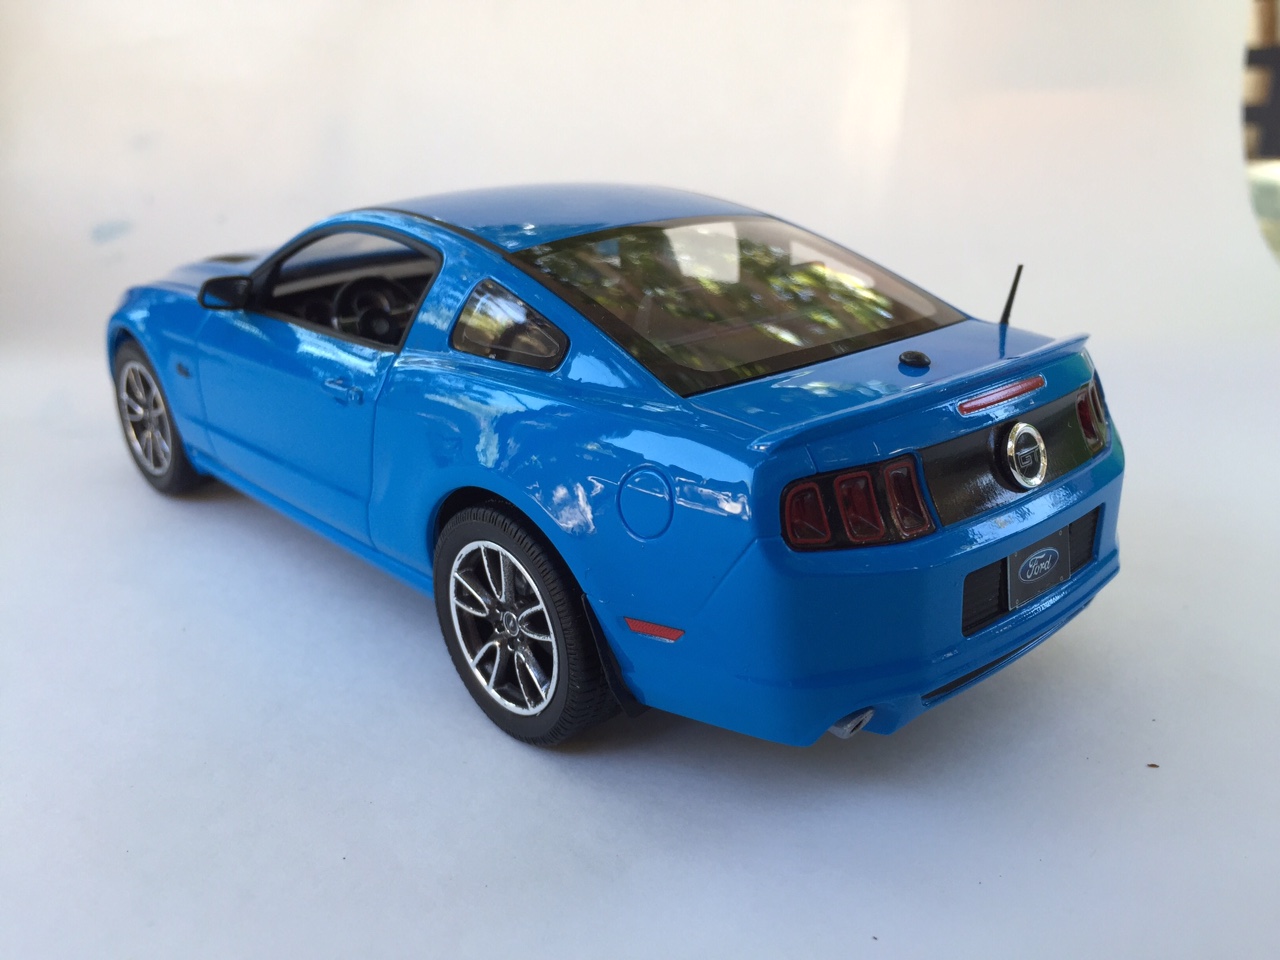
Putting it all together starts with pressing the wheels onto the metal axles. The wheels on the real car are blacked out on the inside and the recessed areas on the front of the rims. I simulated that by spraying the rims from the backside with satin black and wiping the high points on the front before the paint dried. Test fit the wheels to the body to make sure they don’t protrude from the wheel wells. The headlamps are a two-part assembly with a chrome piece backing the clear lenses. On the real car there are LED light bars flanking the headlamps. I duplicated them with sections of guitar string. I used the individual glass panels from the Shelby kit because they flushed with the body better then the one-piece kit part did. I added the coolant overflow tank from the Shelby kit because the kit part was only the top without a tank. A few items were scratch built including the satellite and radio antennas and rear mud flaps. Decals from both kits were used and worked well.
Conclusion
I really enjoyed building this kit even with the alterations needed to reproduce my car. The base kit will build up into a nice model despite the missing details I mentioned at the start. The big hood and low profile custom wheels and tires are a nice addition if you choose to use them. Revell has captured the body lines and trim very nicely and careful painting will highlight the mold maker’s artistry. The price point for this model is very reasonable for what you get and the age recommendation and skill level are accurate. This would be a good step up for a curbside car builder. I have to give another shout out to Gravity Colors. I’ll be placing many future orders as the results are nothing short of amazing. One of the coolest parts of this build was having the reference sitting in the garage whenever I needed it. Actually the coolest part is driving 1:1 scale car! Thank you to Revell for producing and providing the sample kit. As always, thank you to the great folks at IPMS who gave me the opportunity to tweak this kit into a replica of my dream car.

Comments
Add new comment
This site is protected by reCAPTCHA and the Google Privacy Policy and Terms of Service apply.
Similar Reviews