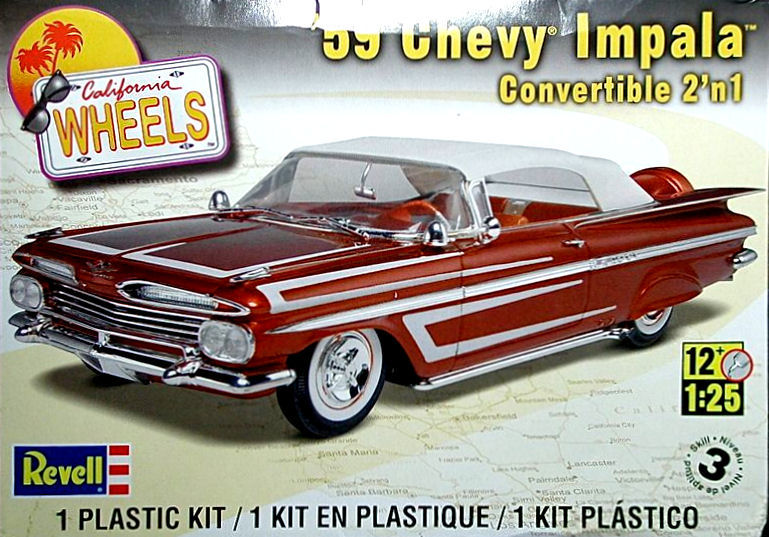
1959 Chevy Impala Convertible 2'n1
The final creation of the legendary designer Harley Earl, the ’59 Chevrolet caused a big “Wow!” reaction when it was introduced – the total redesign sported a long, low hood, and tail fins about as appropriate for an aircraft as a car. Automobile enthusiasts were impressed with this total metamorphosis, particularly since the predecessor ’58 Chevy had all softly-rounded corners and a jellybean look.
Revell’s kit is a re-issue of the 1993 Monogram offering, but the “2 ‘n 1” boxing means it now includes customizing parts such as lake pipes, a tubular grille, spinner hubcaps, fender spotlights, and decals. The continental kit and fender skirts are still included and can be used on either the custom or the stock version.
When I first opened the kit box, my initial impression was, “Cripes, there’s more chrome in here than there are white parts!” and that’s not far from the truth. The big Detroit land yachts of the ‘50’s and ‘60’s did have a lot of brightwork. A lot of the sprue nubs on the chrome parts were such that trimming them left big scars in the plating – on the bigger parts, I “plated” them myself with Alclad “chrome” but for the smaller scars, touch-up with a DecoColor Liquid Silver paint marker worked well. They’re much closer to chrome than silver paint, and are available at craft stores like Hobby Lobby.
The instruction sheet is extensive but falls short in several areas. Parts are numbered, but aren’t named in the assembly diagrams – instead, two pages of the instruction sheet are devoted to a trilingual listing of them. The instruction sheet isn’t a copy of the one in the original release; some of the illustrations are the same, but others have been modified, and overall the quality of reproduction isn’t nearly as good as the old sheet. Specifications where interior trim colors should be, and where body chrome trim areas should be foiled or painted, are simply omitted. The sun visors are shown incorrectly (a fault not corrected from the original instructions) – the cutouts should be inboard so as to clear the rear-view mirror.
Construction is straightforward, but with a few glitches. The oil filler tube was the first question I faced, as there were four things to fit onto the intake manifold, but only three holes – I broke out an old issue of Monogram’s ’60 Chevrolet and the instruction sheet for that one showed where it was supposed to go. The engine looks great when painted and built up.
The steering gear box and shaft need to be attached just prior to fitting the engine into the chassis, and the shaft has to fit between the left exhaust manifold and the inner fender well. I had some problems with the front suspension’s fit to the chassis, so ended up with the spindles not being true. This might have been my fault and not the kit’s….if I knew more about cars, I’d be able to tell, I suppose.
There are some semi-difficult mold seams to access, like the ones beneath the fins. The body shell was warped on my sample, so the hood wasn’t a precise fit to the fenders. I dunked the shell into nearly-boiling water and twisted it to get the warp out, which worked fine – but as the build continued, the plastic’s memory returned and the shell twisted back to where it’d been before. At that point I’d already painted the body and didn’t want to boil my paint job. When I glued the interior tub into place, however, the shell did pull into better alignment.
Decals are provided for the seat cover inserts, but when it came time to paint the interior, I just didn’t like the color of either set – to my eye, they didn’t compliment the blue exterior color I chose, being more brown in color than blue. I painted my seats like the box art photo showed, instead of using the decals. The parking lights are to be painted amber but I’m not sure that’s an original Chevy spec – I’ve seen both white and amber on restored ‘59’s.
I used Tamiya metallic blue acrylic to paint the model, with several oversprays of Tamiya clear gloss. Once that had dried, I used Bare-Metal Foil to trim the exterior chrome strips on the front fenders, tail fins, and interior sills. This model was a little more challenging to foil than others I’ve built, since I had to trim the foil beneath the tail fins, and that got pretty tight up on their forward ends.
The windshield frame was warped on my sample and the glass didn’t fit inside it sufficiently to force it into shape. I was disappointed with the fit of the windshield and vent windows to the body – it’s delicate and tends to be flimsy.
I opted to build the stock version instead of the extensively-decaled custom, so the decals were few, but the ones I did use were excellent and snuggled down to the surface nicely.
I deviated from the OOB build here with the twin outrigger antenna, a trademark of the ’59 – I used the bases, but drilled them out to accept thin telescoping hypo tubing for the masts.
I would’ve liked the build more if the instruction sheet had been a little clearer, but modelers more familiar with car kits will have much less trouble than I had. However, the finished model sits true and accurately captures the low, sleek futuristic look of the ’59 Impala.
Many thanks to Revell and to IPMS/USA for the opportunity to review this kit; it makes a great addition to my stable of Detroit Iron and brings back fond memories of when you could actually tell one car from another at almost any distance.


Comments
Add new comment
This site is protected by reCAPTCHA and the Google Privacy Policy and Terms of Service apply.
Similar Reviews