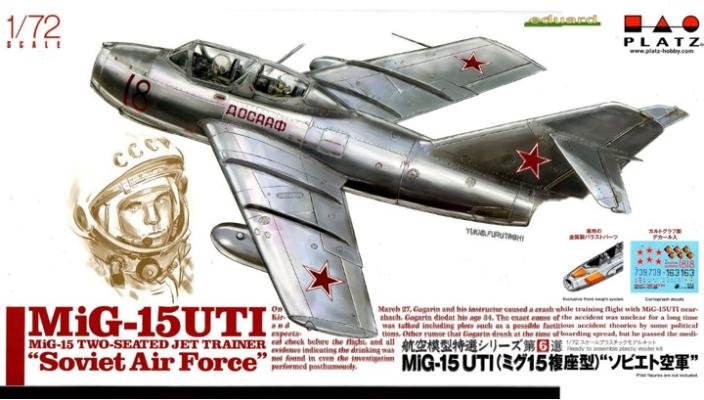
MiG-15UTI Soviet Air Force

History
The MiG-15 was one of the first really impressive fighter airplanes developed by the Soviet Union after WW II. Utilizing some British jet engine technology and some captured German swept wing technology, the Design Bureau of Mikoyan and Gurevich (MiG) produced a fighter that surprised the Allies when it was first encountered during the start of the Korean War. In 1949, a year after the fighter entered series production, work began on an advanced combat trainer variant to provide pilots with the skills necessary to fly the higher performance fighters. This resulted in the MiG-15UTI. The NATO code name for the trainer was Midget while the Soviet nickname was Babushka (grandmother).
The MiG-15UTI was also used to train pilots for the MiG-17, MiG-19 and in some cases the MiG-21. Over 2000 were produced. Most were built in the USSR while a number were also produced in Czechoslovakia and some of the Polish built MiG-15s were converted to the trainer version. One reference lists thirty countries that used the MiG-15UTI.
The Kit
Platz is a plastic model manufacturer located in Japan. They distribute their models through Dragon USA and Universal Models Hong Kong and are looking for more. They do not sell direct to modelers but they have a link on their web site to Hobby Collective, a Japanese online shop. Platz also has distribution agreements for the Japanese market with a number of other worldwide manufacturers.
Platz apparently have a working relationship with the Czech company, Eduard, because the moldings for the MiG-15UTI kit are from Eduard molds. As a result, the kit is finely molded with lots of accurate details. The decals are produced by Cartograf and include two natural metal Soviet aircraft, “Red 18” and “Blue 739” as well as a camouflaged model from East Germany. These are different than the Eduard kit decals. The Platz kit also includes two molded lead weights that fit into the nose structure plus a cut-out cardboard carrying stand for safely transporting the finished model. The step-by-step instructions are entirely in Japanese but are easy to follow. The sheet that shows the three color schemes is in full color and lists all of the paint colors used with references to Mr. Color paints and Model Master Acrylic paints so the modeler can readily figure out the colors called for in the instruction sheets. One of the main colors used for interior areas is thankfully listed as F.S. 36375.
Construction
Construction started with the cockpit. The ejection seats, instrument panels and cockpit side panels were well detailed and fit together well. I generally like to see seat belts on my models and I was contemplating making some belts when I noticed ads on the sides of the bottom half of the box. It turns out that Platz offers several photo-etched sets for this kit. The one for the cockpit was virtually identical to an Eduard set that I had so I used the Eduard set to further dress up the cockpit. The kit cockpit parts looked good but the PE set further dressed it up.
The cockpit looked so good that I got in a hurry to start assembling the fuselage. I had the cockpit assembly glued into the right fuselage half when I remembered the nose weights. Both of them seemed to easily fit into their locations but the left fuselage would not fit correctly. I ended up grinding off some of lower nose weight so that the fuselage would fit together. I don’t know if the weight would have fit properly if I had installed it before assembling to the fuselage. Be careful with this step. I noted that Platz included an entire paragraph of instructions relating to the weight. Unfortunately this was all in Japanese. The remainder of the assembly is straight forward and clearly illustrated.
If the modeler wants to add wing tanks, three holes must be drilled in the lower wings before assembly. Two different types of wing tanks are provided depending on the color scheme chosen. Two different styles of main wheels are provided. I could not find any information regarding which wheel went with which scheme so I chose the one that looked best to me (the one with spokes).
The canopy of the MiG-15UTI consists of three pieces; the windshield, a side opening component that covers the front cockpit and a rear sliding component that covers the rear cockpit. The canopies can be displayed either open of closed. I chose open to better show the cockpit. There is a small curved part that fits between the front and rear cockpits. This is very fragile. Mine broke when I cut it off of the sprue.
Color and Markings
As many of you know, Russia’s astronaut, Yuri Gagarin, the first human in space, was killed in a training plane crash in 1968. The box cover of the Platz kit includes a drawing of Gagarin along with an interesting paragraph about his fatal crash, superimposed over the “Red 18” airplane. This natural metal scheme includes the Cyrillic script letters DOSAAF and the slipper type of fuel tanks. This plane belongs to a paramilitary organization, Volunteer Society to Support the Army, Aviation and the Fleet. As a result, I thought that this was Gagarin’s airplane. I later discovered that “Blue 739” was Gagarin’s airplane but I decided to finish the model as “Red 18” anyhow. I liked the lettering and the drop tanks. I primed the model with Tamiya primer and then finished it with Alclad II Aluminum. I used a darker color of Alclad to outline and highlight the different panels. I was pleased with the final appearance and the Cartograf decals lay down perfectly, the transparent parts disappeared.
Final Steps and Conclusion
The cardboard carrying stand went together easily and has proved handy in moving the model around. I had two minor problems with the stand. Since I opened the cockpit on my model, the toothpick at the rear of the stand that holds the upper cap in place would hit the canopy. In the photo, I used toothpicks on each side to hold the cap in place but not hit the canopy. After taking the carrying stand photo, and as a final assembly step, I added an antenna wire from the rudder to the tip of the antenna. When this was done, I found that the upper cap would contact the antenna wire so I could not use the upper cap. This was not a problem because the wing slots and the front hold-down strap would adequately retain the model. I did reposition the rear toothpick to miss the canopy and still retain the model.
Overall, I was very pleased with the model. Essentially, it is the Eduard Weekend Edition kit with some extras. The fit of the parts is excellent and the drawings are very clear. A modeler with a minimum of experience should be able to complete this great looking little model. Well recommended. My thanks to Platz for providing this interesting kit for review and to IPMS for allowing me to add this interesting model to my collection.


Comments
Add new comment
This site is protected by reCAPTCHA and the Google Privacy Policy and Terms of Service apply.