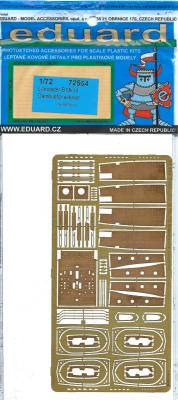
Lancaster B Mk III Dambuster Exterior

First off I’d like to thank Eduard for supplying this great set of photo-etch parts. I’d also like to thank IPMS/USA for allowing me to review this product.
One of the more famous night bombers of the Second World War was the RAF’s four-engine Avro Lancaster. A total of 7,377 Lancasters of all marks were built. Of that number 3,039 were B.Mk.III bombers which were equipped with Packard built Merlin engines and an enlarged bombardier’s compartment. Nineteen of those Mk.IIIs assigned to No. 617 Squadron were modified to attack Germany's Ruhr Valley dams using the Barnes Wallis-designed "bouncing bomb". On the night of May 16, 1943, Wing Commander Guy Gibson lead the Ruhr Valley attack. Two of the four targeted dams were breeched, but eight of the 19 Lancasters and 53 crewmen were lost. After the raid 34 medals were awarded the survivors including Gibson’s Victoria Cross.
Commemorating this dangerous and costly attack, Airfix released a retooled 1/72 version of the Lancaster called the Avro Lancaster B.III The Dambuster. To enhance the looks of this beautiful kit, Eduard has recently released their photo-etched exterior detail set containing approximately 125 pieces. Parts include items found in the cockpit, bomb bay, wheel wells, landing gear struts, intake screens and access panels - not all actually on the exterior of the aircraft. The detail on the parts is excellent without exception. The larger parts are pre-painted in a wood tone.
There are a couple of areas that require the modeler to remove material from the kit parts. One of these areas is on the bomb bay ceiling (A5). Three channel-like structures that transverse the ceiling and other small protuberances are sanded away. This makes way for the placement of a single photo-etched part covering the ceiling. On top of this piece, two parts formed into a channel shape are added as well as two of the small parts that were removed. See picture below. This area is where the barrel bomb rides and will be open to view. The crispness the photo-etch parts give will enhance to looks of this area.
Another area that will require material removal from the kit parts is in the wheel wells. The Eduard instructions call for the removal of a solid section of the wheel well wall (2 x D17 & D18) and replace it with the thin photo-etched part. See photo below. To glue this part in place along its thin edge may be a little tricky. Maybe a little easier technique would be to sand away some material the thickness of the photo-etched part and glue it to the solid section. The Eduard instructions call for four additional parts in the wheel wells (4 x D16) to be modified in the same manner as D17 & D18. Again, I might suggest that material be sanded away and the photo-etched parts glued on to D16.
The last area that requires material removal is on the rear bulkhead (D2) of the main wheel well. There are three channel-like structures that are sanded off and replaced with formed photo-etch parts. See photo below. With the highly detail photo-etch parts visible, the looks of this area will be greatly enhanced.
The remainder of the parts are glued in place with no material removed from the kit parts. They consist of mesh filters for the engine air intakes, panel doors, control surface actuators, antennas of various types, miscellaneous small parts for the landing gears struts including brake lines. There are parts that conform to the inside of the main gear doors that add significantly to the overall look of this area.
The diagrams provided in the instructions are clearly depicted with all parts identified. On the set of instructions found in the review set, the key indicating material removal, photo-etch parts, and fill are done in gray-scale printing. A clearer set of instructions would use a color-coded key. I found such a set of instructions at https://www.eduard.com/out/media/72564.pdf
This set of photo-etch parts is not for the novice builder and may not be suitable for some of us average builders. There are a number of very small parts that require bending into shape and gluing into place. If you are an experienced modeler looking to take your Lancaster to the next level, this set of Eduard photo-etched parts is the ticket.
I want to thank Eduard for the review sample and thank IPMS/USA for allowing me to make the review.


Comments
Add new comment
This site is protected by reCAPTCHA and the Google Privacy Policy and Terms of Service apply.