DG-1000S Glider AKVY
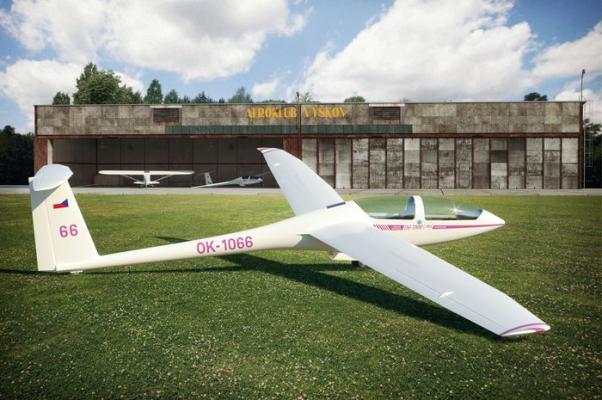
As a glider pilot, I couldn’t pass up a review of this kit from Brengun. The DG-1000S is a two-seater built by DG Flugzeugbau and can be configured for either an 18-meter or 20-meter wingspan. (The Brengun kit represents the 18m wing setup.) DG no longer produces the 1000 but now builds an improved version, the DG1001. For those of you who are adventurous with making painting masks or homemade decals, the USAF Academy uses the DG-1000 (TG-16A) to train its cadets to fly. So I guess technically speaking this aircraft is in the USAF inventory.
Well, no surprise the kit arrives in a typical European end opening box which consists of 33 parts molded in white plastic, three clear parts, plans and a decal sheet. You will use all but a couple parts in construction of the kit. My first reaction was that the DG-1000 looks like a typical “short-run” kit but by the end of the build I can safely say don’t judge a book by its cover. Items of note, the wings are molded complete as is the horizontal stab. I probably should also point out that the sprue gates attach to the wings and stab bit awkwardly. Be careful removing these parts from the sprues as well as some delicate sanding is required to clean up those attachment points. Otherwise, nothing was surprising about what I found in the box.
Well, lets get started. Being an aircraft kit, we start where with the cockpit. (note: Believe it or not, the FAA would really prefer the term flight deck.) I would have to say that I had only a couple small issues with the kit and both presented themselves in this area of the kit. The cockpit actually goes together pretty easy however I found that the front seat instrument pedestal just didn’t seem to be fully formed??? I found it a bit fiddly to get it together and then ended up using filler and scrap polystyrene to build it back up to its full size. Otherwise, the cockpit assembly, wheel well and rear bulkheads just needed a bit of sanding here, and some putty there to fit look right. Make sure you double & triple check the wheel well fit so that when the fuselage halves are brought together it is sitting in the correct position. I should also note, that the fuse halves don’t have alignment pins if that is your thing. I didn’t mind their absence, but unfortunately the fuselage shifted a bit before the it set up and I was left with a bit more sanding that there should have been. (My bad, no fault on the kit.)
If you plan to build this with the gear down, the gear mechanism is made up of several small/tiny parts. Nothing to difficult just be careful and avoid flinging them at the carpet monster. The gear can be fully assembled and painted with wheel attached then added to the fuselage at the end of the build. And that is exactly what I did. So, I mentioned before, there were two fit issues with the kit. The second was with the canopy. Both front and rear glass were oversized and required some sanding and fiddling to fit properly. The canopy parts are very thick but surprisingly very clear, the robustness of the canopy parts made sanding and fitting them a bit easier than what it could have been a royal pain with delicate parts.
The horizontal stab was attached using a small brass pin to help provide a bit of strength. The kit relies on simple butt joint between the stab and top of the rudder. My guess that with a little rough handling the stab would be the first to break off. The clear cover was added to the rear ballast box on the vertical fin before moving on to attaching the wings.
The wings as I mentioned before are molded in one piece. They only required a bit of sanding of the mold seam and a bit of touch up of some surface blemishes. The wing tip wheels are attached and its now is the time for the daunting task of attaching the wings to the fuse. The wings use a pseudo butt joint and again, I felt a small brass pin or two was the way to go. The pocketed butt joint actually gets the wing dihedral alignment pretty close. In the end it turned out well up until I dropped the model and had to reattach the wing.
Last but not least with the obligatory primer and paint work. With the landing gear off the model the only masking required on the canopy and ballast box cover. With the painting and clear coat compete, attention was focused on the decals. I am happy to say that they were thin and behaved very well. Black panel liner was added to the airbrakes, ailerons, elevator and canopy prior to a final clearcoat. A little PVA glue was used to attach the gear and gear doors and this one is in the books as complete.
This build was my first full kit from Brengun and I was pleased with both the kit and the results. Brengun also sells some extra details for the DG-1000 kit. The first item is the BRL48146 Canopy mask ($5.75) and BRL48145 Photoetched set ($12.15).
- https://www.brengun.cz/e-shop/1-48-accessories-22/dg-1000s-glider-canopy-mask-(brengun-kit)-1786
- https://www.brengun.cz/e-shop/1-48-accessories-22/dg-1000s-glider-(brengun-kit)-1785
If I chance upon another copy of the kit in the future, I would definitely invest in the photoetch set as it provides many missing details from the cockpit.
Final judgement, this is a great little kit. J Highly recommended for someone who has least built a couple of kits prior to tackling this one. I would really like to thank Brengun for providing this great kit to the IPMS USA review corps, and to the IPMS for allowing me to review it.


Comments
Add new comment
This site is protected by reCAPTCHA and the Google Privacy Policy and Terms of Service apply.